Group Management Portal Guide
Overview and introduction
The Group Management Portal (GMP) allows security and distribution groups/lists to be managed directly by owners and members. Owners of groups/lists may now add/remove members, update ownership and approve or reject member requests through the Group Management Portal. Employees may easily request to be added/removed from a group or list using this tool and can also view their memberships.
This online guide to using the Group Management Portal was designed to help employees navigate through the tool to self-manage security and distribution groups/lists. Select the action you wish to perform from the left menu and follow the instructions.
What is a Group or List?
- A Security Group is used to assign permissions to shared resources, like File Shares and SharePoint.
- A Distribution Group is generally used for e-mails, and is commonly referred to as an e-mail Distribution List.
What is my role in a Group or List?
User Guide
Review Group and List Memberships
Review Your Memberships
You may want to review what groups or lists you are a member of:
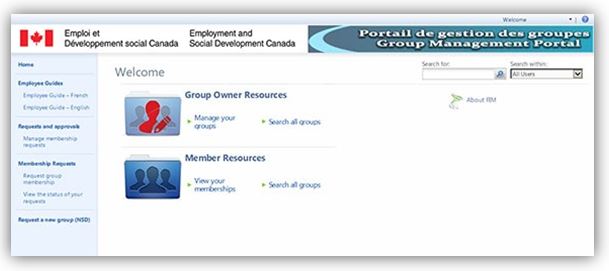
- Open the Group Management Portal (opens new window).

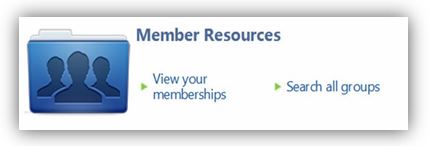
- From Member Resources, select View your memberships.
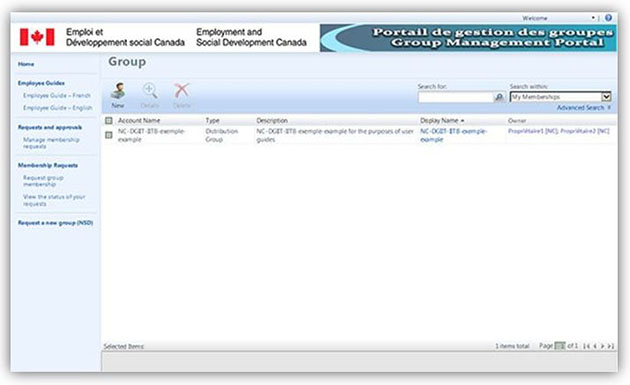
- In the Group window, you can review all of the groups and lists to which you belong.
- Open the Group Management Portal (opens new window).
Find a Group or List
You will need a group or list’s partial name or acronym, and/or another member’s name, and/or some descriptive words in order to find the group or list that you are searching for. These clues will be your search criteria.
- Open the Group Management Portal (opens new window).
- From Member Resources, select View your memberships.
- On the Groups screen that appears, there are several options for initiating your search:
- Type your search criteria into the Search for: field, then select the magnifying glass icon to start the search; OR
- Select the magnifying glass icon of the Search for: field, to either manually scroll through the list of all groups and lists or to enter your search criteria in the Search for: field (and select the magnifying glass icon again to narrow the number of groups); OR
- Select Request group membership in the left-hand navigation bar, then enter your search criteria in the Search for: field and select the magnifying glass icon to start the search.
Entering Multiple Search Criteria
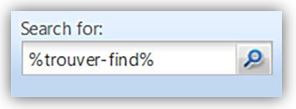
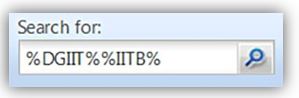
When entering more than one word as your search criteria, separate these words (or phrases) by using percentage signs (%) as you would a pair of quotation marks (e.g. %spam%%spag%).
Using the Search Results
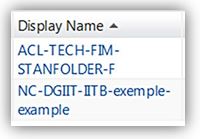
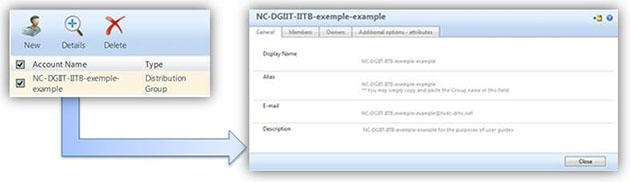
To access a group or list from your search results, select its link under the Display Name column. This will open the appropriate detail window.
Note: If you put a checkmark beside the group or list (in the Account Name column) and then select the Details icon from the top menu bar, this will open a Read Only window. You can only access general information about the group or list from this view.
Need assistance finding a Group or List?
Submit an online service request to the National Service Desk (opens new window).
- Type in Distribution List In the first dropdown list.
- Follow the remaining instructions to the Additional Details screen.
- In the Service Request Details box, include the phrase Find a Group (or similar) and any key search criteria to narrow the search.
- Open the Group Management Portal (opens new window).
Join a Group or List (Request Group or List Membership)
To request to join a group or list (i.e. request group or list membership):
- Open the Group Management Portal (opens new window).
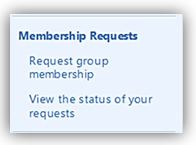
- From the left-hand navigation bar under Membership Requests, select Request group membership.
- Search for the group or list you wish to join. Select the magnifying glass icon of the Search for: field (at the top-right corner), to manually scroll through the list of all groups and lists. You could also enter your search criteria in the Search for: field, then select the magnifying glass icon to see the resulting list.
Note: The instructions for finding a group or list are detailed in the Find a Group or List section.
- In the search results’ Display Name column, select the group or list’s hyperlink to open the detail window for that group.
Note: If you put a checkmark beside the Group (in the Account Name column) and then select the Details icon from the top menu bar, this will open a Read Only window. You can only access general information about the group or list from this view.
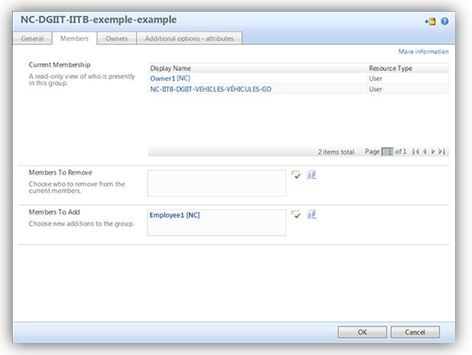
- In the detail window for the group, select the Members tab. The Current Membership is displayed at the top. You can use its scroll bar to review all current members.
- In the Members to Add box, enter your name (last name, first name) as it appears in your e-mail address.
- Select the green checkmark icon
 to validate and resolve the name you have entered. If the name cannot be resolved, the name will be underlined in red. Delete the entire name underlined in red, then you may either:
- Re-renter the name correctly.
- Select the Browse button
 and search using first or last name, or by key word, for the employee to be added to the list. Put a checkmark next to the name and click OK.
- When the name has been resolved and appears correctly in the Member to Add box, select the OK button.
- In the next window that appears, verify that your name details appear in the Inserted Items column, then select the Submit button.
- A summary window will appear. Confirm that “Pending approval” appears in the Status column, then select the OK button to close this window.
Tracking the Status of Your Request
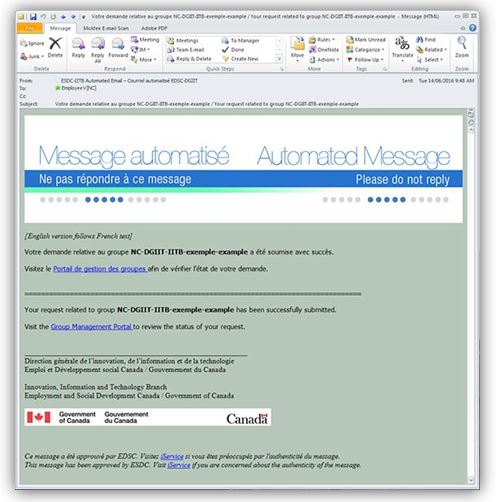
When you Submit a request to join a group or list, every owner for the group or list will receive an e-mail notification that your request is pending approval. Any owner can approve or reject your request. You will receive an automated notification of their decision by e-mail.

At any time, you can View the status of your requests. Contact the group or list’s owner(s) if you have any questions or concerns.
- Open the Group Management Portal (opens new window).
Leave a Group or List (End Group or List Membership)
To leave a group or list (i.e. end group or list membership):
- Open the Group Management Portal (opens new window).
- From Member Resources, select View your memberships.
- From the Display Name column, select the group or list’s hyperlink to open the detail window for that group.
Note: If you put a checkmark beside the Group (in the Account Name column) and then select the Details icon from the top menu bar, this will open a Read Only window. You can only access general information about the group or list from this view.
- In the detail window for the group, select the Members tab. The Current Membership is displayed at the top. You can use its scroll bar to review all current members.
- In the Members to Remove box, enter your name (last name, first name) as it appears in your e-mail address.

- Select the green checkmark icon to validate and resolve the name you have entered. If the name cannot be resolved, the name will be underlined in red. Delete the entire name underlined in red, then you may either:
- Re-renter the name correctly.
- Select the Browse button and search using first or last name, or by key word, for the employee to be added to the list. Put a checkmark next to the name and click OK.
- When the name has been resolved and appears correctly in the Member to Remove box, select the OK button.
- In the next window that appears, verify that your name details appears in the Removed Items column, then select the Submit button.
- A summary window will appear. Confirm that “Pending approval” appears in the Status column, then select the OK button to close this window.
Tracking the Status of Your Request
When you Submit a request to join a group or list, every owner for the group or list will receive an e-mail notification that your request is pending approval. Any owner can approve or reject your request. You will receive an automated notification of their decision by e-mail.
At any time, you can review the status of your requests. Contact the group or list’s owner(s) if you have any questions or concerns.
- Open the Group Management Portal (opens new window).
Review the Status of Your Requests
Review Your Membership Requests
If you have a membership request pending, you may want to cancel or see the status of this request:
- Open the Group Management Portal (opens new window).
- From the left-hand navigation bar under Membership Requests, select View the status of your requests.
- In the Manage My Requests window, you can review all of your requests. The Status column shows the status of your requests.
- To cancel a request: mark the checkbox to the left of the Request Title, then select the Cancel X icon in the ribbon.
- To narrow the search results: use the drop-down menu on either column to filter your search by ‘Date Submitted’ or ‘Status’.
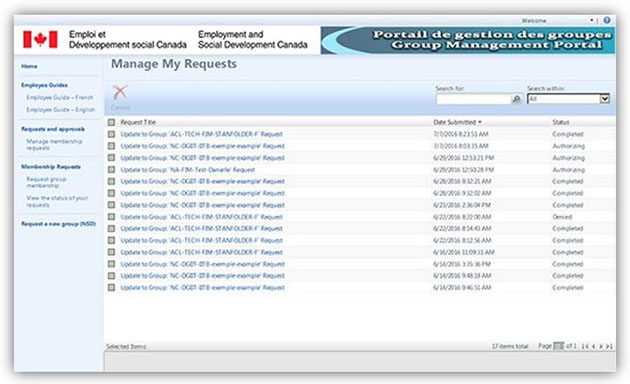
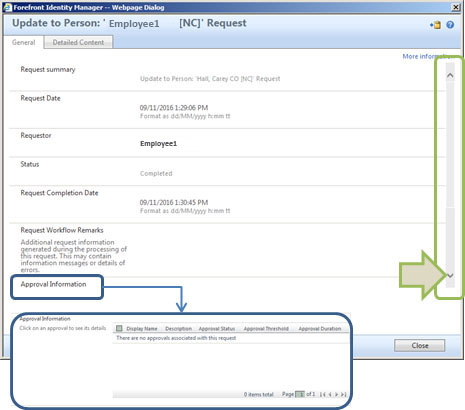
Note: If you click on the Request Title of a specific item, a window that contains detailed information on the request will open in read-only mode. Use the scroll bar on the right-hand side of the window to view all relevant details.
- Open the Group Management Portal (opens new window).
Review Group and List Ownerships
Note: To review your group or list ownerships, you must first be designated as an owner of one or more groups or lists. Otherwise, you may not see all of the menu items described below.
- Open the Group Management Portal (opens new window).

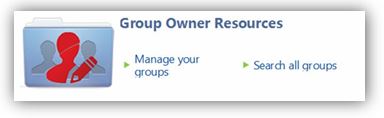
- Under Group Owner Resources, select Manage your groups.

- A list of the groups and/or lists you are an owner of will be displayed, together with the other owners of those groups and lists.

What can I do next as an Owner?
General information about a Group or List
You can access general information about the group or list by putting a checkmark beside its name in the Account Name column and then selecting the Details icon from the top menu bar. This will open a Read Only window.

Completing Owner Actions for a Group or List
By selecting the hyperlink to one of your groups or lists under the Display Name column, you will open a Details window that not only has the summary information about the group or list but allows you to submit requests and complete other Owner actions.

- Open the Group Management Portal (opens new window).
Add/Remove Members from a Group or List
Note: To add or remove members from a group or list, you must first be designated as an owner of that group or list. Otherwise, you may not see all of the menu items described below.
Adding a Member to a Group
- Open the Group Management Portal (opens new window).
- Under Group Owner Resources, select Manage your groups.
- From the Display Name column, select the group or list’s hyperlink to open the detail window for that group/link.
Note: If you put a checkmark beside the Group (in the Account Name column) and then select the Details icon from the top menu bar, this will open a Read Only window. You can only access general information about the group or list from this view.
- In the Details window for that group or list, select the Members tab to view the current membership. The Current Membership is displayed at the top. You can use its scroll bar to review all current members.
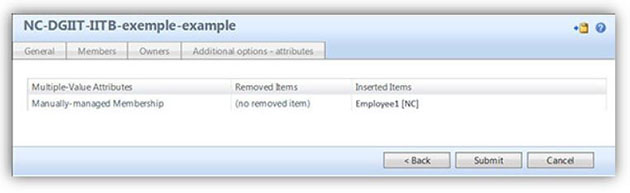
- In the Members to Add box, enter the name of the employee to be added (last name, first name) as it appears in their e-mail address.

Note: If you wish to add multiple names, separate them with a semi-colon (;).
- Select the green checkmark icon to validate and resolve the name you have entered. If the name cannot be resolved, the name will be underlined in red. Delete the entire name underlined in red, then you may either:
- Re-renter the name correctly.
- Select the Browse button and search using first or last name, or by key word, for the employee to be added to the list. Put a checkmark next to the name and click OK.
- When the name has been resolved and appears correctly in the Members to Add box, select the OK button.
- In the next window that appears, verify that the name(s) details appear in the Inserted Items column, then select the Submit button.

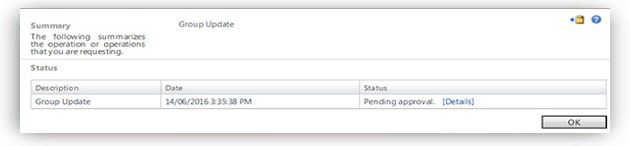
- A summary window will appear. Confirm that “Pending approval” appears in the Status column, then select the OK button to close this window.
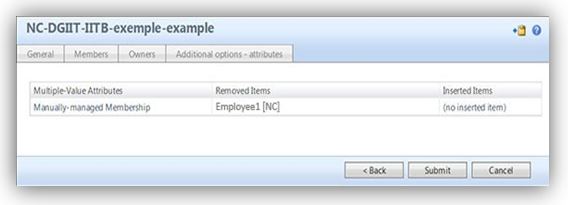
Removing a Member from a Group or List
- Open the Group Management Portal (opens new window).
- Under Group Owner Resources, select Manage your groups.
- From the Display Name column, select the group or list’s hyperlink to open the detail window for that group/link.
Note: If you put a checkmark beside the Group (in the Account Name column) and then select the Details icon from the top menu bar, this will open a Read Only window. You can only access general information about the group or list from this view.
- In the Details window for that group or list, select the Members tab to view the current membership. The Current Membership is displayed at the top. You can use its scroll bar to review all current members.
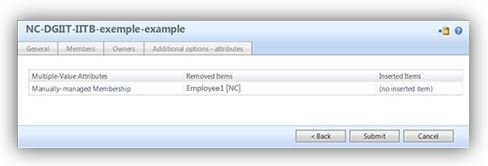
- In the Members to Remove box, enter the name of the employee to be removed (last name, first name) as it appears in their e-mail address.
Note: If you wish to add multiple names, separate them with a semi-colon (;).
- Select the green checkmark icon to validate and resolve the name you have entered. If the name cannot be resolved, the name will be underlined in red. Delete the entire name underlined in red, then you may either:
- Re-renter the name correctly.
- Select the Browse button and search using first or last name, or by key word, for the employee to be added to the list. Put a checkmark next to the name and click OK.
- When the name has been resolved and appears correctly in the Members to Remove box, select the OK button.
- In the next window that appears, verify that the name(s) details appear in the Removed Items column, then select the Submit button.
- A summary window will appear. Confirm that “Pending approval” appears in the Status column, then select the OK button to close this window.
- Open the Group Management Portal (opens new window).
Add/Remove Owners from a Group or List
Note: To add or remove owners from a group or list, you must first be designated as an owner of that group or list. Otherwise, you may not see all of the menu items described below.
Adding an Owner to a Group or List
- Open the Group Management Portal (opens new window).
- Under Group Owner Resources, select Manage your groups.
- From the Display Name column, select the group or list’s hyperlink to open the detail window for that group/link.
Note: If you put a checkmark beside the Group (in the Account Name column) and then select the Details icon from the top menu bar, this will open a Read Only window. You can only access general information about the group or list from this view.
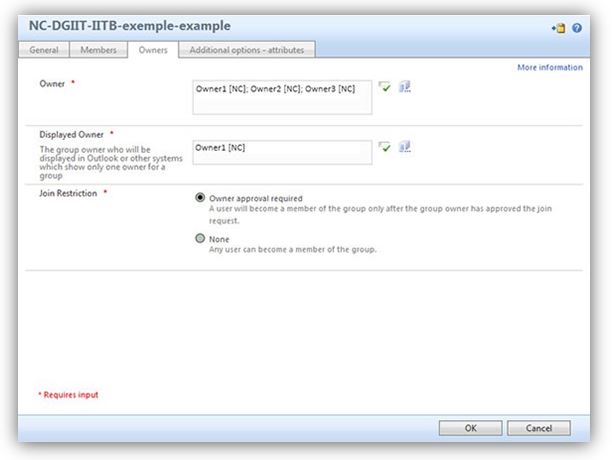
- In the Details window for the group or list, select the Owners tab to view the current owners. You can use the scroll bar to review all current members.
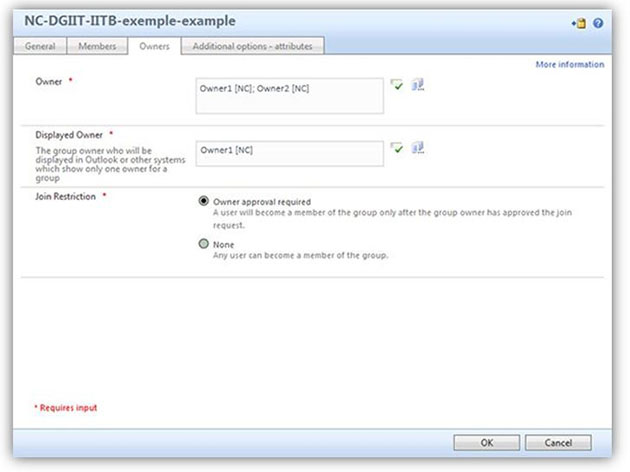
- In the Owners box, enter the name of the employee to be added as an owner (last name, first name) as it appears in their e-mail address.

Note: If you wish to add multiple names, separate them with a semi-colon (;).
- Select the green checkmark icon to validate and resolve the name you have entered. If the name cannot be resolved, the name will be underlined in red. Delete the entire name underlined in red, then you may either:
- Re-renter the name correctly.
- Select the Browse button and search using first or last name, or by key word, for the employee to be added to the list. Put a checkmark next to the name and click OK.
- When the name has been resolved and appears correctly in the Owner box, select the OK button.
- In the next window that appears, verify that the name(s) details appear in the Insert Items column, then select the Submit button.

Note: Approval of this change is not required, since you are an owner of the group.
Removing an Owner from a Group or List
- Open the Group Management Portal (opens new window).
- Under Group Owner Resources, select Manage your groups.
- From the Display Name column, select the group or list’s hyperlink to open the detail window for that group/link.
Note: If you put a checkmark beside the Group (in the Account Name column) and then select the Details icon from the top menu bar, this will open a Read Only window. You can only access general information about the group or list from this view.
- In the Details window for the group or list, select the Owners tab to view the current owners. You can use the scroll bar to review all current owners.
- In the Owners box, select the name of the owner to be removed and press the Delete key on your keyboard. Repeat this step for each owner you want to remove from the group.
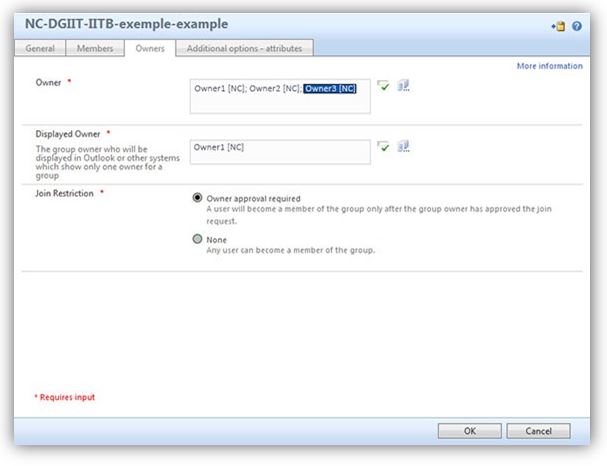
- Once these names have been removed, select the OK button, then verify your request and select the Submit button.
Note: Approval of this change is not required, since you are an owner of the group.
Changing a Display Owner for a Group or List
The Displayed Owner is the name of the owner who will be displayed as the group's owner for the Security Group or in Outlook Properties as the list's Manager.
Note: There must always be an identified Display Owner. You will receive an error message and no actions can be completed until the appropriate field has a validated name entered.
- Open the Group Management Portal (opens new window).
- Under Group Owner Resources, select Manage your groups.
- From the Display Name column, select the group or list’s hyperlink to open the detail window for that group/link.
Note: If you put a checkmark beside the Group (in the Account Name column) and then select the Details icon from the top menu bar, this will open a Read Only window. You can only access general information about the group or list from this view.
- In the Details window for the group or list, select the Owners tab to view the current owners.

- In the Display Owner box, select the name of the owner to be removed and press the Delete key on your keyboard.

Note: This field cannot be left blank. You will receive an error message and no actions can be completed until the field has a validated name entered.

- Enter the name of the employee to be added as an Display Owner (last name, first name) as it appears in their e-mail address. Click on OK.

- Select the green checkmark icon to validate and resolve the name you have entered. If the name cannot be resolved, the name will be underlined in red. Delete the entire name underlined in red, then you may either:
- Re-renter the name correctly.
- Select the Browse button and search using first or last name, or by key word, for the employee to be added to the list. Put a checkmark next to the name and click OK.
- Verify your request and select the Submit button.

Note: Approval of this change is not required, since you are an owner of the group.
- Open the Group Management Portal (opens new window).
Approve/Reject Requests
Note: To approve/reject group or list requests, you must first be designated as an owner of that group. When an employee uses the GMP to submit a membership request, owners of that group will receive the request to ‘Approve’ or ‘Reject’ via an e-mail notification.
Approving a Request
Note: It may take a few minutes for any actions completed using the Group Management Portal to be reflected in impacted applications/software/databases.
You can Approve a request 1) within the GMP or 2) from the e-mail notification
1) Approve Using the GMP
- Use the hyperlink provided in the e-mail to view the request in the GMP. Otherwise, open the Group Management Portal (opens new window).
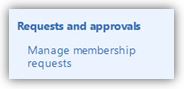
- Under Requests and Approvals from the left-hand navigation bar, select Manage Membership Requests to see all pending requests.
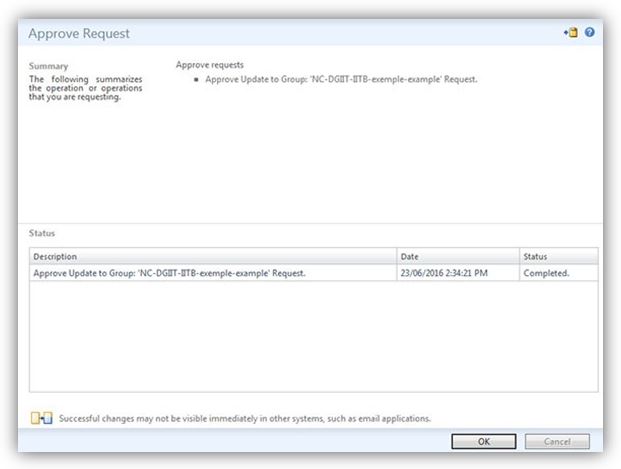
- Select the checkbox to the left of the request you intend to approve, and then select the Approve button in the ribbon.

- Verify the information that appears, then select the Submit button.

- Verify that the status is indicated as ‘Completed’, then select the OK button.
2) Approve from the e-mail Notification (using Outlook 2010)
Note: If you are using Outlook 2016, the Accept and Reject buttons do not appear on the ribbon at this time. Please use the GMP to approve the request.
- Open the e-mail notification.

- There will be two new buttons in the main ribbon under the Approval section:

- Select Approve.

- A response e-mail will open to Approve the request. Click Send.

Note: In the Sent folder of your Outlook, you will notice that your email response will have been sent to sv-fimservice@hrdc-drhc.net. You can delete these emails as part of good IM practices.
- The GMP will be automatically updated and the employee notified via e-mail of their inclusion in the group.
Rejecting a Request
Note: It may take a few minutes for any actions completed using the Group Management Portal to be reflected in impacted applications/software/databases.
You can Reject a request 1) within the GMP or 2) from the e-mail notification.
1) Reject Using the GMP
- Use the hyperlink provided in the e-mail to view the request in the GMP. Otherwise, open the Group Management Portal (opens new window)
- Under Requests and Approvals from the left-hand navigation bar, select Manage Membership Requests to see all pending requests.
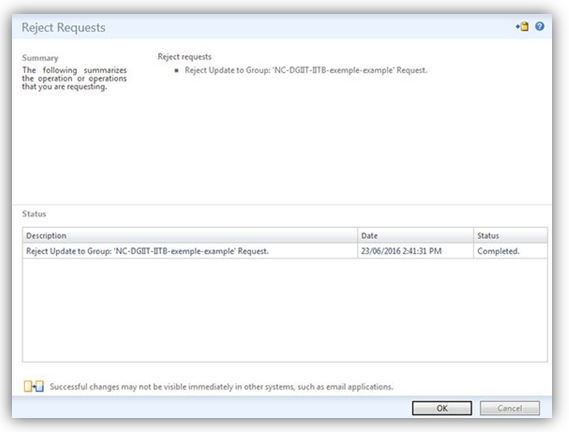
- Select the checkbox to the left of the request you intend to reject, and then select the Reject button in the ribbon.
- Verify the information that appears, then select the Submit button.

- Verify that the status is indicated as ‘Completed’, then select the OK button.
2) Reject from the e-mail Notification (using Outlook 2010)
Note: If you are using Outlook 2016, the Accept and Reject buttons do not appear on the ribbon at this time. Please use the GMP to reject the request.
- Open the e-mail notification.
- There will be two new buttons in the main ribbon under the Approval section:
- Select Reject.
- A response e-mail will open to Reject the request. Click Send.

Note: In the Sent folder of your Outlook, you will notice that your email response will have been sent to sv-fimservice@hrdc-drhc.net. You can delete these emails as part of good IM practices.
- The GMP will be automatically updated and the employee notified via e-mail.
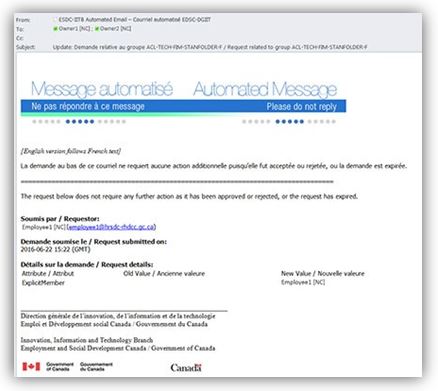
E-mail Notifications
Note: At any time, you can view your Requests submitted to you. See under the Owner's section Approve membership requests.
Member Requests
As a group and/or list owner you will receive an e-mail notification for employees wanting to ‘Join’ or ‘Leave’ a group, as will any other owner of the group. When you action the request, the employee will receive a notification of your decision by e-mail.
Owner Actions
An Owner of a group or list will receive a general e-mail notification when they have actionned a request. All Owners of a group or list will also receive a general e-mail notification noting that an action has been completed.
- Use the hyperlink provided in the e-mail to view the request in the GMP. Otherwise, open the Group Management Portal (opens new window).
Create/Delete (Decommission) a Group
Note: To create or delete (decommission) a Group, you must be designated as an owner of that group. In both cases you will need to Submit an online service request to the National Service Desk.
Create a New Group
- Open the Group Management Portal (opens new window) in a new browser window.
- You can select Request a new group (NSD) from the left-hand navigation bar, or else visit the National Service Desk directly.

- On the NSD web page, select Report an IM/IT problem / Submit a request.
- In response to the first question, enter ‘Group Management Portal’.
- Follow the provided instructions.
- When entering your service request details, use the words “Create a group”. Include as much information as you can about the group to be created: a description of the group and its purpose, a preliminary member list, and an owner list (if applicable).
Delete (i.e. Decommission) a Group
- Open the Group Management Portal (opens new window) in a new browser window.
- You can select Request a new group (NSD) from the left-hand navigation bar, or else visit the National Service Desk directly.
- On the NSD web page, select Report an IM/IT problem / Submit a request.
- In response to the first question, enter ‘Group Management Portal’.
- Follow the provided instructions.
- When entering your service request details, use the words “Delete a group” (or “Decommission a group”). Include the full name of the group in the details section of your request, to ensure that the correct group is decommissioned.
- Open the Group Management Portal (opens new window) in a new browser window.
Language Preference
The Internet Explorer (IE) browser, by default, assumes the language of the Microsoft 10 Operating System.
To change language settings of the Group Management Portal, which opens in an IE browser window, follow the quick fix instructions for changing the language settings in Internet Explorer.
Note: Changing the IE browser language settings will apply the new settings to all web pages you visit, where applicable.