Step 4- Complete and submit the Separation Clearance (Checklist)
Follow the applicable instructions according to the type of departure (Part A - Permanent or Part B - Temporary)
- Part A
- Completing and submitting the Separation Clearance (Checklist) for an employee leaving permanently for the following reasons: Resignation, Retirement, Termination (Abandonment of Position, Discharge for misconduct, Early end of contract, End of contract, Rejection on probation, Release for incapacity, Unsatisfactory performance), Death in Service and Transfer to another department
- Part B
- Completing and submitting the Separation Clearance (Checklist) for an employee leaving temporarily for the following reasons: Leave without Pay (Maternity, Paternity, Education, Sick, Suspension, etc.), Secondment Out, Interchange Out
Part A: Offboarding (Separation Clearance) Process for an employee leaving permanently
Once the employee's Notification of Separation form has been submitted, an email will be sent to you and your unit's Administrative Assistant (if identified on the employee Notification of Separation Form). In the case of employees working in a separate geographical location, an on-site manager can be identified as the Alternate contact on the Notification of Separation form to assist with the physical aspects of the process.
In order to assist you, a detailed step-by-step description of the Offboarding process (Separation Clearance) is provided below.
Step 4-1 - Receiving an employee's Notification of Separation
When an employee submits their Notification of Separation form, you will receive an email from the Human Resources Services Centre containing a link to view the Notification of Separation form as well as the instructions for completion.
Step 4-2 - Reviewing the Notification of Separation
Upon receiving an email with the Notification of Separation form, review the information to ensure that you were correctly identified as the employee's manager and that the appropriate separation type was selected by the departing employee.
Please see the additional information below in Step 4-3 - Accepting a notification of resignation, retirement, termination or transfer to another department; in the event that you no longer have the system generated email with the Notification of Separation form.
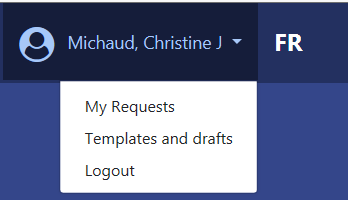
All of the Separation Clearance Process requests that you created or were assigned to you can be accessed in the My Requests page found in the menu with your name located at the top right side of the page. Click the down arrow and select "My Requests".
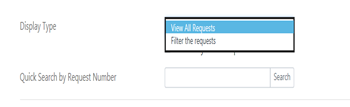
Understandably, you may have a large number of requests on this page; as such you are able to filter them using the display type drop down list at the top of the page.
To find Separation Clearance Process requests available for you to process:
- Select "Filter the requests" from the Display Type drop down list. The My Requests filter page appears.
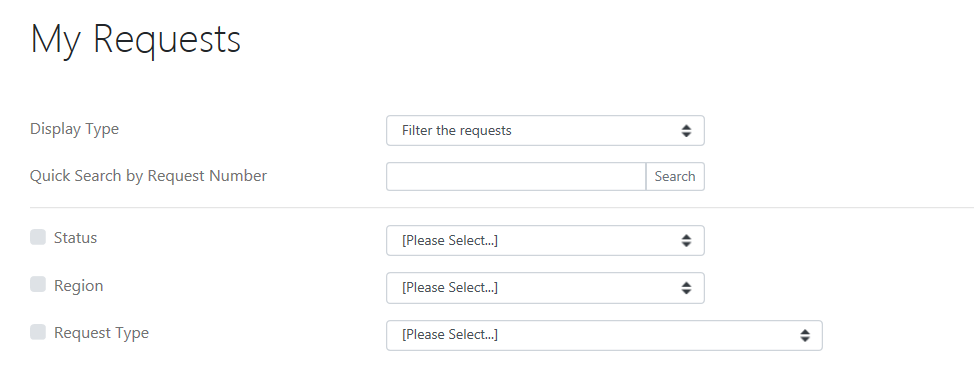
- Click the Status checkbox and select "New Request" from the Status drop down list.
- Click the Request Type checkbox and select "Separation Clearance Process" from the Request Type drop down list.
- Click "Refresh"
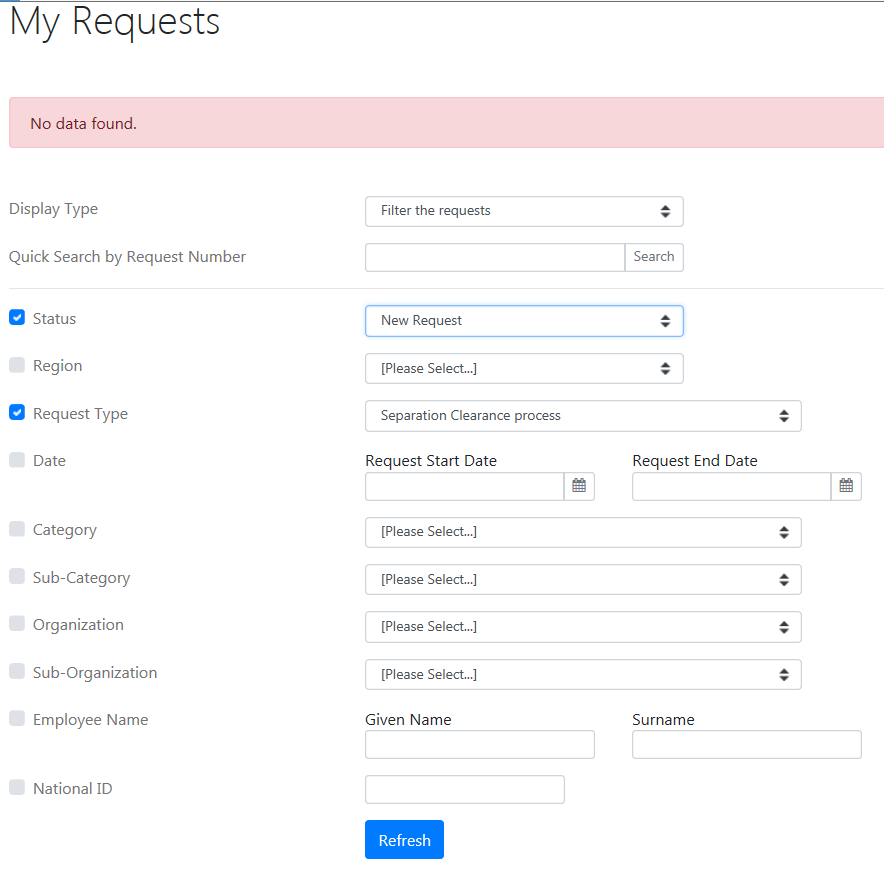
The displayed results are ready for review. To select a specific request, click on the Request Number link, highlighted in yellow in the image below.

- Select "Filter the requests" from the Display Type drop down list. The My Requests filter page appears.
Step 4-3 - Accepting a notification of resignation, retirement, termination or transfer to another department
*** Important ***
Send and save the email as it will be required proof of manager acceptance when you proceed with the necessary Pay Related Actions required (Step 2 – Complete and submit the HRSC Pay Related Action form).
If the employee is submitting a Notification of Separation form with the separation type being a resignation, retirement, termination or transfer to another department, as that employee's manager, you must acknowledge their termination of employment to be legal.
In order to assist with this step, an email template (MSG, 47 KB) is available and a link was included in the email you received upon the employee's submission of their notification of separation.
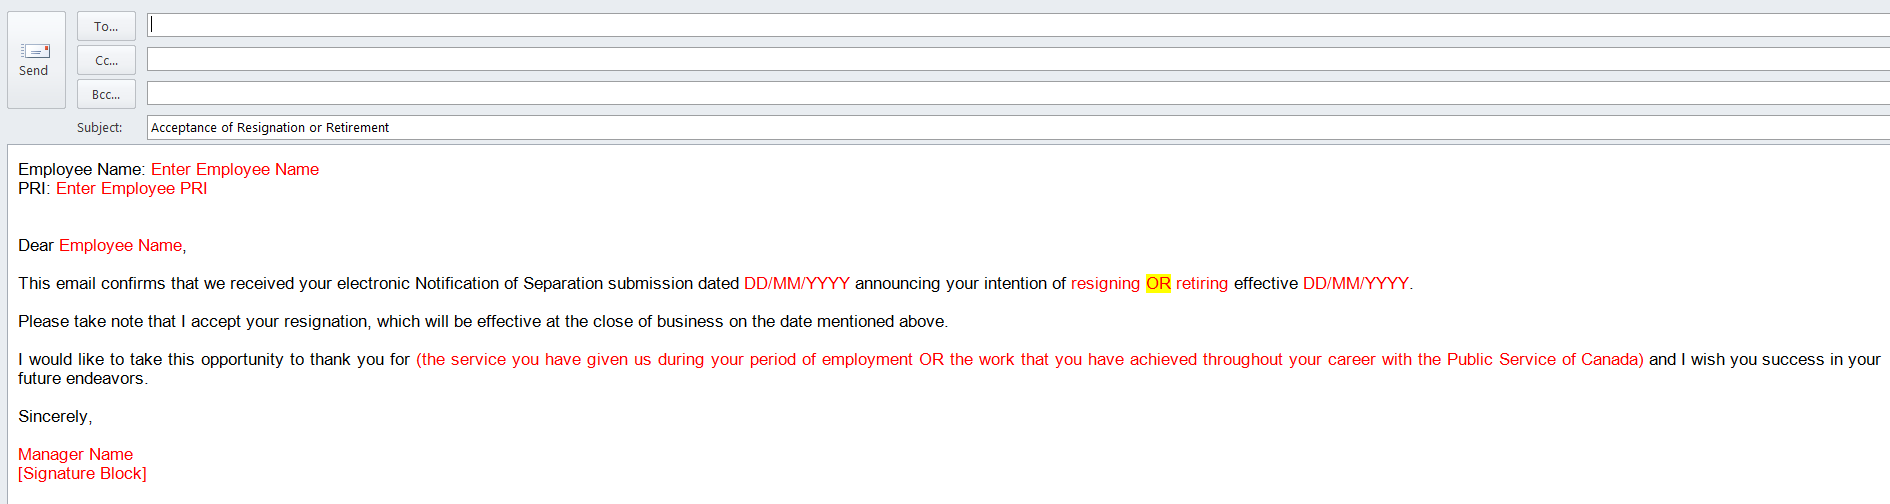
Prior to sending this email you will need to enter the employee's email address and replace the red text with the employee's information. Please pay close attention to the text in RED font, and adjust the content accordingly.
Step 4-4 - Modifications to Notification of Separation form
To modify a Notification of Separation form, use the "Update Request" button at the bottom of the review page. You might be required to modify the Notification of Separation form, if you notice some errors or omissions while reviewing the Notification of Separation form, or if changes are required after the initial form was sent (i.e. change in their official date of departure).
The "Update Request" button is located below the Cost Centre Checklist.

Click "Update Request", the Notification of Separation form will open in an editable format, enabling you to update most fields.

To save any modifications, scroll to the bottom of the form and click "Save".
Save button
Click "Save" to save modifications applied on the Notification of Separation form. Once the "Save" button has been clicked, an email will be sent to the employee, manager, administrative assistant and alternate contact.
Cancel Request button
Click "Cancel Request" in the event that the employee informs you that he/she wish to retract their Notification of Separation. It should be noted that once canceled a request cannot be reactivated and will need to be re-submitted by the employee.
Step 4-5 – Completing the Cost Centre Checklist
The Cost Centre Checklist is used to indicate that the employee's manager has guaranteed the return of departmental assets, met with the employee to conduct the security screening briefing and discussed the conflict of interest and post-employment policy requirements.
The Cost Centre Checklist can be completed in stages or all at once by the employee's manager or administrative assistant identified on the Notification of Separation form. The alternate contact will have access to complete the Cost Centre Checklist, if he/she was identified as an alternate contact on the Notification of Separation form.
To access the Cost Centre Checklist, click "Update Request" to access the Notification of Separation form.
Once the Notification of Separation form is opened, scroll to the bottom to find the Cost Centre Checklist.
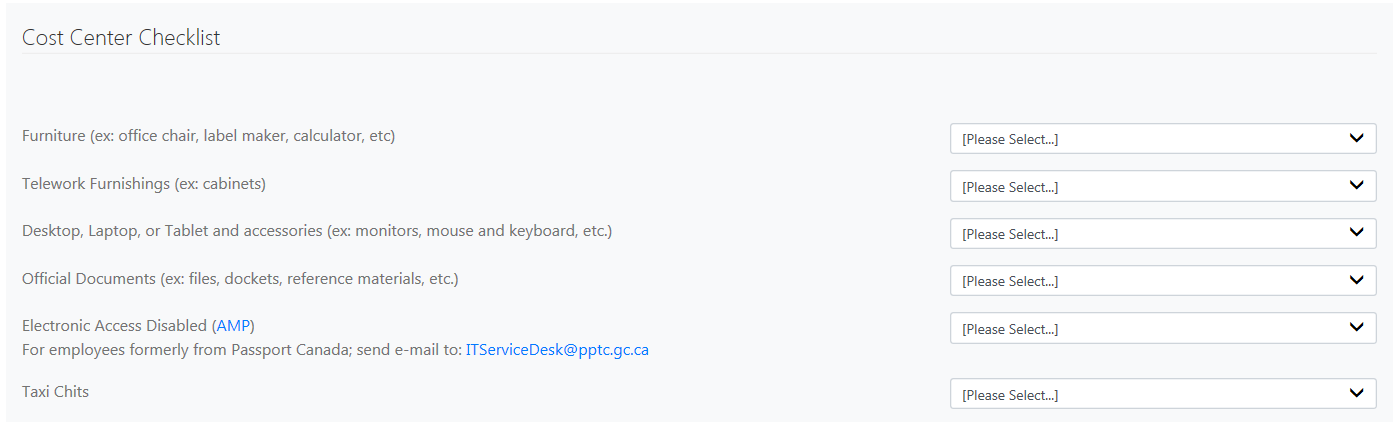
The Cost Centre checklist item identifies tasks the manager must perform for an employee leaving the department such as:
- recover Assets: Furniture (ex: office chair, label maker, calculator), Telework Furnishings (ex: cabinet), Desktop, Laptop or Tablet and accessories (ex: monitors, mouse and keyboard, etc.), Taxi Chits, Parking Pass, Telecommunications (Cellular Telephones, Pagers, Blackberry, Long Distance Calling Cards and Portable Storage Devices (USB, external hard drives);
- recover Photo ID Card, Access Card(s) and Control Key(s);
- remove Electronic Access: Network and System access; perform necessary debriefs regarding security and attach a digital scan of the Security Screening Certificate and Briefing Form (TBS/SCT 330-47), and the original document with signatures and send them by internal mail to the Regional Security Office;
- validate that all electronic or paper information resources are cleaned, stored in a location that is accessible and has appropriate level of access. Adhering to IM/IT Guidelines and Policies;
- discuss conflict of interest and Post-Employment policy requirements with employee. Adhering to IM/IT Guidelines and Policies;
- review and approve the list of personal information resources (personal email, personal resume, outlook contact list, etc.)
On every Cost Centre Checklist item, the manager must identify the action taken for this particular task by selecting a value from the drop down list. Click "Save" in order to save any changes made on the Cost Centre Checklist item selection.
*** Important ***
The removal of Network and System access must be done in the AMP system. Click "AMP" link located beside the checklist item Electronic Access Disabled. If the employee is formerly from Passport Canada; you must send an e-mail to: ITServiceDesk@pptc.gc.ca for the removal of Network and System access.
Step 4-6 - Completing the Security Screening and Briefing Form
*** Important ***
Please print and sign the Security Screening Certificate and Briefing Form (TBS/SCT 330-47). You must upload the scanned copy within the Notification of Separation form and then send it to your RSO who will then send it to the National Personnel Security.
The Security Screening Certificate and Briefing Form (TBS/SCT 330-47) provides a record of the security briefing of employees who have been granted a reliability status, security clearance or site access.
The form is used to confirm that the manager has met with the employee to inform him/her of the obligations in terms of security. This information session is a requirement of the security screening process.
The form is used throughout the employment cycle, not only at the departure point but to document the updates and changes in accesses and of security levels of employees. The signature by both employee and manager is an attestation that the manager has briefed the employee, and that the employee understands his or her obligations. The completed and signed form is added to the employee's personnel security file when the security clearance is granted or updated, at the end of the employment cycle, or whenever there is a change in the security level.
A mandatory information session must be given to the employee immediately after reliability status or security clearance is granted or updated, and when the employee leaves the department.
The purpose of this information session at the end of employment is to inform the employee that the classified or protected information or assets to which he/she had access must be returned, or that the access to this information has ended and must not be shared outside the department. This includes returning access and ID cards, turning in documents, etc. The manager should also mention that details and knowledge of ESDC processes are not to be shared outside the department.
The completion and signature of the Security Screening Certificate and Briefing Form does not alter or modify the security level of the employee.
Completing the Security Screening Certificate and Briefing form (TBS/SCT 330-47)
Section - Part A: To be completed by security office
When completing the form to confirm the end of employment security briefing (information session), the manager completes Part A that is identified in red below.
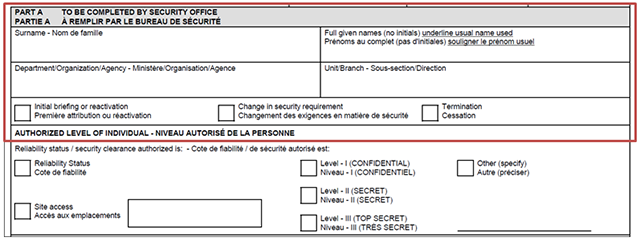
- Surname:
- Enter the surname of employee
- Full given names (no initials):
- Enter the complete given names of the employee and underline the name that is used (e.g. John Xavier)
- Department/Organization/Agency:
- Enter the name or initials of the department. For Service Canada, use ESDC/Service Canada
- Unit/Branch:
- Enter the Branch, Directorate and/or Division in this section.
The manager checks the appropriate box for employees permanently leaving the department.

Important: The information in this section has no impact on the security level of the employee
Termination checkbox on this form identifies the removal of access to systems, buildings and information that the employee can access. This checkbox should be selected when an employee retires, resigns, terminates or is deceased.
Change in security/requirement checkbox is used when an employee is transferring to another department on a permanent basis.
Part B: Briefing Summary
The manager reads Part B to the employee. After the last paragraph, the manager can list the assets and information that must be returned (for example, photo ID and access cards) and review the continued obligation that the employee has with regards to the safeguard of the information after departure from the department. Additional information is available on the back of the form concerning the security of information.
Part C: Acknowledgement
The employee signs and dates (blue ink). If the employee cannot complete or sign Part C (death in service, resignation while on leave), the employee signature can be left blank and the manager will provide the reason in this space.
Part D: Briefing Official
The manager or delegated official who provided the briefing is to sign and date Part D (blue ink).
The completed Security Screening Certificate and Briefing Form (TBS/SCT 330-47) is then attached to the HR Web application form and is required to complete the separation process. The signed original form must then be sent by internal mail to the Regional Security Office.
Quick reference for completing and returning the Security Screening Certificate and Briefing form (TBS/SCT 330-47)
- Separation Type
- Death in service
- TBS33047 required
- Yes
- What to send to RSO
-
Send signed original Security Screening Certificate and Briefing form (TBS/SCT 330-47) to RSO. Include Photo ID, Access Card.
No briefing is required.
Disable access from systems, buildings and offices.
- Separation Type
- Resignation
- TBS33047 required
- Yes
- What to send to RSO
-
Briefing is mandatory.
Recover Photo ID and Access Card from employee.
Send signed original Security Screening Certificate and Briefing form (TBS/SCT 330-47) to RSO. Include Photo ID, Access Card.
Suspend access from systems, buildings and offices.
- Separation Type
- Retirement
- TBS33047 required
- Yes
- What to send to RSO
-
Briefing is mandatory.
Recover Photo ID and Access Card from employee.
Send signed original Security Screening Certificate and Briefing form (TBS/SCT 330-47) to RSO. Include Photo ID, Access Card.
Suspend access from systems, buildings and offices.
- Separation Type
- Termination
- TBS33047 required
- Yes
- What to send to RSO
-
Briefing is mandatory.
Recover Photo ID and Access Card from employee.
Send signed original Security Screening Certificate and Briefing form (TBS/SCT 330-47) to RSO. Include Photo ID, Access Card.
Suspend access from systems, buildings and offices.
- Separation Type
- Transfer to another department
- TBS33047 required
- Yes
- What to send to RSO
-
Briefing is mandatory.
Recover Photo ID and Access Card from employee.
Send signed original Security Screening Certificate and Briefing form (TBS/SCT 330-47) to RSO. Include Photo ID, Access Card.
Suspend access from systems, buildings and offices.
Step 4-7 - Attaching documents
As instructed in the Cost Centre Checklist, once signed, the Security Screening Certificate and Briefing Form (TBS/SCT 330-47) must be uploaded back into the system. The original (hard copy) signed TBS/SCT 330-47 form as well as a signed copy of the Separation Clearance Form must be sent, by internal mail, with the departing employee's Photo ID Card attached, to the RSO. The access card(s) must be returned to the issuance office (e.g. on-site management).
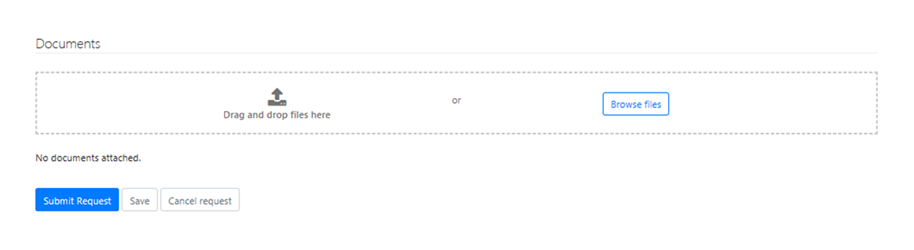
To upload a document
Option A: click "Browse files" to find the document that will be uploaded. Once the document is found, click "Open" and the document will appear in the documents section shown below. Click "Submit Request" if you are ready to submit the separation clearance request to the Enabling Services Branches for processing or click “Save” to save the changes.

Option B: drag and drop your file from your folder to the documents section shown below. Click "Submit Request" if you are ready to submit the separation clearance request to the Enabling Services Branches for processing or click “Save” to save the changes.

***Please note that clicking “Save” button will not transmit your request to the Enabling Services Branches, it will remain in “New request” status. You must click "Submit Request" button in order to transmit the request to the Enabling Services Branches.
Step 4-8 - Returning the Photo Identification (ID) Card / Access Cards/Keys
Managers are required to ensure that the Photo ID, access cards and control keys of the departing employee are collected and returned to the appropriate/identified responsible authority (e.g. all Photo ID cards returned to the Regional Security Office (RSO); the access card and keys returned to the issuance office (e.g. on-site management).
If the employee's Home manager cannot retrieve the Photo ID, access card(s) or keys directly from the employee (e.g. employee and manager located in separate locations), the Home manager can make arrangements with a Host manager, from that site, to retrieve the items from the employee and confirm by email to the Home manager when this is complete. (Note: The Home manager is still responsible for returning these items to the appropriate issuance office.)
Once you have completed all of the Cost Centre Checklist items, you must enter a Cost Centre Manager's comment; which is used to capture additional information with regard to the request. For example: if you were unable to scan and attach any of the requested documentation you can indicate that you have mailed the documents, or add a general comment to indicate that all necessary steps have been completed.
You are now ready to submit the Separation Clearance form to the Enabling Services Branches for processing.
*** Important ***
You must be a manager with FAA section 34 delegation to submit the request to the applicable Enabling Services Branches.
You must enter a Cost Centre Manager’s comment in the “Cost Centre Manager Comments” field before transmitting the request to the appropriate Enabling Services Branches. If you do not have any additional information with regard to the request, you can enter “N/A” in the Cost Centre Manager Comments field.

If you are a manager with FAA section 34 delegation and have reviewed and approved the complete Cost Centre Checklist, click the “Submit Request” button to transmit the request to the applicable Enabling Services Branches. This attests that you have reviewed and actioned the entire Cost Centre Checklist.
After you have submitted the Separation Clearance form to the Enabling Services Branches you will receive a confirmation email. In the event that one of the Enabling Services Branches requires additional information they may contact you directly or use the "return to client" functionality.
Part B: Offboarding (Separation Clearance) Process for an employee leaving temporarily
Once the employee's Notification of Separation form has been submitted, an email will be sent to you and your unit's Administrative Assistant (if identified on the employee Notification of Separation Form). In the case of employees working in a separate geographical location, an on-site manager can be identified as the Alternate contact on the Notification of Separation form to assist with the physical aspects of the process.
Step 4-1 - Receiving an employee's Notification of Separation
When an employee submits their Notification of Separation form, you will receive an email from the Human Resources Services Centre containing a link to view the Notification of Separation form as well as the instructions for completion.
Step 4-2 - Reviewing the Notification of Separation
Upon receiving an email with the Notification of Separation form, review the information to ensure that you were correctly identified as the employee's manager and that the appropriate separation type was selected by the departing employee.
Please see the additional information below in the event that you no longer have the system generated email with the Notification of Separation form.
All of the Separation Clearance Process requests that you created or were assigned to you can be accessed in the My Requests page found in the menu with your name located at the top right side of the page. Click the down arrow and select "My Requests".
Understandably you may have a large number of requests on this page; as such you are able to filter them using the display type drop down list at the top of the page.
To find Separation Clearance Process requests available for you to process:
- Select "Filter the requests" from the Display Type drop down list. The My Requests filter page appears.
- Click the Status checkbox and select "New Request" from the Status drop down list.
- Click the Request Type checkbox and select "Separation Clearance Process" from the Request Type drop down list.
- Click "Refresh"
The displayed results are ready for review. To select a specific request, click on the Request Number link, highlighted in yellow in the image below.
- Select "Filter the requests" from the Display Type drop down list. The My Requests filter page appears.
Step 4-3 - Modifications to Notification of Separation form
To modify a Notification of Separation form, use the "View Request" button at the bottom of the review page. You might be required to modify the Notification of Separation form, if you notice some errors or omissions while reviewing the Notification of Separation form, or if changes are required after the initial form was sent (i.e. change in their official date of departure).
The "Update Request" button is located below the Cost Centre Checklist.
Click "Update Request", the Notification of Separation form will open in an editable format, enabling you to update most fields.
To save any modifications, scroll to the bottom of the form and click "Save".
Save button
Click "Save" to save modifications applied on the Notification of Separation form. Once the "Save" button has been clicked, an email will be sent to the employee, manager, administrative assistant and alternate contact.
Return to my requests button
Click "Return to my requests" to return to the previous page and process another request within the HRSC portal.
Cancel Request button
Click "Cancel Request" in the event that the employee informs you that he/she wish to retract their Notification of Separation. It should be noted that once canceled a request cannot be reactivated and will need to be re-submitted by the employee.
Step 4-4 – Completing the Cost Centre Checklist
The Cost Centre Checklist is used to indicate that the employee's manager has guaranteed the return of departmental assets, met with the employee to conduct the security screening briefing and discussed the conflict of interest and post-employment policy requirements.
The Cost Centre Checklist can be completed in stages or all at once by the employee's manager or administrative assistant identified on the Notification of Separation form. The alternate contact will have access to complete the Cost Centre Checklist, if he/she was identified as an alternate contact on the Notification of Separation form.
To access the Cost Centre Checklist, click "Update Request" to access the Notification of Separation form.
Once the Notification of Separation form is opened, scroll to the bottom to find the Cost Centre Checklist.
The Cost Centre checklist item identifies tasks the manager must perform for an employee leaving the department such as:
- recover Assets: Furniture (ex: office chair, label maker, calculator), Telework Furnishings (ex: cabinet), Desktop, Laptop or Tablet and accessories (ex: monitors, mouse and keyboard, etc.), Taxi Chits, Parking Pass, Telecommunications (Cellular Telephones, Pagers, Blackberry, Long Distance Calling Cards and Portable Storage Devices (USB, external hard drives);
- recover Photo ID Card, Access Card(s) and Control Key(s);
- remove Electronic Access: Network and System access; perform necessary debriefs regarding security and attach a digital scan of the Security Screening Certificate and Briefing Form (TBS 330-47), and the original document with signatures and send them by internal mail to the Regional Security Office;
- validate that all electronic or paper information resources are cleaned, stored in a location that is accessible and has appropriate level of access. Adhering to IM/IT Guidelines and Policies;
- discuss conflict of interest and Post-Employment policy requirements with employee. Adhering to IM/IT Guidelines and Policies;
- review and approve the list of personal information resources (personal email, personal resume, outlook contact list, etc.)
On every Cost Centre Checklist item, the manager must identify the action taken for this particular task by selecting a value from the drop down list. Click "Update" in order to save any changes made on the Cost Centre Checklist item selection.
*** Important ***
The removal of Network and System access must be done in the AMP system. Click "AMP" link located beside the checklist item Electronic Access Disabled. If the employee is formerly from Passport Canada; you must send an e-mail to: ITServiceDesk@pptc.gc.ca for the removal of Network and System access.
The following is applicable only to the LWOP in the context of the COVID-19 Vaccination policy: Managers can delay the return of IT equipment and access cards for one month following the LWOP effective date. If such is the case, please indicate the option ‘not applicable (N/A)’ on the Separation Clearance form for these items. Please note that managers are still required to submit a request in the Access Management Portal (AMP) as stipulated in the Separation Clearance Form.
Step 4-5 - Completing the Security Screening and Briefing Form
*** This is required for Interchange Out, Secondment Out and Leave Without Pay (Maternity, Paternity, Education, Parental, Suspension, Sick (without pay) and other when there is a break in service for four [4] consecutive weeks (20 business days) of time.)
*** Important ***
Please print and sign the Security Screening Certificate and Briefing Form (TBS/SCT 330-47). You must upload the scanned copy within the Notification of Separation form and then send it to your RSO who will then send it to the National Personnel Security.
The Security Screening Certificate and Briefing Form (TBS/SCT 330-47) provides a record of the security briefing of employees who have been granted a reliability status, security clearance or site access.
The form is used to confirm that the manager has met with the employee to inform him/her of the obligations in terms of security. This information session is a requirement of the security screening process.
The form is used throughout the employment cycle, not only at the departure point but to document the updates and changes in accesses and of security levels of employees. The signature by both employee and manager is an attestation that the manager has briefed the employee, and that the employee understands his or her obligations. The completed and signed form is added to the employee's personnel security file when the security clearance is granted or updated, at the end of the employment cycle, or whenever there is a change in the security level.
A mandatory information session must be given to the employee immediately after reliability status or security clearance is granted or updated, and when the employee leaves the department.
The purpose of this information session at the end of employment is to inform the employee that the classified or protected information or assets to which he/she had access must be returned, or that the access to this information has ended and must not be shared outside the department. This includes returning access and ID cards, turning in documents, etc. The manager should also mention that details and knowledge of ESDC processes are not to be shared outside the department.
The completion and signature of the Security Screening Certificate and Briefing Form does not alter or modify the security level of the employee.
Completing the Security Screening Certificate and Briefing form (TBS/SCT 330-47)
Section - Part A: To be completed by security office
When completing the form to confirm the end of employment security briefing (information session), the manager completes Part A that is identified in red below.
- Surname:
- Enter the surname of employee
- Full given names (no initials):
- Enter the complete given names of the employee and underline the name that is used (e.g. John Xavier)
- Department/Organization/Agency:
- Enter the name or initials of the department. For Service Canada, use ESDC/Service Canada
- Unit/Branch:
- Enter the Branch, Directorate and/or Division in this section.
The manager checks the appropriate box.
Important: The information in this section has no impact on the security level of the employee
Termination checkbox on this form identifies the removal of access to systems, buildings and information that the employee can access. This checkbox should be selected when an employee is on an Interchange Out, Secondment Out and Leave Without Pay (Maternity, Paternity, Education, Parental, Suspension and Sick without pay) or when there is a break in service for an extended period of time.
Part B: Briefing Summary
The manager reads Part B to the employee. After the last paragraph, the manager can list the assets and information that must be returned (for example, photo ID and access cards) and review the continued obligation that the employee has with regards to the safeguard of the information after departure from the department. Additional information is available on the back of the form concerning the security of information.
Part C: Acknowledgement
The employee signs and dates (blue ink). If the employee cannot complete or sign Part C (death in service, resignation while on leave), the employee signature can be left blank and the manager will provide the reason in this space.
Part D: Briefing Official
The manager or delegated official who provided the briefing is to sign and date Part D (blue ink).
The completed Security Screening Certificate and Briefing Form (TBS/SCT 330-47) is then attached to the HR Web application form and is required to complete the separation process. The signed original form must then be sent by internal mail to the Regional Security Office.
Quick reference for completing and returning the Security Screening Certificate and Briefing form (TBS/SCT 330-47)
- Separation Type
- Leave without pay (period of four [4] consecutive weeks/20 business days)
- TBS33047 required
- Yes
- What to send to RSO
-
Briefing is mandatory.
Send signed original Security Screening Certificate and Briefing form (TBS/SCT 330-47) to RSO. Include Photo ID, Access Card.
Recover Photo ID, Access Card, etc. from employee and hold until return.
- Separation Type
- Interchange Out
- TBS33047 required
- Yes
- What to send to RSO
-
Briefing is mandatory.
Recover Photo ID and Access Card, etc. from employee and hold until return.
Send signed original Security Screening Certificate and Briefing form (TBS/SCT 330-47) to RSO. Include Photo ID, Access Card.
Suspend access from systems, buildings and offices.
- Separation Type
- Secondment Out
- TBS33047 required
- Yes
- What to send to RSO
-
Briefing is mandatory.
Recover Photo ID and Access Card, etc. from employee and hold until return.
Send signed original Security Screening Certificate and Briefing form (TBS/SCT 330-47) to RSO. Include Photo ID, Access Card.
Suspend access from systems, buildings and offices.
Step 4-6 - Attaching documents
As instructed in the Cost Centre Checklist, once signed, the Security Screening Certificate and Briefing Form (TBS/SCT 330-47) must be uploaded back into the system. The original (hard copy) signed TBS33047 form as well as a signed copy of the Separation Clearance Form must be sent, by internal mail, with the departing employee's Photo ID Card attached, to the RSO. The access card(s) must be returned to the issuance office (e.g. on-site management).
To upload a document
Option A: click "Browse files" to find the document that will be uploaded. Once the document is found, click "Open" and the document will appear in the documents section shown below. Click "Submit Request" if you are ready to submit the separation clearance request to the Enabling Services Branches for processing or click “Save” to save the changes.
Option B: drag and drop your file from your folder to the documents section shown below. Click "Submit Request" if you are ready to submit the separation clearance request to the Enabling Services Branches for processing or click “Save” to save the changes.
***Please note that clicking “Save” button will not transmit your request Enabling Services Branches, it will remain in “New request” status. You must click "Submit Request" button in order to transmit the request to the Enabling Services Branches.
Step 4-7 - Returning the Photo Identification (ID) Card / Access Cards/Keys
Managers are required to ensure that the Photo ID, access cards and control keys of the departing employee are collected and returned to the appropriate/identified responsible authority (e.g. all Photo ID cards returned to the Regional Security Office (RSO); the access card and keys returned to the issuance office (e.g. on-site management).
If the employee's Home manager cannot retrieve the Photo ID, access card(s) or keys directly from the employee (e.g. employee and manager located in separate locations), the Home manager can make arrangements with a Host manager, from that site, to retrieve the items from the employee and confirm by email to the Home manager when this is complete. (Note: The Home manager is still responsible for returning these items to the appropriate issuance office.)
Once you have completed all of the Cost Centre Checklist items, you must enter a Cost Centre Manager's comment which is used to capture additional information with regard to the request. For example: if you were unable to scan and attach any of the requested documentation you can indicate that you have mailed the documents, or add a general comment to indicate that all necessary steps have been completed.
You are now ready to submit the Separation Clearance form to the Enabling Services Branches for processing.
*** Important ***
You must be a manager with FAA section 34 delegation to submit the request to the applicable Enabling Services Branches.
You must enter a Cost Centre Manager’s comment in the “Cost Centre Manager Comments” field before transmitting the request to the appropriate Enabling Services Branches. If you do not have any additional information with regard to the request, you can enter “N/A” in the Cost Centre Manager Comments field.
If you are a manager with FAA section 34 delegation and have reviewed and approved the complete Cost Centre Checklist, click the “Submit request” button to transmit the request to the applicable Enabling Services Branches. This attests that you have reviewed and actioned the entire Cost Centre Checklist.
After you have submitted the Separation Clearance form to the Enabling Services Branches you will receive a confirmation email. In the event that one of the Enabling Services Branches requires additional information they may contact you directly or use the "return to client" functionality.