Signatures of Applicants and Managers on Security Forms
Long description
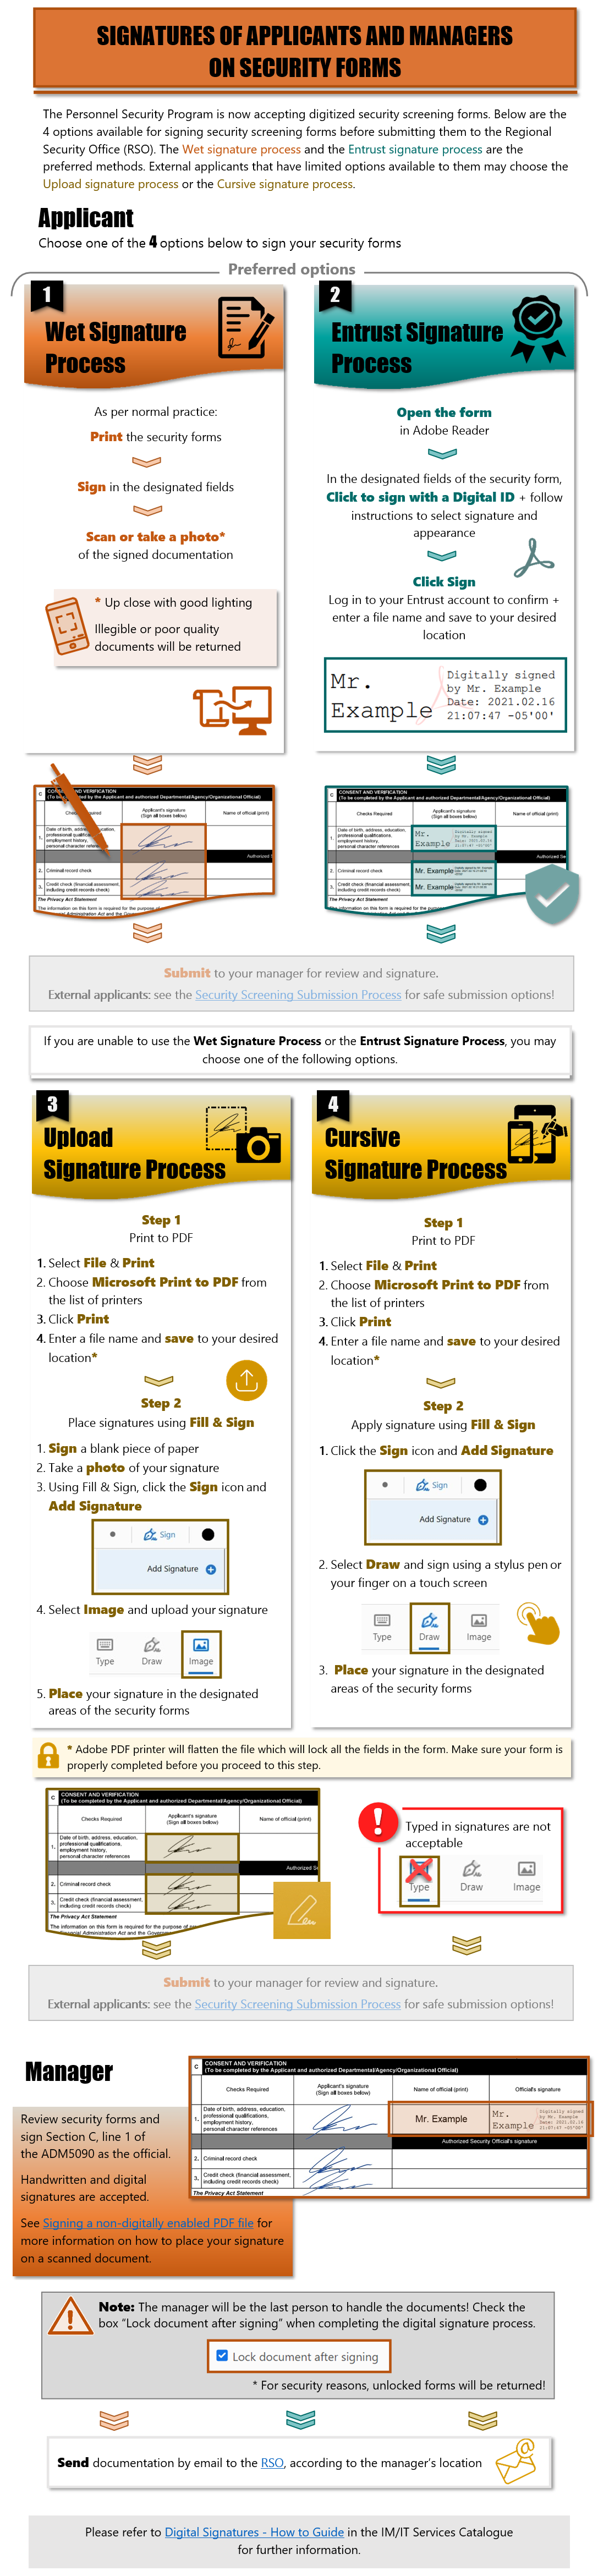
Signatures Of Applicants And Managers On Security Forms
The Personnel Security Program is now accepting digitized security screening forms. Below are the 4 options available for signing security screening forms before submitting them to the Regional Security Office (RSO). The Wet signature process and the Entrust signature process are the preferred methods. External applicants that have limited options available to them may choose the Upload signature process or the Cursive signature process.
The applicant must choose one of the following 4 options to sign the security forms.
Preferred Options
1. Wet Signature Process
As per normal practice:
- Print the security forms.
- Sign in the designated fields.
- Scan or take a photo* of the signed documentation.
- Submit to your manager for review and signature.
* Insure that the photo is taken up close with good lighting. Illegible or poor quality documents will be returned.
External applicants: see the Security Screening Submission Process for safe submission options!
2. Entrust Signature Process
- Open the form in Adobe Reader.
- In the designated fields of the security form, Click to sign with a Digital ID + follow instructions to select signature and appearance.
- Click Sign
- Log in to your Entrust account to confirm and enter a file name and save to your desired location.
- Submit to your manager for review and signature.
Mr. Example
Digitally signed by Mr. Example,
Date: 2021.01.16,
21:07:47 - 05'00'
External applicants: see the Security Screening Submission Process for safe submission options!
If you are unable to use the Wet Signature Process or the Entrust Signature Process, you may choose one of the following options.
Other Options
3. Upload Signature Process
Step 1 Print to PDF
- Enter a file name and save to your desired location. (Adobe PDF printer will flatten the file which will lock all the fields in the form. Make sure your form is completed properly before you proceed to this step).
- Select File & Print
- Choose Microsoft Print to PDF from the list of printers
- Click Print
- Submit to your manager for review and signature.
Step 2 Place signatures using Fill & Sign:
- Sign a blank piece of paper
- Take a photo of your signature
- Using Fill & Sign, click the Sign icon and Add Signature
- Select Image and upload your signature
- Place your signature in the designated areas of the security forms
* Adobe PDF printer will flatten the file which will lock all the fields in the form. Make sure your form is properly completed before you proceed to this step.
External applicants: see the Security Screening Submission Process for safe submission options!
4. Cursive Signature Process
Step 1 Print to PDF:
- Select File & Print
- Choose Microsoft Print to PDF from the list of printers
- Click Print
- Enter a file name and save to your desired location*
- Submit to your manager for review and signature.
Step 2 Apply signature using Fill & Sign:
- Click the Sign icon and Add Signature
- Select Draw and sign using a stylus pen or your finger on a touch screen
- Place your signature in the designated areas of the security forms
Note: a typed in signature using the Type option within Fill and Sign is not acceptable.
* Adobe PDF printer will flatten the file which will lock all the fields in the form. Make sure your form is properly completed before you proceed to this step.
External applicants: see the Security Screening Submission Process for safe submission options!
The manager must review the security forms and sign section C, line 1 of ADM5090 as the person responsible. Digital and wet signatures are accepted. Refer to the link Signature d'un fichier PDF non numérique for more information and methods to place your signature on a scanned document.
The manager is the last person to manipulate the documents! Check the Lock the document after signature box once you have completed the digital signature process.
Finally, send the documentation to the Regional Security Office (RSO) by email, in respect to the location of the manager.
Please refer to the Digital Signatures — How to Guidein the IM/IT iService catalogue for more information.