Windows 10
Topics
Security
- My Windows 10 firewall is not configured!
- How do I sign out of Windows 10 (i.e. log off)?
- How do I lock my desktop?
- What are the end-of-day procedures for working outside of the office (with VPN connection)?
- What are the end-of-day procedures for working in the office?
Tools
- How do I use the File Explorer?
- How can I quickly switch between running software?
- How do I change which software opens a file?
- How can I quickly find and reopen a recently used file?
- How do I search for a file or folder on my computer?
- How do I find my computer name?
- How do I check my Windows 10 version?
Customize
- How do I customize my Start menu tiles?
- How do I add a new icon to the Taskbar?
- How do I create a new desktop shortcut?
- How do I change my default internet browser?
- How do I change (or hide) the taskbar's location?
- How do I change the sound of a Windows event?
- How can I display the time in a different time zone?
- How do I change the size of the icons on my desktop?
- How do I personalize my desktop (background, colour, font size)?
- How do I change my keyboard language?
- How do I change my Windows language setting?
Troubleshoot
- What do I do if a shortcut no longer works?
- What should I do if my computer or Windows won't start?
- How do I obtain access to a file or folder where "Access is denied"?
- Why is my computer telling me it needs to restart?
- How (and why) do I clean up my desktop files?
My Windows 10 firewall is not configured!
Windows 10 Firewall Configuration Message
ESDC uses a firewall (a component of information technology [IT] security) to help protect our electronic network. The firewall configuration, which best protects our department, ironically causes this Windows 10 message to occasionally appear. This message cannot be completely prevented from occurring, but it can be disregarded when you see it.
How do I sign out of Windows 10 (i.e. log off)?
Sign Out of Windows 10 (i.e. log off)
Note: if you are not familiar with end-of-day procedures while working in the office or outside of the office, you should visit/review that content now.
Signing out of Windows 10 requires that you restart your computer:
- Open the Windows Start menu. On the left-hand margin, select the Power icon.

- Select the option Restart to close your account but stay connected to the network.
Still need assistance? Submit an online service request to the National Service Desk.
- Open the Windows Start menu. On the left-hand margin, select the Power icon.
How do I lock my desktop?
Lock Your Desktop
Always lock your desktop when you will be away from your computer. This is an important practice for our Department's security procedures: lock before you walk!
Simultaneously press Ctrl + Alt + Del on your keyboard, then select Lock.
To unlock your desktop when you return, press Ctrl + Alt + Del on your keyboard again and then enter your network password.
Still need assistance? Submit an online service request to the National Service Desk.
What are the end-of-day procedures for working outside of the office (with VPN connection)?
End-of-Day Procedures When Working Outside of the Office (i.e. laptop or tablet with VPN connection)
Make sure you sign off from your laptop at the end of every work day. Important software updates, security updates/patches and security scans are applied overnight. Only laptops connected to the network (powered on and connected via VPN) receive these updates.
To sign off when working outside of the office using VPN, at the end of your workday:
- Open the Windows Start menu. On the left-hand margin, select the Accounts icon.

- Select the option Sign out to close your account but stay connected to the network via VPN.
- On the next day, please restart your computer prior to logging in to VPN. (Getting Started with VPN)
Still need assistance? Submit an online service request to the National Service Desk.
- Open the Windows Start menu. On the left-hand margin, select the Accounts icon.
What are the end-of-day procedures for working in the office?
End-of-Day Procedures for Working in the Office
It is important that you restart your computer at the end of every work day. Important software updates, security updates/patches and security scans are applied overnight. Only computers that are connected to the network and powered on will receive these updates. This includes desktop computers as well as laptops or tablets placed in a docking station.
To restart your computer when working in the office, at the end of your work day:
- Open the Windows Start menu. On the left-hand margin, select the Power icon.
- Select Restart to close your account and restart your computer.
Still need assistance? Submit an online service request to the National Service Desk.
- Open the Windows Start menu. On the left-hand margin, select the Power icon.
How do I use the File Explorer?
Using the File Explorer and Quick Access
The File Explorer (formerly called Windows Explorer) is a simple interface for finding files and folders on your computer and network drives. To open it: from the Windows Start menu, select Windows System and then select File Explorer (or right-click the Start menu icon and select File Explorer).
The File Explorer is divided into a number of areas:
- At the top of the File Explorer, a pathname describes the current folder you are viewing.
- The left panel of the File Explorer describes the various drives you have access to. Its top section provides Quick Access to particular folders.
- The right panel displays the contents of the folder you are currently viewing.
You can add a folder you use frequently to the Quick Access section of the left pane, to more quickly access it without having to navigate to it every time (noting that this will not change the actual location of the folder):
- Using the left and/or right panels, navigate to your frequently used folder.
- Drag-and-drop its folder icon from the right panel to the Quick Access section of the left panel. It will now appear there as a new pinned item (or: right-click the folder in the right panel and select Pin to Quick Access.)
To unpin a Quick Access item, right-click on the item in the right-hand pane and select Unpin from Quick Access.
Still need assistance? Submit an online service request to the National Service Desk.
How can I quickly switch between running software?
To easily view and select among all software that is currently running, hold down the Windows Logo key
 and press Tab on your keyboard.
Another way to view everything that you currently have running:
- While holding down the Alt key on your keyboard: press the Tab key once to see all running programs. Cycle through them by pressing the Tab key multiple times, or use the keyboard's arrow keys to navigate.
- Release the Alt key when you have selected the program you want to use.
Still need assistance? Submit an online service request to the National Service Desk.
How do I change which software opens a file?
Changing Which Software Will Open a File
Sometimes a particular file, or all files of a particular type (e.g. all PDF files), will not open in the expected software. This could be because Windows does not associate the file type with the software that you prefer to use when viewing these files.
To change the file association for one file:
- Navigate to the file using File Explorer (from the Windows Start menu, select "Windows System" and then select "File Explorer").
- Right-click the file's name/icon and select "Open With".
- A list of options will appear to the right; you may select one of these (and skip the remainder of these steps.)
- If you don't see your preferred option, select "Choose another app".
- In the "How do you want to open this file?" dialogue box, select "More Apps". Choose your preferred option from this expanded list, or else select "Look for another app on this PC" to initiate a search on your computer.
To change the file association for all files of that type:
- In the Windows Start menu, select the "Settings" icon.
- In the "Find a setting" search box, enter the word "Default". From the search results, select "Default app settings".
- Scroll to the bottom and select "Choose default applications by file type". It may take a moment to display this list.
- In the list that appears, file types will be listed alphabetically on the left-hand side. Scroll down this list until you see the extension of the file type you are looking for (e.g. ".pdf" for changing how you view PDF files).
- Select the name of the software currently listed next to this file type (or else select "Choose a default" if no software is associated.)
- From the list of software options that appears, select the software that you would normally use to open this file type (e.g. for a PDF file, you might choose Adobe Acrobat Reader).
Note: if you see the following message: "There is no currently installed application for this type of file or protocol", it means that there is no software on your computer that is able to open this type of file.
Still need assistance? Submit an online service request to the National Service Desk.
How can I quickly find a recently used file?
Using a Jump List
Windows provides jump lists for quickly finding recently opened files.
In the Windows Start menu, right-click on the name of the program you were using to view that file. At the bottom of the options that appear you'll see the header Recent, followed by the jump list of files most recently opened in that program.
Note: you can select the pin icon next to a jump list entry, to keep that entry listed after it is no longer considered recently opened.
Still need assistance? Submit an online service request to the National Service Desk.
How do I search for a file or folder on my computer?
Searching for Files and Folders in Windows 10
Select the Windows Start menu to open it, and begin typing the name of what you are searching for. The menu will immediately switch to a search function, and it will display the Best Match for what you are typing. Select your choice from the list of results.
Note: you can select Filters in the top-right corner of the search function to limit the range of your search results.
Still need assistance? Submit an online service request to the National Service Desk.
How do I add a new icon to the Taskbar?
Pinning (or Unpinning) an Item to the Taskbar
Your Windows taskbar can host pinned icons for launching software, saving you from having to find them in your Windows Start menu. All of the following methods are available for pinning an item to the taskbar:
- In the Windows Start menu you can right-click on an item, select More, then select Pin to Taskbar.
- If the item is a program that is running, you can right-click the program's button on the taskbar and select Pin to taskbar.
- Drag-and-drop the program's shortcut from the desktop to the taskbar.
- Drag-and-drop the shortcut of a file, folder, or website to the taskbar.
To unpin a program, document or website from the Taskbar:
- Right-click the pinned item you want to remove and select Unpin from taskbar.
Still need assistance? Submit an online service request to the National Service Desk.
How do I create a new desktop shortcut?
Creating a Desktop Shortcut
A desktop shortcut is an icon that remains on your Windows background screen. It provides an easy way to access a file or program, and is an alternative to pinning an item to the taskbar. It is best to maintain shortcuts for only a small number of items, to avoid confusion.
Note: while shortcuts pose little risk (i.e. icons with arrow symbols attached), you should not store actual documents on your desktop.
To create a new desktop shortcut:
- From the Windows Start menu, select Windows System and then select File Explorer (or right-click the Start menu icon and select File Explorer)
- Navigate to the location (i.e. folder) containing the item for which you want to create a shortcut.
- Right-click the item and select Create shortcut.
- If a message offers you an option to place the shortcut on your desktop, select the Yes button.
- Otherwise, the new shortcut will appear as a new item in that same folder. You can drag-and-drop this shortcut item from your folder to your desktop (or else use the copy/paste commands), and it will appear on your desktop as a new icon.
Still need assistance? Submit an online service request to the National Service Desk.
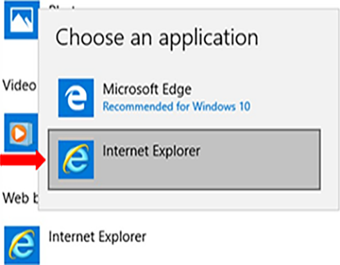
How do I change my default internet browser?
Changing the default internet browser
Internet Explorer is set as your default browser in Windows 10. Unless you prefer to change this setting, this is the browser that will open whenever you select a hyperlink in a document, email, etc.
To select a different default web browser:
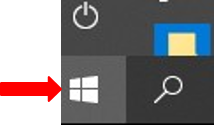
- Select the Windows Start button.
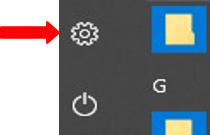
- Select the Settings icon (i.e., the gear image).
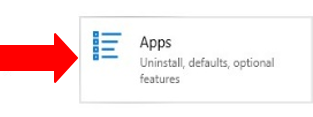
- In the "Windows Settings" screen, select "Apps".
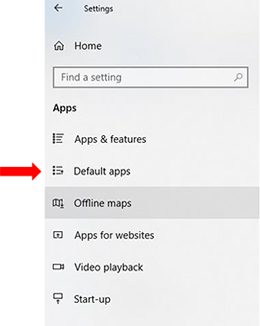
- Select Default Apps.
- Scroll down to Web Browser and select the current default browser (i.e., Microsoft Edge as shown in the example below).
- Select the browser of your choice (i.e., Internet Explorer) from the application choices.
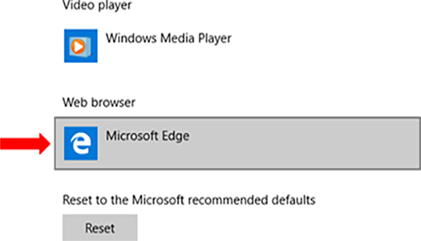
- Your new default browser is now set.
Direct all enquiries to the Enterprise Project Management Office.
Still need assistance? Submit an online service request to the National Service Desk.
How do I change (or hide) the taskbar's location?
Moving and/or Hiding the Windows 10 Taskbar
By default the Windows 10 taskbar will appear along the bottom of your screen. You can choose instead to move it to the top or one of the sides of your screen, if this is your preference (noting that in future, when you are reading any Windows reference, it will typically provide directions on the assumption that your taskbar is in its default position.)
To change the Windows 10 taskbar’s location:
- First ensure that it is not locked in position. Right-click on any empty portion of your taskbar, and look for the Lock the taskbar option. If a checkmark appears next to it, select this option to remove the checkmark and deactivate the lock.
- If the taskbar position is not locked: hold down the left mouse button on an empty portion of the taskbar and drag it to its preferred position at one of the other three sides of your screen. Alternatively, you can right-click on an empty portion of the taskbar and select Taskbar Settings, then choose your preferred location for the taskbar from the Taskbar location on screen drop-down menu.
- Optional: you can lock the taskbar in its new position if you wish (i.e. right-click an empty portion of the taskbar, and select Lock the taskbar to place a checkmark next to it).
To “hide” the Windows 10 taskbar, so that it only appears when you place your mouse at its position on your Windows screen:
- Right-click on an empty portion of the taskbar and select Taskbar settings.
- Select the option Automatically hide the taskbar in desktop mode (or select Automatically hide the taskbar in tablet mode if you are using tablet mode.)
Still need assistance? Submit an online service request to the National Service Desk.
How do I change the sound of a Windows event?
Changing Windows Event Sounds
To change a sound associated with a Windows event:
- From the Windows Start menu, select Windows System and then Control Panel
- Choose Hardware and Sound
- Under the Sound heading, select Change system sounds
- Select the Sounds tab, then locate and select a Windows event in the list that you wish to alter the sound for.
- Select an alternative sound from the drop-down list just below. Use the Test button to hear the sound you select.
- When you have made your choice, select OK
Still need assistance? Submit an online service request to the National Service Desk.
How can I display the time in a different time zone?
Displaying Different Time Zones (Clock Settings)
Your computer’s clock (bottom-right corner of the Windows screen) corresponds with your current time zone. It will automatically correct for daylight savings. You can alter the time zone that is displayed, or add additional clocks that will show you the time in other zones.
- Change the Displayed Time Zone
- Right-click on the clock in the lower right corner of your Windows screen and choose Adjust date/time. In the Settings window for Date & Time, if Select time zone automatically is turned on, turn it off to access the Time zone setting.
- Select the Time zone drop-down menu to choose a different time zone. The change takes place immediately.
- Use the X button to close this window.
- Add Additional Clocks
You can add up to two additional clocks to your display:
- Right-click on the clock in the lower right corner of your Windows screen and choose Adjust date/time
- In the Settings window for Date & Time, on the right-hand side under the heading Related settings, select Add clocks for different time zones.
- On the Additional Clocks tab, place a checkmark next to the additional clocks you wish to have displayed. For each clock, select its time zone and enter a meaningful display name. When you are done, select OK (then use the X button to close the Settings window).
To see the additional clock(s), select your system clock or hover your mouse over it.
Still need assistance? Submit an online service request to the National Service Desk.
- Change the Displayed Time Zone
How do I change the size of the icons on my desktop?
Changing the Size of Desktop Icons
- Method 1:
- Right-click on any empty area of the Windows desktop. Select View, then choose Large, Medium or Small icons.
- Method 2:
- This method provides more size options but requires a mouse with a scroll wheel. Left-click on any empty area of the desktop to ensure that no applications are selected. Hold down the CTRL button on your keyboard as you adjust the scroll wheel, to adjust the size of all desktop icons. Making this adjustment may change the position of icons on your screen.
Still need assistance? Submit an online service request to the National Service Desk.
- Method 1:
How do I personalize my desktop (background, colour, font size)?
Personalizing your Desktop (Background, Colour, Font Size)
- Change Your Desktop Background
- Right-click on a blank area of your desktop and select Personalise
- If Background options are not displayed, select Background from the left-hand menu.
- Select an alternative picture from those displayed, or use the Browse button to select a saved image on your computer. Your selected picture immediately becomes your background image.
- Optional: use the Choose a Fit drop-down box to adjust how your selected background will be displayed.
- Change the Colour Scheme
- Right-click on a blank area of your desktop and select Personalise
- Select Colours from the left-hand menu
- From the Windows colours panel, select your accent colour.
- Optional: under More Options you can also turn transparency effects on/off, choose the show the accent colour on the taskbar, title bars, etc., and/or switch to white-on-black text if you prefer. All changes are made immediately.
- Change the Font Size
- Right-click on a blank area of your desktop and select Display settings
- Under the Scale and layout sub-heading, select a different option from the Change the size of text, apps and other items drop-down box.
Still need assistance? Submit an online service request to the National Service Desk.
- Change Your Desktop Background
How do I change my keyboard and language settings?
Your current language settings can be observed in the Windows System Tray (bottom-right corner of your screen). There are two components: the “input language” (e.g. ENG, FRA) and the “keyboard layout” (e.g. US, CAFR).
- Input language (e.g. ENG, FRA) determines things like date settings, reading direction, dialogue layouts, etc. Select the language you prefer working in by using the left ALT + SHIFT shortcut, observing which abbreviation appears in the Windows System Tray at the bottom-right corner of your screen.
- Keyboard layout (e.g. US, CMS) determines what each key of your keyboard will do when you press it. You will need to select the CMS layout, for example, if you wish to enter French accents. Select the keyboard layout you prefer by using the left CTRL + SHIFT shortcut, observing which abbreviation appears in the Windows System Tray at the bottom-right corner of your screen.
You can set a different preferred keyboard layout for each input language, so that when you change your input language the keyboard layout will also be changed (e.g. ENG/US will switch to FRA/CAFR).
To review your language settings:
- Select the language setting abbreviations in the Systems Tray and choose “Language preferences” (or: in the Windows Start menu select “Settings” and choose “Time and Language”, then select “Region & Language” from the left-hand side).
- Under the heading “Preferred languages” you will find a list of your current input language options.
- Select one of these input languages and choose “Options” to see the keyboard layouts associated with that language. You can add or remove layouts from this list, to either simplify your choices in this language or give you more to choose from.
Note: Some documents may have a section dedicated to a particular language by the document’s creator. You may discover that your language settings are changed for your when you place your cursor in that section of the document.
Still need assistance? Submit an online service request to the National Service Desk.
How do I change my Windows display language?
The following instructions will alter the language in which Windows and its applications are displayed. Please note that completing this process will require you to restart your computer.
- In the Windows Start menu select “Settings” and choose “Time and Language”, then select “Region & Language” from the left-hand side.
- In the “Languages” section under “Windows display language”, you will see your current display language is selected. Open this drop-down menu to select an alternative language.
- A new sentence in red font appears: “Will be display language after next sign-in”.
- Restart (or Log off) your computer now if you wish this change to take effect immediately. Whether it is now or later, the next time you log back into Windows your system and display settings will be in the other language.
Still need assistance? Submit an online service request to the National Service Desk.
What do I do if a shortcut no longer works?”
Repairing a Broken Shortcut Icon
Shortcut icons are distinguished by a small arrow in a white box on the icon’s bottom-left corner. If your shortcut icon is not working, first ensure that the software it is a shortcut for is installed and successfully runs on your computer:
- Go the Windows Start menu, or select the Search icon next to it (magnifying glass).
- Type the name of the software and select it from the Best Match list.
If the software is not listed or it will not open, you probably need to have this software reinstalled. Otherwise the problem is with the shortcut itself: you need to delete and then create a new shortcut for this software.
Still need assistance? Submit an online service request to the National Service Desk.
What should I do if my computer or Windows won’t start?
Basic Solutions for Computer Start-Up Problems (before contacting National Service Desk)
- Ensure that the computer is plugged in, turned on, and that all other cables are firmly and properly connected.
- Ensure your computer and monitor(s) are powered on.
- If your computer starts, but Windows will not: power off your computer completely and wait at least one minute (60 seconds) before trying again.
Still need assistance? Submit an online service request to the National Service Desk.
How do I obtain access to a file or folder where “Access is denied”?
Obtain Access to a File or Folder (i.e. “Access is denied” message)
If you have recently changed jobs (e.g. moved from another office or department), you may encounter an “Access is denied” message when attempting to open a file or folder on a network drive that you require for your work.
Inform your team leader or manager (or other approved requestor). That person must complete the online AMP form (found on the National Service Desk web portal) for you to receive this permission.
Still need assistance? Submit an online service request to the National Service Desk.
Why is my computer telling me it needs to restart?
“Your computer is about to restart” notification
You may observe a pop-up window notification advising you that your computer will restart in thirty minutes to complete the installation of an application or software update. This notification is for the final thirty minutes of a twenty-four hour countdown and cannot be delayed further.
If this message is displayed, you should immediately save and close any work you have open.
You may initiate the restart yourself when you are ready, or wait for it to happen automatically:
- Restarting your desktop computer
- Open the Windows 10 Start menu. On the left-hand margin select the Power icon and choose Restart
- Restarting your laptop computer
- Open the Windows 10 Start menu. On the left-hand margin select the Power icon. Select the option Logoff to close your account but stay connected to the network via VPN
At any time you can review the status of this countdown in progress by selecting the green sunburst icon
 from the Windows system tray. This icon disappears and the countdown ends if you Restart your computer at any time within the countdown period.
If your computer or its software behaves in an unusual way that interferes with your work, the delayed restart may be causing the issue. Before you request assistance from the National Service Desk, first ensure that you restart your computer to remove this icon and discover whether your problem is resolved.
To avoid this potential interruption to your work day, and to ensure that important software updates, security updates/patches and security scans are applied overnight to your work device, make sure you restart your computer every day. Only desktops connected to the network (powered on) and laptops connected to the network (powered on and connected via VPN) receive these updates.
Still need assistance? Submit an online service request to the National Service Desk.
- Restarting your desktop computer
How (and why) do I clean up my desktop files?
Replacing Files with Shortcuts on your Windows Desktop
Always maintain shortcuts rather than files on your desktop, to avoid the risk of losing these files if your computer fails. This also serves to keep these files accessible when you use a different computer.
A shortcut icon has an arrow in a small white box, at its bottom-left corner. Icons for files will not have this arrow. To remove a file from your desktop and replace it with a shortcut, first you must move the file to your F: network drive:
- Select the file’s icon on your Windows desktop and then pressing Ctrl + X (i.e. Cut) on your keyboard.
- Open File Explorer: from the Windows Start menu, select Windows System and then select File Explorer (or, right-click the Start menu icon and select File Explorer).
- Navigate to an appropriate folder on your F: drive.
- Press Ctrl + V (i.e. Paste) on your keyboard to paste the file into this folder.
To place a shortcut icon on your Windows desktop that will link to the file:
- Select the file and right-click (or press Shift + F10) and choose Create Shortcut. A new shortcut will be created, appearing in the same folder as your file.
- Select the Shortcut and press Ctrl + X (i.e. Cut) on your keyboard.
- Return to your Windows desktop and press Ctrl + V. The shortcut is now located on your desktop, and points to your file on the F: drive.
Regularly review the shortcuts on your desktop, to delete any that are no longer needed or obsolete. This will reduce the time required to login to your computer, and it will place less strain on the electronic network.
Still need assistance? Submit an online service request to the National Service Desk.
Finding your computer name
Your computer name is often required and must be included when submitting an IM/IT request to the National Service Desk.
In Windows 10:
- Select the Windows Start menu.
- Using your keyboard, type “Computer name”.
- Choose the search result, “View your PC name”.
- In the “Settings” window that opens, your computer name appears as “Device name” in the “Device Specifications” section.
How do I check my Windows 10 version?
The Windows 10 version number may be required when you are submitting an online request to the National Service Desk.
- Select the Windows Search button and then type “About”.
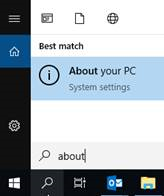
- From the search results, select “About your PC”.
-
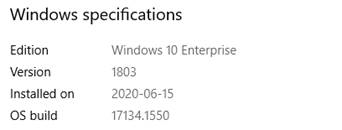
In the Settings window, scroll down to the “Windows specifications” section to check which version of Windows your computer is running.
- Select the Windows Search button and then type “About”.