Monitors
Topics - Dual Monitors
- Dual Monitors - Ergonomic Tips for Employees (OHS)
- Guide to Connecting Desktop or Laptop to Dual Monitors (including support arm for monitor)
- How to Change Settings for Dual Monitors in Windows 10
- Dual monitors and tablets
- How do I connect a second monitor to a laptop?
- What do I do if the cursor does not move properly from one screen to the other?
- What do I do if the cursor gets stuck or lost?
- What do I do if the Taskbar indicates an application is open but it does not appear on a monitor?
- How do I adjust the font size on my monitor(s)?
- How do I change the screen resolution?
- How do I disable sleep mode?
- How do I move the Start bar?
- How do I remove the black bars on the sides of the screen(s)?
- How do I turn on or off SmartImage mode?
- How do I adjust my monitor lighting for optimal eye comfort?
- My issue is not in this list
How to Change Settings for Dual Monitors in Windows 10
Note: The instructions below apply to any type of monitor setup.
To adjust settings for dual monitors:
- From the Windows Start menu, select the “Settings” icon on the left.
- Choose “System”, and then “Display”.
- If you want to change which monitor is your main one, first start by selecting the “Identify” button in order to identify the monitor setup.
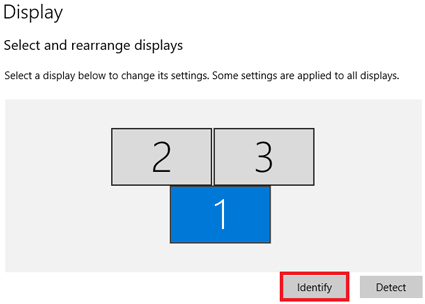
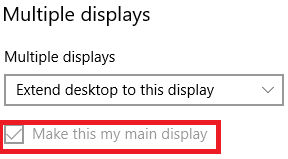
- Next, select the monitor within the “Select and rearrange displays” and then scroll down until you see the “Make this my main display” option. Select the option to automatically apply it.
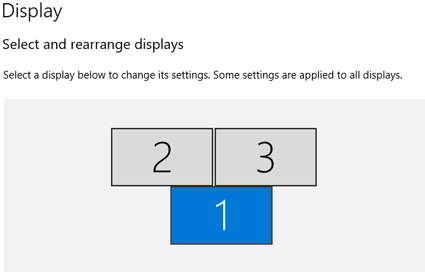
- Example 1: You have two external monitors and you are using your laptop monitor. If your two external monitors are side-by-side and your laptop monitor is in the middle, then make sure in the diagram that your two external monitors are side-by-side and your laptop monitor is underneath in the middle so that when you move your mouse cursor from monitor to monitor, it will behave properly.
- Example 2: You have two external monitors side-by-side. Make sure in the diagram that they are side-by-side, putting your left monitor is on the left side and putting your right monitor is on the right side. If your left monitor is number 1 and right monitor is number 2, then click and hold your monitor 1 to slide it to the left side. Your right monitor will automatically switch to the right side. Select “Apply” to save settings.
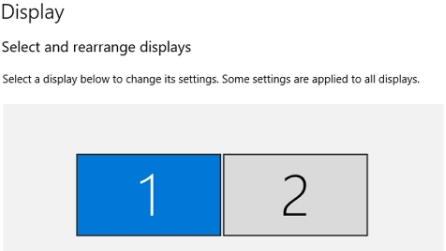
- Example 3: You have one external monitor and one laptop monitor side-by-side. Make sure in the diagram that they are side-by-side, putting your left monitor is on the left side and that your right monitor is on the right side. Usually, laptop monitors are detected as monitor 1 by Windows automatically and your external monitor as monitor 2. If your external monitor is on the left side and your laptop monitor to the right side, then click and hold your external monitors (monitor 2) and slide to the left side. Your laptop monitor (monitor 1) will automatically switch to the right side. Select “Apply” to save settings.
- Example 1: You have two external monitors and you are using your laptop monitor. If your two external monitors are side-by-side and your laptop monitor is in the middle, then make sure in the diagram that your two external monitors are side-by-side and your laptop monitor is underneath in the middle so that when you move your mouse cursor from monitor to monitor, it will behave properly.
- A window will appear to ask “Keep these display settings?” If you are satisfied, select “Keep Changes”. Otherwise, after 15 seconds the original setup will be restored; or you can immediately restore it by selecting Revert.
- When you are satisfied with your monitor settings, you can close the “Display” window.
If Windows does not automatically extend your monitors after detecting all of your monitors, press the Windows key + P. This will open another window. Select “Extend” to extend your monitors.
Monitor Setting Options
The “Scale and layout” options (found in “Display”) include the following drop-down menus:
- “Change the size of text, apps and other items.”
- “Resolution” changes the resolution of each monitor.
- “Orientation” switches the selected monitor’s orientation between portrait and landscape.
Dual monitors and tablets
Tablets are capable of supporting dual monitors while in their docking station. This installation requires additional cabling and the assistance from an IT professional.
Be sure to mention that you are using a tablet when submitting a request for dual monitors (and vice versa).
Please visit the Quick Fixes for Tablets section for information on eligibility and functions.
How do I connect a second monitor to a laptop?
Connecting your laptop to a second monitor
When plugging a monitor into a laptop, Windows 10 should automatically detect it and provide you with multiple display options.
- Extend your displays: This spreads your desktop over both monitors and lets you drag items between the two screens. This is how most people use two monitors, and it's the default setting.
- Duplicate your displays: This displays the same desktop on both monitors. For a laptop, this is the default setting. This is useful if you're giving a presentation with your laptop connected to a projector or large monitor.
- Show your desktop on only one monitor: This is most commonly used with a laptop if you might want to keep your laptop screen blank after you connect to a large desktop monitor.
To change how the monitors display your desktop:
- Right-Click on a blank spot on your Desktop.
- Choose the Screen Resolution menu item and the Screen Resolution dialogue box will open.
- Under Multiple Displays, select how to display the monitors.
- Click Apply > OK.
What do I do if the cursor does not move properly from one screen to the other?
How you can make your cursor move properly from one screen to the other
- Right-click on a blank spot on your Desktop.
- Choose the Screen Resolution menu item and the Screen Resolution dialogue box will open.
- Make sure you know which monitor is which by clicking on Identify. A large number 1 and 2 will appear on each monitor.
- In the Screen Resolution dialogue box, click and drag one of the monitors so it reflects the physical setup on your desk.
- Click Apply > OK.
What do I do if the cursor gets stuck or lost?
What to do if the cursor gets stuck or lost
The monitors are either not correctly aligned in the Screen Resolution screen, or the monitors are different resolutions and thus different “sizes”, so you have to move the mouse around the edges of the ‘smaller’ monitor.
- Right-click on a blank spot on your Desktop.
- Choose the Screen Resolution menu item and the Screen Resolution dialogue box will open.
- Click and drag one of the monitors in the Screen Resolution dialogue box so that the monitor edges line-up.
What do I do if the Taskbar indicates an application is open but it does not appear on a monitor?
The Taskbar indicates an application is open but it does not appear on a monitor
An application may appear in the Taskbar but not be accessible on a monitor. This may be caused by a third display monitor, or "phantom screen". To remove the phantom screen configuration options:
- Confirm that your monitor(s) are working properly.
- Right click on the desktop and select Screen resolution.
- From the Display menu, select the Mobile PC Display.
- From the Multiple display dropdown menu, select Disconnect this display.
- Click OK.
How do I adjust the font size on my monitor(s)?
Adjusting the font size on your monitor(s)
- Right-click on a blank spot on your Desktop.
- Choose the Screen Resolution menu item and the Screen Resolution dialogue box will open.
- In the Screen Resolution dialogue box, click on the Make text and other item larger or smaller.
- In the next screen, select from Smaller, Medium or Larger.
- Click Apply > OK.
Please Note: The changes made here will impact both monitors, but will NOT change the font within most programs.
How do I change the screen resolution?
How you can to change your screen resolution
Single monitor instructions:
- Right-click on a blank spot on your Desktop.
- Choose the Screen Resolution menu item and the Screen Resolution dialogue box will open.
- In the Screen Resolution dialogue box, click on the Resolution button.
- A ‘slider’ will appear, allowing you to adjust the resolution.
- Move the slider button to the desired resolution and click the Apply button.
- A new window will appear. You will have 15 seconds to keep the new resolution, or you can revert back to the current resolution. Try different resolutions to suit your needs.
Dual monitor instructions:
- Right-Click on a blank spot on your Desktop.
- Choose the Screen Resolution menu item and the Screen Resolution dialogue box will open.
- In the Screen Resolution dialogue box, select the monitor for which you want to adjust the resolution. Use Identify to ensure you are changing the correct monitor.
- Click on the Resolution button.
- A ‘slider’ will appear, allowing you to adjust the resolution.
- Move the slider button to the desired resolution and click the Apply button.
- A new window will appear. You will have 15 seconds to keep the new resolution, or you can revert back to the current resolution. Try different resolutions to suit your needs.
- Click Apply > OK.
How do I disable sleep mode?
How you can disable sleep mode
Human Sensor / PowerSensor
Some monitors contain sensors to detect a user’s presence in front of the monitor screen. It will automatically switch the monitor into power saving mode when it does not detect anyone in front of the monitor within a specified range. When the user comes back, the power resumes automatically when it detects the user’s presence. The default setting for this sensor is “Medium/3”. You can adjust the sensitivity for more/less, or you can switch off sensor function completely. Adjustments are made using the OSD (On Screen Display) built-in to the monitor.
ASUS (Human Sensor)
- Select > Menu button (found on the monitors right hand edge)
- Select > ‘System Setup’
- Select > ‘Human Sensor’
- Select > Menu button to cycle the options, stop at ‘Off’
- Select > S /A button twice to exit (found on the monitors right hand edge)
BENQ
- Press on any of the white dots on the black edge of the screen.
- Choose the Menu button (square with 3 dots and 4 lines) by pressing the white dot underneath the icon.
- Press the down ( v ) button to navigate down to ECO.
- Press the right ( > ) button to open the ECO menu.
- Press the right ( > ) button to choose ECO sensor.
- Press the down ( v ) button to choose OFF.
- Press the OK ( ✓ ) button.
Don’t press anything else and the menu screen will disappear within 30 seconds.
Philips (PowerSensor)
- Select > Menu button (found on the monitor bottom right hand corner)
- Select > ‘PowerSensor’
- Select > ‘Off’
- Select > ‘<’ button to exit (or wait 15 seconds and it will save and close on its own)
Samsung
- Press the Menu button (bottom right of the screen), and using the arrow buttons move to Source.
- Select Setup & Reset then Source.
- Select MagicEco then Source.
- Select Power Saving Off.
- Select Menu button 3 times to finish.
How do I move the Start bar?
How you can move the Start Bar
You can change the location of Start Bar/Task Bar to any side of any monitor.
(Ensure that “Lock the taskbar” is not checked prior to trying to move the Start Bar/Task Bar. Right-click on a blank spot on the Start Bar/Task Bar and de-select “Lock the taskbar”.)
- Click on a blank spot on the Task Bar and hold.
- Drag the Taskbar to where you want it, and release the mouse button.
How do I remove the black bars on the sides of the screen(s)?
How you can remove the black bars on the sides of the screen(s)
One (or both monitors) have black bars along the side, not using the entire space available. To change this setting:
In the systems tray (part of the toolbar) there will be an icon to access the graphics settings for the desktop. (These instructions are for Intel® HD Graphics but similar settings exist for other graphic cards, i.e. ATI.)
One monitor:
- Left-click on the icon.
- Digital Display …
- Ensure that Maintain Display Scaling is check marked.
Two monitors:
- Left-click on the icon.
- Graphics Options > Panel Fit
- Select either Digital Display -OR- Digital Display (2)
- Ensure that Maintain Display Scaling is check marked.
How do I turn on or off SmartImage mode?
Turning the SmartImage mode on or off
To activate or deactivate the SmartImage mode on your Philips monitor, press and hold the SmartImage button for at least eight (8) seconds.
To locate the SmartImage button, first determine the monitor’s model number (printed on its top left corner.) When you find your monitor’s series of buttons, the SmartImage button will usually be the leftmost button:
Philips Brilliance 225B
There will either be six buttons on the lower right side of the monitor, or five soft touch keys on the bottom centre of the monitor.Philips Brilliance 231P
There are five soft touch keys on the lower right of the monitor.How do I adjust my monitor lighting for optimal eye comfort?
Standard monitor settings cast a blue light, promoting energy throughout the day. In the evening however, this light can interfere with circadian rhythms.
The following instructions describe how to adjust the monitor lighting on your computer, laptop or tablet to circumvent this problem and to achieve the best eye comfort.
Find your Blue Light setting
To find and adjust your blue light level:
- Open your Windows Start menu, and type "night light".
- From the search results, select the "Night Light" system setting.
- In the "Settings" window, you may find an option to select and turn on the Night light setting.
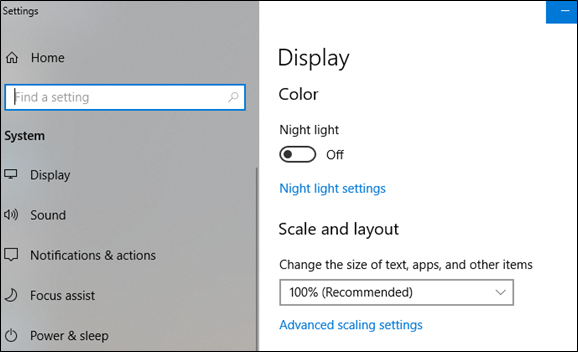
- You may also be able to select "Night light settings" to adjust colour temperature, and to schedule when these settings should take effect.

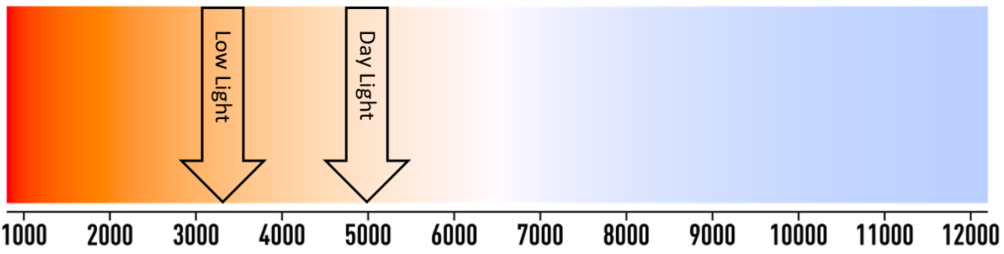
Use this graphic to adjust the Color Temperature Night/Day to the Occupational Health and Safety (OHS) recommended setting, depending on lighting condition, by finding the image above and moving the arrow sliders.