Office 2016
Topics
- Security Warning (Yellow): Macros have been disabled
- Security Warning (Red): BLOCKED CONTENT
- Why can't I launch (i.e. open) my Office applications?
- How do I open a password protected Office document?
- How do I add a Microsoft Office shortcut (Word, Excel, PowerPoint and/or Outlook)?
- How do I add a custom dictionary to Microsoft Office?
- How do I add or delete words in a Custom Dictionary?
- How do I customize the Microsoft Office Ribbon?
- How do I disable Antidote in Microsoft Office?
- How do I change my language preferences?
- My issue is not in this list
Security Warning (Yellow): Macros have been disabled
This is a standard warning and the macros are not blocked.
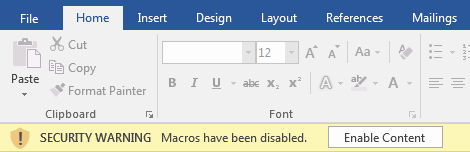
This warning will appear (in a yellow box) to remind you that the document you have opened contains one or more macros. A macro is a small embedded program, designed to do a specific task. Some macros are programmed to activate as soon as their document is opened.
If you trust this document’s origin and you see this warning message, you can select the “Enable Content” button to allow the document to use its macro(s). Only enable macros for documents with content that you trust!
After you have done this once, whenever you open the same document the macros will be enabled automatically without the warning appearing. Once enabled, the macros contained will function normally. If there are issues with a macro, close the document and reopen.
There is another warning that will appear (in a yellow box) to remind you that the document you have opened contains one or more macros and the document is encrypted/password protected.

If “Options…” is selected the following warning is presented.
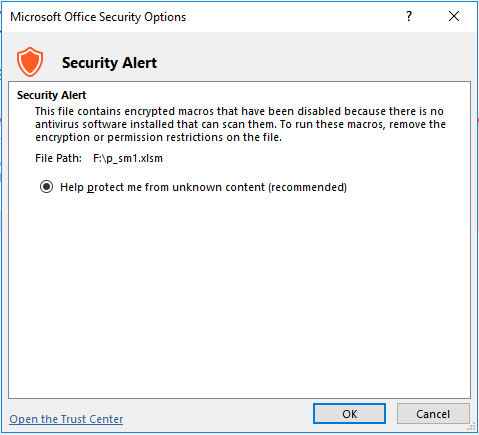
Removing the password protection on the file and saving will bypass this issue.
Security Warning (Red): BLOCKED CONTENT
This warning will appear (in a red box or popup) to inform you that the document you have opened has been flagged as “internet based” and contains one or more macros. A macro is a small-embedded program, designed to do a specific task. Some macros originate from internet solutions such as Outlook/Skype or have code that extends outside the Employment and Social Development Canada (ESDC) network.
If you see a related warning (in a red box) that begins with the words “Blocked Content”, this document contains macros that cannot be enabled. This is likely because the document comes from a source outside of ESDC and its safety cannot be assured.

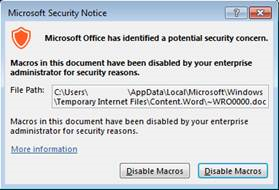
Note: you may instead see a pop-up window entitled “Microsoft Security Notice”, which effectively conveys the same restriction message. Similarly, it does not provide an option to enable this type of macro.
If this error is encountered, ask for the file to be sent again by the originator and if using Outlook/Skype save the file do not open it. Once saved navigate to the files saved location and open it.
Otherwise, these is no way to open the file due to security enforcements in place.
Why can't I launch (i.e. open) my Office applications?
Running the Quick Repair to Fix Problems with Opening Office Software
If you encounter problems with launching (i.e. opening) Office software from a SharePoint directory, a file directory, Outlook attachment or from the programs menu, try the following steps for running Quick Repair to correct this issue:
- On the Windows Start menu, select All Programs and browse to the Microsoft Office 2016 Tools folder, then select Office 2016 Quick Repair.
- This will launch a series of dialogue boxes indicating Preparing to install, followed by Please wait while Windows configures Microsoft Office Professional Plus 2016.
Within several minutes, the repair will be completed and you should be able to open Office software without any issues.
If you do continue to experience this issue, please submit an online request to the National Service Desk and mention that you have already tried this solution.How do I open a password protected Office document?
Open a Password-Protected Document in Office 2016
To open a document protected by a password:
- Obtain the password for the file from its originator, if you did not apply the password yourself.
Unfortunately, there is no way to recover a forgotten password or to open a file that is password-protected if you do not have its password. If you have having difficulty, remember that the password is case-sensitive.
- Proceed to open the Office document in the usual way. A Password window will appear that asks you to enter a password to open the file.
- Enter the password in the text field and select OK.
How do I add a Microsoft Office shortcut (Word, Excel, PowerPoint and/or Outlook)?
Adding an Office 2016 Shortcut to the Windows Desktop
To add a shortcut from Office 2016 to your desktop:
- In the Windows Start menu, select All Programs and then choose the Microsoft Office 2016 folder.
- Select and drag the software (e.g. Outlook) that you want to create a shortcut for to your desktop or to the Quick Launch tray (i.e. on your Windows status bar, next to the Start button) and release the mouse button.
How do I add a custom dictionary to Microsoft Office?
Adding a Custom Dictionary to Microsoft Office
A custom dictionary allows you to add additional words (e.g. work-related) that are not in the basic Microsoft Office dictionary, so they will no longer be flagged by spell-checking. If you have saved a separate custom dictionary .DIC file, follow these instructions to make it accessible by Office 2016:
- Using Windows Explorer, copy your custom dictionary (NameOfDictionary.DIC) into the following folder: C:\Users\[Your User Name]\AppData\Roaming\Microsoft\UProof
- Open Word 2016. On the File ribbon menu, select Options from the left-hand menu.
- In the Word Options window, select Proofing from the left-hand menu.
- In the When correcting spelling in Microsoft Office programs section, select the Custom Dictionaries button.
- In the Custom Dictionaries window, select the Add button.
- In the Add custom dictionary window, browse to locate your dictionary file in the UProof file folder and highlight it, then select Open, OK and OK.
- Your selected custom dictionary now appears in the Dictionary List of the Custom Dictionaries window. Add a checkmark next to it, then select OK.
How do I add or delete words in a Custom Dictionary?
Add or Delete words in a Custom Dictionary
A custom dictionary allows you to add additional words (e.g. work-related) that are not in the basic Microsoft Office dictionary, so they will no longer be flagged by spell-checking.
To add or delete a word in your custom dictionary:
- On the File ribbon menu, select Options from the left-hand menu.
- In the Options window, select Proofing from the left-hand menu.
- In the When correcting spelling in Microsoft Office programs section, select the Custom Dictionaries button.
- In the Custom Dictionaries window, select the Edit Word List… button.
- To add a new word, type the word and select Add (note: as a shortcut, you can also right-click any word in the text of your document and select Add to dictionary).
- To delete words, either type the word that you want to remove or highlight it in the list, then select Delete.
- When you have finished editing your dictionary, select the series of OK buttons to save your changes and close these windows.
How do I customize the Microsoft Office Ribbon?
Customizing a Microsoft Office Ribbon Menu
Ribbon menus can be customized in each program of the Office suite:
- On the File ribbon menu, select Options from the left-hand menu.
- In the Options window, select Customize Ribbon from the left-hand menu.
- On the Customize the Ribbon panel (right-hand side) you will see two columns: a list of available commands, and your current ribbon menu hierarchy. You can expand the ribbon hierarchy by selecting the plus signs next to each main tab. Within each tab of the hierarchy, you can:
- Select the New Tab button to create a new tab at the selected location in the ribbon hierarchy.
- Select the New Group button to create a new group at the selected location in the ribbon hiearchy.
- You can customize new tabs/groups by adding commands using the Add button, or deleting them using the Remove button.
At any time, you can undo your changes by using the Reset button at the bottom.
How do I disable Antidote in Microsoft Office?
- From any Microsoft Office program, select File > Options > Add-Ins.
- At the bottom of the Add-Ins window, beside Manage, select COM Add-ins > Go.
- In the COM Add-Ins window uncheck the boxes related to Antidote and click OK, or click to highlight the Antidote component(s) and click Remove.
- Click OK.
How do I change my language preferences?
Change your language preferences
Within any Office program you can assign a different language preference:
- On the File ribbon menu, select Options from the left-hand menu.
- In the Options window, select Language from the left-hand menu.
- In the Choose Editing Languages section, select your preferred language and activate the Set as Default button, then choose Yes to confirm.
- Select OK, close your Office program and open it again for the change to take effect.