Guide to Disconnecting and Connecting Your Computer
This guide will help you to disconnect and connect your computer equipment.
** Important Note **
Print these instructions (PDF, 659 KB) prior to using them! Your computer will not be connected during this process, so you’ll need a printed copy to refer to.
Disconnecting Your Computer
Disconnecting Your Computer
STEP 1
First you need to shut down your computer completely. Click on the start menu button on the bottom left of your screen. Click the arrow beside Restart and select Shut down.
STEP 2
After your system has shut down, take a look at what’s plugged into the back of your computer: your keyboard, mouse, monitor, network cable, etc. All of these cables need to be unplugged. You can safely do this, but while you are doing it you should observe carefully which ones are plugged into which places. Are they colour-coded? Are there any plugs that look similar, or that could be mistakenly plugged into the wrong place? Write down anything that’s helpful to remember on a paper, or draw a small diagram that will help you to plug the correct wires back into the correct places later. You may also refer to the “Visual Guide” in Appendix.
STEP 3
After you have disconnected every plug and wire from your computer, ensure that everything loose stays together for reconnection after your move. Place your wires, keyboard, mouse etc. that you are taking with you together in one box (or bag).
Note: Ethernet (network) cables are the long grey or blue wires that snap into sockets like phone cords. One of these connects your computer to the network. You will have a second one if you use a VoIP phone. You might be expected to leave one or both of these cables behind and use replacements at your new location, or you might be expected to take yours with you. These wires are interchangeable among different computers; you only need to ensure that you’ll have some cable(s) to reconnect with!
Connecting/Reconnecting Your Computer
Connecting/Reconnecting Your Computer
Please review the following health and safety considerations before setting up any computer at your desk:
- Clean the desk space that the computer will occupy before setup, rather than after. It will be much easier now before your equipment and cables are in the way.
- Try to keep all wires and the power bar on your desk, so that only the power bar cable runs beneath it if necessary. This will minimize having to go under your desk and avoids tripping, entanglements, etc. Be tidy with how you arrange your cables after they are connected. You can use various kinds of ties to keep long cables neatly bundled and out of the way.
- Position your computer where you can maintain airflow around it to avoid overheating. Look for vents where hot air from the internal fan may emerge and ensure these vents will not press against any barrier.
- Examine your cables for any sign of fraying or other significant damage that may present a fire hazard. Submit a online request to the National Service Desk as soon as possible to have damaged cables exchanged.
- Arrange your computer area to make it ergonomically comfortable. Visit iService to review ergonomic tips and exercises that will help you to eliminate discomfort and prevent injury.
- Keep any drinks or other liquids well away as you are moving and adjusting your equipment to avoid spilling.
STEP 1
If you are connecting a new computer, keep in mind that you may need to try arranging your computer and monitor in different ways if you discover that some of your cords aren’t long enough to reach what they need to. Refer to the appendix at the end of these instructions for images that may help you to determine which cords plug into which sockets. Computer and monitor power cords should be connected last.
If you are reconnecting a computer that you are moving to a new location, place your computer and monitor so they are arranged approximately the same way as at your previous location. This should help ensure all cords will be long enough for their purposes. Now you’re ready to reconnect everything that was plugged in! Refer to your diagram or notes to help you. Computer and monitor power cords should be connected last.
Note: Remember if you are using a VoIP (Voice over IP) phone that you need to connect one end of an Ethernet (network) cable (long grey or blue wire that snaps into a socket like a phone cord) to your computer and the other end to the VoIP phone.
STEP 2
After your computer and monitor power cords are plugged in, press the power button on your monitor and on your computer. If the power doesn’t come on, check the power cord connections and ensure your power bar is turned on. If you remembered to plug an Ethernet (network) cable back into your computer, you should be able to connect to the network. Login and verify that your keyboard and mouse are working properly, as well as anything else that you plugged into your computer.
STEP 3
Note: please skip the following step if you will be printing to the same network print device as you have before.
If you need to establish a connection with the nearest network print device, go to your Windows Start Menu, select All Programs and choose Install a Printer. Help is available from iService on how to use the Self-Install Printer Tool (SIPT).
Remember at the end of the day to restart and leave your computer turned on overnight, as usual. Important updates are installed automatically after business hours, and your computer needs to be powered on for the process to take place.
If you encounter any problems that you can’t solve by verifying or changing your wire connections and restarting your computer, or with the help of a colleague, please submit an online request to the National Service Desk (NSD). If you can’t access the network, call the NSD at 1-800-268-0408.
Appendix A: Visual Guide to Cables and Sockets
Appendix A: Visual Guide to Cables and Sockets
The following examples may help you determine what sockets to look for when connecting certain types of plugs. If a plug will fit into more than one socket and you don’t know which socket to choose, choose whichever will fit. If what you plugged in fails to work correctly, try another similar socket (you may need to restart your computer to test the new connection).
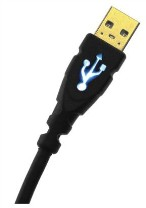
Examples of Cables
This USB-A Cable …
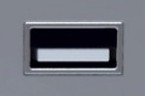
Examples of Sockets
…plugs into this socket
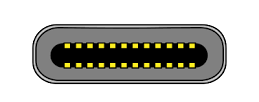
This USB-C cable…
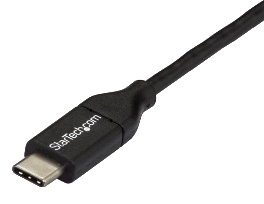
…Plugs into this USB-C Port
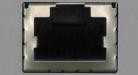
This Ethernet cable …

… plugs into this socket
This Cable Lock…
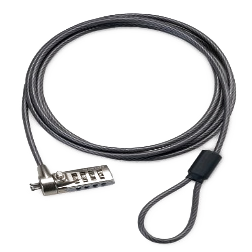
… Plugs into these sockets
Video connections…
Workstation and Monitor Ports Available ports listed in "Appendix A"
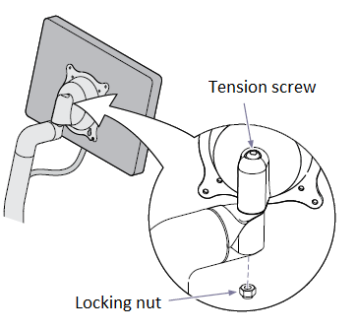
Appendix C: Support Arm for Monitor
Appendix B: Support Arm for Monitor
If your Branch provided you with a support arm to hold your monitor, follow these installation instructions:
- Install support arm to work surface.
- Remove monitor swivel from support arm and mount swivel to monitor (see figure 1 below)
- Remove nut, bolt and washers of swivel.
- Remove monitor swivel from support arm.
- Align swivel with holes on back of monitor.
- Secure swivel with screws (provided with monitor).
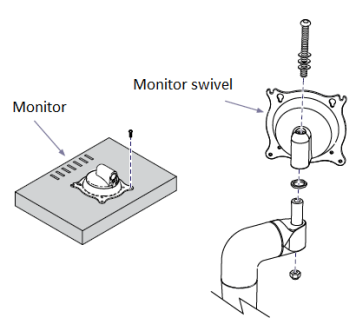
- Install swivel/monitor onto support arm
- Position swivel/monitor onto support arm.
- Secure with bolt, washers, and nut.
- If monitor will not stay in position (see figure 2 below)
- Loosen locking nut.
- Tighten tension screw as necessary.
- Tighten locking nut.