Avaya 9608 IP Phone User Guide

-
Overview
Introduction
The following section describes the display, keys, buttons, and the associated features that are available on the 9608 IP Telephone.
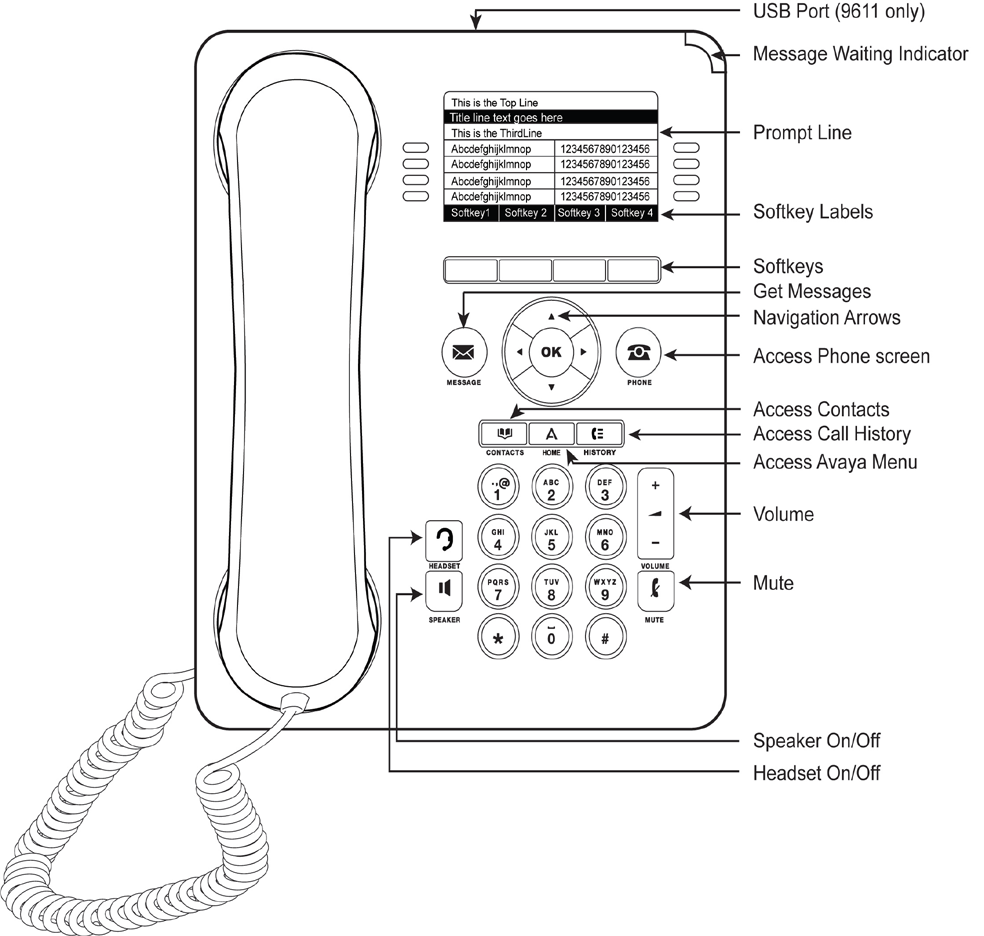
Long description
Buttons and elements location list, from top-left to bottom-right.
- USB Port (9611 only)
- Message waiting Indicator
- Top of display screen, Prompt Line
- Bottom of display screen, Softkey Labels
- Softkeys
- Get Messages
- Navigation Arrows
- Access Phone screen
- Acces Contacts
- Access Avaya Menu
- Access Call History
- Headset On/Off
- Speaker On/Off
- 1-9 and 0 Numbered keys with * and #
- Volume
- Mute
Table 1: 9608 IP Telephone Button/Feature Descriptions
Table 1: 9608 IP Telephone Button/Feature Descriptions Name Description Call Appearances The number of lines available to make or receive calls. Press the line button to initiate or answer a call. Contacts 
Press the Contacts button to view the entries in your contact list. Headset 
If you have a headset and it is connected, press the Headset button to use the headset. History 
Press History (Call History) to view a list of your outgoing, incoming and missed calls. Home (Avaya menu) 
Press the Home (Avaya menu) button to configure options, settings and log out. Line buttons The Lines on either side of the screen show which lines are in use and correspond to the lines on the display. The content within the lines also indicates if a feature is enabled or disabled in the Features menu. Message 
Press the Message button to connect directly to your voicemail. Message Waiting Indicator An illuminated red light in the upper-right hand corner of your phone indicates you have voicemail messages waiting. If Visual Alerting is enabled, this light flashes when you receive an incoming call. Missed Calls Indicator The icon on the History button is illuminated when you have Missed Calls. The top line shows the Missed Calls icon and the number of calls missed. Mute 
The Mute button is used to mute a call in progress. To take a call off mute, the Mute button is pressed again. Navigation Arrows 
Use the up and down Navigation Arrow buttons to scroll through lists. Use the right and left Navigation Arrow buttons to navigate between menus or to move the cursor during text input. OK 
Press the OK button for a shortcut to an action. For example, when you select a Call History entry, pressing OK dials the number. Phone 
Press the Phone button to view and manage your calls. Prompt Line The prompt line is used to describe the phone display.
- The first line shows status information such as the time and date, primary extension, error indications, and missed calls.
- The second line, called the Status Line, provides information, such as when you can use the right or left navigation arrows to view alternate screens or menus.
- The Status Line also provides messages related to the current application or the actions that you must perform on a screen.
Speaker 
Press the Speaker button to use the speakerphone. To take a call off speakerphone, lift the handset and press the Speaker button.
Note: 2-way Speakerphone is enabled on all phones except for courtesy phones.
Speed Dial Speed dial numbers can be assigned to up to 10 people in your contact list. Then when you want to call a speed dial contact, simply press the number you've assigned to that person. Volume 
Press the volume button to adjust the volume of the handset, headset, speaker, and ringer. Table 2: 9608 IP Telephone Softkey/Feature Descriptions
Note: Softkeys are used to act on objects displayed on the phone screen. The softkey labels show you the action that each key produces.
Table 2: 9608 IP Telephone Softkey/Feature Descriptions Name Description Add To add additional parties to a conference call Answer To answer the call using the speakerphone Assign To assign speed dial or favorites Back To return to the list view Bridge To join an existing call on a bridged line Call To call selected contact from Contacts Call Forward To redirect calls to another phone number Cancel To cancel an action Change To change options Classic To toggle between Classic Tones and Rich Tones Clear To un-assign a speed dial or text field Clear All To delete all of the entries in the list you are viewing Complete To complete the transfer of a call to another telephone number Conf To set up a conference call +Contact To add a number from the Call History to your contacts list Default To revert back to the default button labels Delete To delete a contact Details To view information for a contact Drop To disconnect a call Edit To make changes to telephone information such as contacts, autodial numbers, button labels Enter To confirm an entry made using the dial pad Hold To place the current call on hold Ignore To ignore an incoming call Join To join a party to a conference call More To obtain additional information on the softkey or the action you are using New To add a new contact Play To “re-listen” to the ring tone selected Primary To make an alternate telephone number the primary telephone number Redial To redial the last number or to display the list of the most recent dialed numbers Resume To return to a call on hold Rich To toggle between Classic Tones and Rich Tones Save To save your changes Select To display options available SendAll (Send all Calls) Incoming calls go directly to a predefined coverage number Transfer To transfer an existing call to another phone number or voicemail Type To change a telephone number to a specific type of number i.e. work, home and mobile VMail To forward an incoming call to voice mail Yes To confirm Login, Logout, and some functions in Options and Settings To Log in and out
To Log in to Your Phone
Log in from the initial screen when it prompts you for your Username.
- Using the dial pad, enter your 10 digit phone number in Username.
- Using the Navigation Arrow buttons, scroll down to Password.
- Enter your assigned phone password.
- Press the Enter softkey or the OK button.
To Log out of Your Phone
- Press the Home (Avaya menu) button.
- Using the Navigation Arrow buttons, scroll down and select Log Out.
- Press the Yes softkey or the OK button.
Note: Your contacts, speed dial settings, favorites, and Autodial numbers are saved during logout and are available the next time you log in to your Phone. If you had logged in as a guest user, the original settings of the phone are restored upon logout.
To Log in to Your Telephone Number from a Temporary Phone
Log in from the initial screen when it prompts you for your Username.
- Log out the current phone. Press the Home (Avaya menu) button.
- Using the Navigation Arrow buttons, scroll down and select Log Out.
- Press the Yes softkey or the OK button.
- Log in using the dial pad.
- Enter your 10 digit phone number in Username.
- Using the Navigation Arrow buttons, scroll down to Password.
- Enter your assigned phone password.
- Press the Enter softkey or the OK button.
Note:
- If you log into a temporary phone, you will automatically be logged out of your permanent phone. You can only be logged into one phone at a time.
- If someone else logs into your permanent phone, your contacts, speed dial settings, favorites, and Autodial numbers are saved during logout and are available the next time you log in to your Phone.
To Log out of Your Telephone Number from a Temporary Phone
- Press the Home (Avaya menu) button.
- Using the Navigation Arrow buttons, scroll down and select Log Out.
- Press the Yes softkey or the OK button.
Note: Your contacts, speed dial settings, favorites, and Autodial numbers are saved during logout and are available the next time you log in to your phone. If you had logged in as a guest user, the original settings of the phone are restored upon logout.
Making Phone Calls
Use the phone screen to view and manage calls. Dial a call manually by picking up the handset, activating your headset, or activating the speaker on your telephone.
- Pick up the handset, press the Headset button, or press the Speaker button.
- Use the dial pad to enter the number you want to call.
- Hang up the handset, deactivate the headset, or press the Speaker button to end the call.
Long Distance Calls
Long distance calls should continue to be dialled in the same fashion as before (i.e. dial 1 followed by the area code and telephone number).
Redialing a Party
From the phone screen, press the Redial softkey. The last number will be redialed or you will see a list of the most recent numbers, you can then choose which number to redial.
Receiving Calls
- When you receive an incoming call, the call is automatically selected when you lift the handset, or press the Speaker button.
- However, if you are already on a call, you will be presented with the option to press one of three softkeys, as follows:
- Press the Answer softkey _ to answer the incoming call. The current call is placed on hold.
- Press the Ignore softkey _ to turn off the ringer for an incoming call.
- Press the VMail softkey _ to forward the incoming call to voice mail.
- Pick up the handset, press the Headset button, or press the Speaker button.
-
Call Handling Features
Conference
The Conference (Conf) feature allows you to conference up to a maximum number of 5 parties (6 including yourself).

Adding another party to a call
- Dial the first party, and press the Conf softkey. The current call is placed on hold.
- Dial the number of the next party and wait for an answer. If the party does not answer, press the Drop softkey to get a new dial tone to try another number.
- Once the party answers, press the Join softkey to add the new party to the call.
- Repeat Steps 1- 3 for each party you want to conference in to the call. Once you have added the first party, the softkey changes to Add rather than Conf.
Adding a held call to the current call
- Press the Conf softkey.
- Ignore the dial tone and using the Navigation Arrow buttons, scroll up or down to the held call you wish to add and press the OK button.
- Press the Join softkey. All parties are now connected.
Dropping the last party added to the call
- Press the Drop softkey. The last party connected to the conference call is dropped from the call.
Mute
During an active call, use of the Mute button prevents the party with whom you are speaking to from hearing you. You generally use this feature in conjunction with the Speaker button.
To prevent the other person on the line from hearing you:
- Press the Mute button. The other party cannot hear you. The mute icon appears.
- Press the Mute button. The other party cannot hear you. The mute icon appears.
Transfer
The Transfer feature allows you to transfer a call from your telephone to another telephone.
- With the call active (or with only one call on hold and no active calls), press the Transfer softkey. The call is automatically placed on hold.
- Dial the number to which you want to transfer the call.
- If you do not want to announce the call, press the Complete softkey. The call is sent to the phone number you dialed.
- If you wish to wait for an answer and announce the call, remain on the line and announce the call. If the line is busy or if no one answers, return to the call by pressing the Cancel softkey.
- Press the Complete softkey. The call is sent to the phone number you dialed.
SendAll Calls
The SendAll Calls feature is used to redirect callers directly to voicemail when you are away from your desk for a period of time. This eliminates a caller from having to hear 3 rings before going to voicemail.
- Press the SendAll (Send All Calls) softkey to activate.
- Press the SendAll (Send All Calls) softkey to deactivate.
Call Forward
The Call Forward feature is used to redirect your calls to another phone number.
- Press the Call Forward softkey; you will hear a dial tone. Enter the phone number you wish to forward your calls to. You will hear “beep, beep, beep”, which is the confirmation tone that your phone has been forwarded.
- Press the Call Forward softkey to deactivate.
-
Customized Features
-
The following instructions apply only to phones programmed with the EC500 and/or the Bridged Calls feature.
Bridged Calls
Using bridged call appearances
In addition to your own call appearances, your phone screen may show one or more bridged call appearances on the display screen. A bridged call appearance is of another user and allows you to see if that call appearance is in use, answer calls on that appearance, or join a call in progress on that call appearance from your desk phone. You can also make outgoing calls on a bridged call appearance when it is not in use.
Answering a call on a bridged line
Answering a call on a bridged line is the same as a call on a primary line. If the ringing line is selected, you can answer by picking up the handset, or by pressing the Speaker button or the Headset button, or by pressing the Answer softkey.
- Select the bridged call that you want to answer. The ringing line is selected automatically. If you are on another call when a call comes in to a bridged line, you have to select the ringing line.
- Press the Answer softkey.
Joining a call on a bridged line
You can join an existing call on a bridged line.
- Select the bridged call in progress that you want to join.
- Press the Bridge softkey.
Making an outgoing call on a bridged line
When you make a call on a bridged line, you are using another telephone user’s line. The caller ID associated with the call you are making may show the call as coming from you or coming from the person whose line you are using.
- Select the bridged line you want to use.
- Press the OK button to get a dial tone.
- Dial the telephone number, or call the person from the Contacts list, or call the person from the History list.
Note: If you have any questions about how the name or phone number displays to the person you are calling, visit your departmental website as follows:
ESDC, Labour Program & Service Canada: Telephone ServiceExcluding others from bridging onto your call
The Exclusion feature is used to prevent others who are bridged to your phone number from bridging onto a specific call. You can activate exclusion only during an active call.
- During an active call, scroll right from the phone screen to access the Features menu.
- Using the Navigation Arrow buttons, scroll down to Exclusion, press the OK button or just press the corresponding line button.
Note: When you activate the Exclusion feature during a call, all parties except you and the calling/called party, are dropped from the call.
Independent alerting for each Bridged Call Appearance
The four options available are the following:
- On: The default ringtone is played when there is a call on the bridged appearance.
- Off: No alert is played.
- Delayed: If the call on the bridged appearance is not answered, an alerting melody is played after a delay.
- Abbreviated: There is a single beep to indicate the call on the bridged appearance.
EC500 - Extend Call Feature
Configuring simultaneous ringing for multiple phones using EC500
Using the EC500 – Extend Call feature, you can program your desk phone in such a way that the desk phone and your cell phone ring simultaneously when there is an incoming call. With this feature, you can answer office calls while you are away from your desk.
- From the phone screen, using the appropriate Navigation Arrow button to scroll right to access the Features menu.
- Select the EC500 feature.
- Press the OK button to turn simultaneous ringing on or off.
Extending a call to your cell phone (EC500)
The Extend Call feature allows you to “extend” a call that is active on your desk phone to your cell phone using EC500 Extension to Cellular. This allows you to transfer an office call to your cell phone and move away from your desk.
- During an active call, use the appropriate Navigation Arrow button to scroll right from the phone screen to access the Features menu.
- Select the Extend Call feature.
- Press the OK button to send the call to your cell phone.
- Answer the call on your cell phone. The call remains active on your desk phone as well, so you can switch back if you want to.
- From the phone screen, using the appropriate Navigation Arrow button to scroll right to access the Features menu.
Contacts
You can save up to 250 names and up to 6 telephone numbers per name.
Viewing Contacts Details
- Press the Contacts button.
- Select the contact you want to view.
- Press the Details softkey to see the information available for that contact.
Note:
- Pressing the Details softkey is the only way to dial a second or third telephone number for a contact.
- Press the appropriate softkey to Call or Edit this contact, Delete this contact, or return to the Contacts screen.
Adding a New Contact
You can add up to 6 telephone numbers for a contact.
- Press the Contacts button.
- Press the New softkey if this is your first contact list entry, or press the More softkey, then the New softkey if you already have entries in your contact list.
- Enter the First Name using the dial pad. Select the next field using down arrow.
- Enter the Last Name using the dial pad. Select the next field using down arrow.
- Ringer - Select < Default > or any other ringtone from < Classic Tone1 > to < Classic Tone8 >. Select the next field using down arrow.
- Track Presence - Yes (not used at this time). Select the next field using down arrow.
- Number 1: enter the telephone number using the dial pad. Select the next field using down arrow.
- Select Type using left - right arrow to indicate a general number to a specific type of number i.e. work, home, or mobile, if applicable.
- Press the More and select Primary softkey, if applicable. The primary number is the one that will always display without having to go into contact details.
- Select the next field using down arrow, to enter a maximum of 6 different phone numbers by repeating steps 7 and 8 as applicable.
- Press the OK button when completed.
Editing a Contact
- Press the Contacts button.
- Search for and select the contact you want to edit.
- Press the More softkey, then the Edit softkey.
- Choose the field you want to edit.
- Use the dial pad and softkeys to make changes to the contact information.
- Press the Save softkey or the OK button.

Deleting a Contact
- Press the Contacts button.
- Select the contact you want to delete.
- Press the More softkey, then the Delete softkey.
- Press the Delete softkey to confirm or the Cancel softkey to cancel.
- Press the Contacts button.
Autodial
Programming Autodial
- From the phone screen, use the Navigation Arrow buttons to scroll right twice to display the autodial options.
- To program, select the applicable autodial line.
- Press the Edit softkey.
- Use the dial pad to enter the Autodial number.
- Press the Save softkey.
Accessing Autodial
- From the phone screen, use the Navigation Arrow buttons to scroll right twice to view programmed autodial numbers.
- Select the number you want to call.
- From the phone screen, use the Navigation Arrow buttons to scroll right twice to display the autodial options.
Call History
You can press the History button to view lists of your outgoing, answered, or missed calls. Both the History and Missed Calls icons light up when you have one or more missed calls. The number of missed calls is displayed on the top line.
- Press the History button to turn off notification light.
- Press the Phone button to reset to home screen.
Viewing the Call History
- Press the History button.
Note: You can go to the top of the list by pressing the History button again. - Using the Navigation Arrow buttons, scroll to the right or left to view separate lists of answered, outgoing, or missed calls.
- Using the Navigation Arrow buttons, scroll up or down to view the entries on the list.
Viewing Call History Details
- Press the History button.
- Select the number you want to view.
- Press the Details softkey.
- Press the Back softkey to return to the list view.
Adding an entry from the Call History to your Contacts list
- Press the History button.
- Select the number you want to add to your Contacts list.
- Press the +Contact softkey.
- Edit name and telephone number.
- Press the Save softkey.
Making a call from the Call History List
- Press the History button.
- Using the Navigation Arrow buttons, scroll to the left or right to view a separate list of all calls, missed (unanswered) calls, answered calls, or outgoing calls.
- Using the Navigation Arrow buttons, scroll up or down to select the person or number you want to call.
- Select the person or number you want to call.
- Press the Call softkey or the OK button.
Removing an entry from the Call History
- Press the History button.
- Select the number you want to delete.
- Press the More softkey, and then press the Delete softkey.
- Press the Delete softkey to confirm, or press the Cancel softkey if you do not want to delete it.
Clearing all entries from the Call History
Clearing all entries from Call History might or might not delete all of the entries in every log. For example, if you are viewing the Outgoing Calls list, only outgoing calls are deleted from the Call History. However, if you are viewing the All Calls list, pressing the Clear All softkey deletes all calls from the Call History.
- Press the History button.
- Select the list you want to delete.
- Press the More softkey, and then the Clear All softkey to delete all of the entries in the list you are viewing.
- Press the Clear All softkey or the OK button to confirm.
- Press the History button to turn off notification light.
-
Options & Settings
The Options & Settings menu contains choices for:
- Call Settings
- Assign Speed Dial entries
- Assign Favorite entries
- Application Settings
- Screen & Sound Options
- Language and Region
Call Settings
Setting Phone Screen on Calling
Set Phone Screen on Calling to Yes to automatically display the phone screen when you place a call.
- Press the Home (Avaya menu) button.
- Select Options & Settings.
- Press the Select softkey or the OK button.
- Select Call Settings.
- Press the Select softkey or the OK button.
- Select Go To Phone Screen on Calling.
- Press the Change softkey or the OK button or use the right or left Navigation Arrow buttons to set the option to Yes or No.
- Press the Save softkey.
Setting the Phone Screen on Ringing
Set Phone Screen on Ringing to Yes to automatically display the phone screen when you get an incoming call.
- Press the Home (Avaya menu) button.
- Select Options & Settings.
- Press the Select softkey or the OK button.
- Select Call Settings.
- Press the Select softkey or the OK button.
- Select Go to Phone Screen on Ringing.
- Press the Change softkey or the OK button or use the right or left Navigation Arrow buttons to set the option to Yes or No.
- Press the Save softkey.
Setting Redial Options
You can set Redial to dial the last number you dialed or to display a list of the last 3 numbers dialed.
- Press the Home (Avaya menu) button.
- Select Options & Settings.
- Press the Select softkey or the OK button.
- Select Call Settings.
- Press the Select softkey or the OK button.
- Press the Redial softkey.
- Press the Change softkey or the OK button to toggle between One Number and List.
- Press the Save softkey.
Configuring Visual Alerts
When the Visual Alerting option is turned on, incoming calls cause the light in the top right corner of the phone to flash. An illuminated red light in the upper-right hand corner of your phone also indicates that you have voicemail messages waiting.
In addition to the Message Waiting Indicator, the Message button is also illuminated when you have voicemail. You can turn Visual Alerting on or off.
- Press the Home (Avaya menu) button.
- Select Options & Settings.
- Select Call Settings.
- Press the Select softkey or the OK button.
- Select Visual Alerting.
- Press the Change softkey or the OK button or use the right/left Navigation Arrow buttons to turn Visual Alerting on or off.
- Press the Save softkey.
Setting the Audio Path
You can set your phone to go off-hook on the Speaker or the Headset when you make an on-hook call.
- Press the Home (Avaya menu) button.
- Select Options & Settings.
- Press the Select softkey or the OK button.
- Select Call Settings.
- Press the Select softkey or the OK button.
- Select Audio Path.
- Press the Change softkey or the OK button to change the speaker or headset setting.
- Press the Save softkey.
- Press the Home (Avaya menu) button.
Assign Speed Dial Entries
You can assign speed dial numbers to up to 10 people in your contact list. Then when you want to call a speed dial contact, simply press the number you've assigned to that person.
- Press the Home (Avaya menu) button.
- Select Options & Settings.
- Press the Select softkey or press the OK button.
- Select Assign Speed Dial Entries.
- Press the Select softkey or press the OK button.
- To un-assign an existing speed dial contact, use the Navigation Arrow Buttons to scroll to the line you want to un-assign and press the Clear softkey. Proceed to the next step to reassign that number.
- To add a speed dial contact, scroll to the first unassigned line, press the Assign softkey or press the OK button.
- Using the Navigation Arrow buttons, scroll to the contact you want to assign the telephone number to, and press the Select softkey or press the OK button.
- Select the telephone number you want to assign.
- Press the Select softkey or press the OK button.
Speed Dialing a Person
Speed dial numbers enable you to access a contact via a single digit. Once assigned, pressing and holding the digit, i.e. 2 completes the call to the assigned number.
- Press the Home (Avaya menu) button.
Setting up Favorites
You can create a list of up to 9 favorite contacts or features for quick access.
- Press the Home (Avaya menu) button.
- Select Options & Settings.
- Press the Select softkey or the OK button.
- Select Assign Favorite Entries.
- Press the Assign softkey or the OK button.
- To add a favorite contact, select an assignment line and press the Contacts button.
- Using the Navigation Arrow buttons, scroll to the contact/feature you want and press the Select softkey or the OK button.
- If you are assigning a favorite contact, select the telephone number you want to use to call this favorite person.
Calling a favorite
To call one of your favorite contacts as created in the previous section (Setting up Favorites):
- Press the button beside the Favorite's name or if there are more Favorites, use the Navigation Arrow buttons, scroll down through your call appearances.
- Press the applicable key to call the person.
- Press the Home (Avaya menu) button.
Application Settings
Personalizing button labels
You can change the labels that are displayed for your phone extensions, features, or Speed Dial buttons. For example, you can change the label of the button assigned to your phone number to "My Line."
- Press the Home (Avaya menu) button.
- Select Options & Settings.
- Press the Select softkey or the OK button.
- Select Application Settings.
- Press the Select softkey or the OK button.
- Select Personalize Labels.
- Press the Change softkey or the OK button.
- Select the label you want to edit.
- Press the Edit softkey.
- Edit the label using up to 13 characters. Press the Clear softkey to clear all text fields and start over.
- Press the Save softkey or the OK button.
Note: You may revert back to the default button labels by selecting the Home (Avaya menu) button > Options & Settings > Application Settings > Restore Default Button Labels and pressing the Default softkey.
- Press the Home (Avaya menu) button.
Screen & Sound Settings
Adjusting the brightness or contrast of the display
- Press the Home (Avaya menu) button.
- Select Options & Settings.
- Press the Select softkey or the OK button.
- Select Screen & Sound Options.
- Press the Select softkey or the OK button.
- Select Brightness or Contrast.
- Press the Change softkey or the OK button.
- Press the Phone button.
- Using the Navigation Arrow buttons, scroll to the right or left to adjust the brightness or contrast.
- Press the Save softkey or the OK button.
Changing the ring pattern
- Press the Home (Avaya menu) button.
- Select Options & Settings.
- Press the Select softkey or the OK button.
- Select Screen & Sound Options.
- Press the Select softkey or the OK button.
- Select Personalized Ringing, and then press the Classic or Rich softkey. Each category contains 8 ring patterns.
- Press the Change softkey or the OK button to listen to the available ring patterns.
- Press the Play softkey or the OK button to hear it again.
- Press the Save softkey to make it your ring pattern.
Setting a call pickup ring tone
You can set ring tones to alert you when you receive an incoming call.
- Press the Home (Avaya menu) button.
- Select Options & Settings.
- Select Screen & Sound Options.
- Press the Select softkey or the OK button.
- Select Call Pickup Ring Type.
- Press the Change softkey or the OK button, or use the right/left Navigation Arrow buttons to toggle from one ring tone/telephone number to another. Each tone sounds briefly as you move to it.
- If desired, press the Play softkey or the OK button to listen to the ring tone.
- Repeat the last two steps until you find the ring tone you want for calls within your pickup group.
- Press the Save softkey to make it your call pickup ring tone.
Setting Phone Screen Width
- Press the Home (Avaya menu) button.
- Select Options & Settings.
- Press the Select softkey or the OK button.
- Select Screen & Sound Options.
- Press the Select softkey or the OK button.
- Select Phone Screen Width.
- Press the Change softkey or the OK button, to change the screen width from full (each call appearance or feature occupies the entire width of a line) to half (each call appearance or feature occupies half the width of a line, splits the screen in half).
- Press the Save softkey.
- Press the Home (Avaya menu) button.
Language and Region
Changing the language
- Press the Home (Avaya menu) button.
- Select Options & Settings.
- Press the Select softkey or the OK button.
- Select Language & Region.
- Press the Select softkey or the OK button.
- Select Language.
- Press the Select softkey or the OK button.
- Select a display language.
- Press the Select softkey or the OK button.
- Press the Yes softkey to confirm the selected language.
Setting the time format
You can change the way the time displays on your screen. The time format is either 12 or 24 hours.
- Press the Home (Avaya menu) button.
- Select Options & Settings.
- Press the Select softkey or the OK button.
- Select Language & Region.
- Press the Select softkey or the OK button.
- Select Time Format.
- Press the Select softkey or the OK button.
- Press the Change softkey or the OK button.
- Press the Select softkey or the OK button or use the right/left Navigation Arrow buttons to change the time format.
- Press the Save softkey.
- Press the Home (Avaya menu) button.
