Human Resources Service Centre (HRSC) Web Application
User guide for HR Employees
Version 1.11
Effective Date:
July 14, 2017
Review By Date:
April 30, 2020
Last Modified:
December, 2019
Revisions History
#
Date
Author
Changed Reference
1.7
2016-02
HRSC
Inclusion of new fonctionnalités
1.8
2016-05
HRSC
Addition of the new Pay Related Functionalities Rework of the User Guide Layout
1.9
2017-06
HRSC
Addition of the July 14, 2017 release. HRSC Version 4.5
1.10
2019-04
HRSC
Entire review and update of the document
Contents
What is the HRSC Web Application?
What is the purpose of this guide?
Icons Identified in the User Guide
- 1.0 HRSC Web Application
- 2.0 HR Screen Presentation
- 2.1 Overview of "New Requests", "All Requests" and "My Assigned Requests"
- 2.1.1 Common information about three screens
- 2.1.2 Information on "New Requests" Screen
- 2.1.3 Information specific to "All Requests"
- 2.1.4 Information specific to "My Assigned Requests"
- 2.1.5 Filter the requests
- 2.2 Overview of Recall Screen
- 2.3 Overview Workbench Screen
- 2.4 Overview Dashboard Screen
- 3.0 Request Management for BC Employees
- 3.1 Display Summary of a Submitted Request
- 3.2 View Details of a Request
- 3.3 View Attachments of a Request
- 3.4 View Notes and Interventions
- 3.5 Change the Category and Sub-Category of a New Request
- 3.6 Change Effective Date of a request
- 3.7 Assign request to Lead and Collaborators
- 3.8 Transfer a New Request to a Business Centre
- 3.9 Decline a request from the New Requests Screen
- 3.10 Assign, Transfer or Decline multiple requests
- 3.11 View the intervention
- 3.12 Understanding intervention
- 3.13 Display Notes of a request
- 3.14 Add a Note to a Request
- 3.15 View the Status of a Request
- 3.16 Update the Status of a Request
- 3.17 Understand the Status of a Request
- 3.18 Add a Follow-up Reminder to a Request
- 3.19 Add Key Words to a Request
- 3.20 Display documents of a Request
- 3.21 Add documents to a Request
- 3.22 View the History of a Request
- 3.23 Access to a request in relation
- 3.24 Understand displays of requests in relation
- 3.25 Add Relations between Requests
- 3.26 Change the Lead and/or Collaborator
- 3.27 Pending Signature of a Client
- 3.28 Return a Request to the Client for modification
- 3.29 Modify the original client request
- 3.30 Decline a request
- 3.31 Transfer a request between Business Centers
- 3.32 Add Information in a Colleague Request
- 3.33 Add Information in a Resolved or Returned Request
- 3.34 Send a follow-up reminder or recall a request
- 3.35 Confirm Article 34 Validation
- 3.36 Open and Save a Pay Intervention Request Form
- 3.37 Inform Managers of the PeopleSoft Data Entry
- 3.38 Send an email containing selected documents
- 3.39 Compress Documents to send via email
- 3.40 Uploading signed documents on behalf of a client
- 3.41 Search in the HRSC Web Application
- 3.41.1 Search a Request-by-Request ID
- 3.41.2 Search for a Request by Manager or Contact Name
- 3.41.3 Search for a Request by Employee Name
- 3.41.4 Search for a Request by National ID (PRI)
- 3.42 Export a list of requests in Excel File
- 3.43 Creation of a PAR Log
- 4.0 Request Management for HRSC Employees
- 5.0 Request Management for BC Managers
- 5.1 Caseload Overview
- 5.1.1 Overview the list of employees from a Business Centre
- 5.1.2 View Caseload of an Employee
- 5.1.3 View Details of a Request
- 5.1.4 Reassign requests from Caseload screen
- 5.2 Workbench Screen to manage employee’s workload
- 5.2.1 Display a BC Employee Workbench
- 5.2.2 Display a request detail from an Employee Workbench
- 5.3 Reassign Request to another Business Centre Employee
- 5.4 Consult a request from Dashboard
- 6.0 Reporting Section
- 6.1 Tools for Reports
- 6.2 Reports Available
- 6.2.1 Assignment Report by Intervention Status
- 6.2.2 Intervention Processing time Report by Fiscal Year
- 6.2.3 Intervention Sub-Category Report by Fiscal Year
- 6.2.4 Intervention Sub-Category Report by Status
- 6.2.5 Lead Report by Age of Intervention
- 6.2.6 Active Intervention Report
- 6.2.7 Separation Report
- 6.2.8 Active Separation Report
- 7.0 Access right management
Preface
This guide explains how to use the Human Resources Web application and its features.
What is the HRSC Web Application?
The HRSC web application is an online tool to submit enquiries or requests. It is a central repository designed to facilitate the management of HR requests. The application allows users to view the status of requests submitted at any time and follow the progress until it is resolved.
It allows the Human Resources Business Units to coordinate and exchange information between members, with other teams or with clients directly to finalize the request or to ensure the documents are transferred to the Public Services Pay Centre if required.
What is the purpose of this guide?
The guide will describe in detail how use the HRSC web application when performing HR tasks. It can be used as a reminder to review functions already seen or as a training tool to address different functionalities not yet seen.
Who should read this guide?
This guide is applicable to the following roles. Take note that Client’s sections has been removed from this current guide to reduce the size and repetition of the information which is in the Client’s User guide.
| Roles | Sections of the guide | ||||||
|---|---|---|---|---|---|---|---|
| 1.0 | 2.0 | 3.0 | 4.0 | 5.0 | 6.0 | 7.0 | |
| Business Centre Employee | ✓ | ✓ | ✓ | χ | χ | χ | χ |
| Business Centre Employee (HRSC) | ✓ | ✓ | ✓ | ✓ | χ | χ | χ |
| Business Centre Management | ✓ | ✓ | ✓ | χ | ✓ | ✓ | ✓ |
| Business Centre Management (HRSC) | ✓ | ✓ | ✓ | ✓ | ✓ | ✓ | ✓ |
| HRSC Management | ✓ | ✓ | ✓ | ✓ | ✓ | ✓ | ✓ |
Acronyms
To reduce the text of this guide, some acronyms will be used while referring to examples. Refer to this section If you are unsure of the meanings.
| Abbreviation | Description |
|---|---|
| BC | Business Centre |
| BF Date | Bring-forward Date |
| Branch/SC Region | Branch/ Service Canada Region |
| Cat. | Category |
| Dir | Directorate |
| E | English |
| F | French |
| HR | Human Resources |
| HRSC | Human Resources Service Centre |
| Sub. Cat. | Sub-category |
Icons Identified in the User Guide
You will see 5 types of icons when reviewing this guide. They will provide you with information on a different topics / streams. See the right column to understand the meaning of each.
| Icon | Description |
|---|---|
| Tells user when emails are generated. | |
| Informs user of features and actions system limitations. | |
| Informs reader of additional options that can be achieved at different steps. | |
| Provides tips and advice on good practice to perform in the Web Application. | |
| The "New" banner will indicate that the item was developed and added to the latest improvements release. |
Icons identified on a request
Each request that you display on the Web application systematically includes symbols. The right column describes what they mean.
| Icon | Description |
|---|---|
| In the New Requests, All Requests, and My Assigned Requests screens, the icon indicates documents are attached. | |
| Click to show the status of the request (refer to 3.2 View Details of a Request). | |
| In the New Requests, All Requests, and My Assigned Requests screens, this icon displays the Options Section for each request. | |
| In the New Requests, All Requests, and My Assigned Requests screens, the icon displays the summary of a request, documents, notes, interventions and actions available. In the Search screen, it also allows you to access the interventions on the request by clicking the View link. |
1.0 HRSC Web Application
BC Employee – BC Management
1.1 Top Bar Menu
Top Bar content and display depends on the User Role but, also of the Business Centre, you have access to. It is normal that you do not have access to all the screens we will introduce in this chapter. To get more information on Users access Rights, report to 7.1 Types of User Roles and Access Right.
Screens
Description
HR Section
Submit a request on behalf of an Employee
Complete the web form on behalf of the client to request HR services.
HRSC Section
New Requests
New requests reviewed and transferred to a Business Centre (refer to 4.0 Request Management for HRSC Employees).
Inactive Requests
This new screen lists Separation Clearance Requests that have not yet been finalized by client or requests that are returned by another Business Centre with the status "No action".
Search
Search Screen is limited to HRSC Users. It allows HR Employees to search by name, PRI or by request number.
ASRF
Archived requests submitted through the Automated Staffing Request Forms system.
ELS
Archived requests submitted through the Express Lane Staffing System.
Business Centre
Workbench
This screen allows the BC Employee User to view the New Requests from its active and pending workload. A BC Manager can also view this information for each of their employees.
New Requests
New requests received in a business centre (refer to 3.0 Request Management for Business Centre Employees).
All Requests
List of all requests in a business centre.
My Assigned Requests
List of requests in your caseload (refer to 3.0 Request Management for Business Centre Employees).
Staffing Processes
A new screen that allows the workforce management team to manage processes initiated by ESDC.
Recall
This screen allows an HR User to recall/return back to there workload, returned to client or pending signature request.
Search
Search for a request using the request ID or name of Manager/Contact, name of the Employee, request ID or National ID (PRI) (refer to 3.41 Search in the HRSC Web Application).
Management Section
Dashboard
This screen displays the status of unresolved, actives and pending workloads in a Business Centre. (Refer to 5.0 Request Management for Business Centre Managers).
Caseload
List of requests in a business centre by lead and/or collaborators (refer to 5.0 Request Management for Business Centre Managers).
Reports
Different reports on the status of interventions in a Business Centre (refer to 6.0 Reports).
Administration
Manage Users
Add and delete HR users from the HRSC web application (refer to 7.0 Access Rights Management).
Manage User Roles
Assign user roles and access rights to a business centre (refer to 7.0 Access Rights Management).
1.2 Business Centers Definition
The HRSC Web application now has over 60 different business centres. Because the names, roles and users of each business centre can be changed over time, we are no longer able to provide you with a complete and accurate listing. If you need information regarding any of the business centres you see in the application, please contact us at our generic email (NA-HRSC-CSRH-WEB-APP-GD@hrsdc-rhdc.gc.ca).
2.0 HR Screen Presentation
BC Employee – BC Management
Section 2 is intended to familiarize the user with common screens used by different Business Centers. This section can help you understand the functionalities presented in the 3rd section, as all these functions are performed in one or more screens within this section.
2.1 Overview of "New Requests", "All Requests" and "My Assigned Requests"
2.1.1 Common information about 3 screens
| Screen | New Requests, All Requests and My Assigned Requests |
|---|---|
| Displayed Information |
|
| Sorting Options |
|
| Filtering Options |
The following fields are available to customized your view:
|
| Screen Features |
|
| Export to Excel |
Allows the extraction of filtered data on the screen in a .XLSX file format used by Excel from Microsoft Office |
2.1.2 Information on "New Requests" Screen
| Screen | New Requests |
|---|---|
| Description |
New Requests is a repository of requests transmitted to a Business Centre. HR employees use this section to review and/or assign requests to themselves for processing. |
| Default display |
By default, it is only new requests with statuses “Auto-transferred” and “Transferred” interventions that are displayed on this screen. |
| Columns in the Screen |
|
| Screen Options |
|

Figure 2-1: Overview of the New Requests Columns and options with the summary
2.1.3 Information specific to "All Requests"
| Screen | All Requests |
|---|---|
| Description |
All Requests is a repository of all requests transmitted to a Business Centre. |
| Default display |
By default, this screen displays “All Statuses” for the default Business Centre. |
| Columns in the Screen |
|
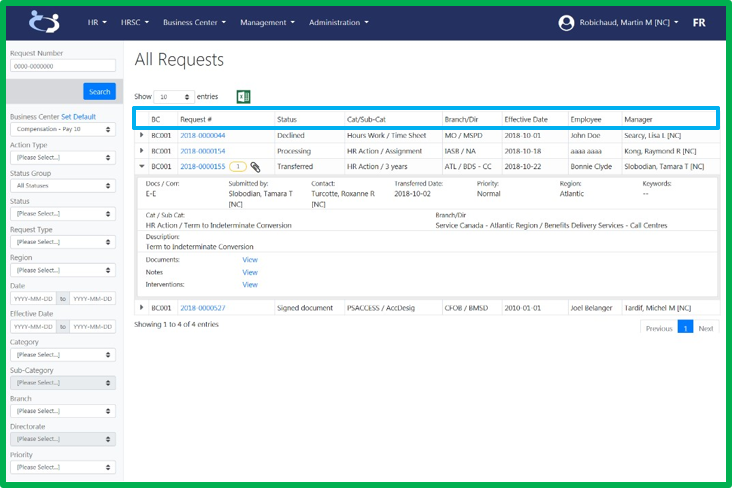
Figure 2-2: Overview of the All Requests Columns.
2.1.4 Information specific to "My Assigned Requests"
| Screen | My Assigned Requests |
|---|---|
| Description |
My Assigned Requests is a repository of requests assigned to a Business Centre employee for processing. HR employees use this section to manage the requests within their caseload. |
| Default display |
The HR Employee Active Workload Status Group is displayed for Business Centers where an employee is identified as a Lead or Collaborator. |
| Columns in the Screen |
|

Figure 2-3: Overview of My Assigned Requests Columns
2.1.5 Filter the requests
Step 1
Click Business Centre - New Requests, All Requestsor My Assigned Requests.
Step 2
Select theBusiness Centre you have access too, if you are working in more than one select All if you have access to all Business Centers.
Step 3
Choose a value within the dropdown menus that you would like to filter.
Step 4
Click on Search
2.2 Overview of Recall Screen
| Screen | Recall |
|---|---|
| Description |
This screen allows user to identify requests in "Pending signature" or "Returned to Client" status and are able to send the requests back into the HR workload without any client intervention. It is also possible to send an email reminder to the client to informing them that we are still waiting for action regarding there request. |
| Filtering Options |
|
| Columns Displayed |
|
| Screen Options |
From this screen, an HR User can identify and return the request into the active workload or can send a reminder email to client. A BC Management User can do it for all BC Employees. |
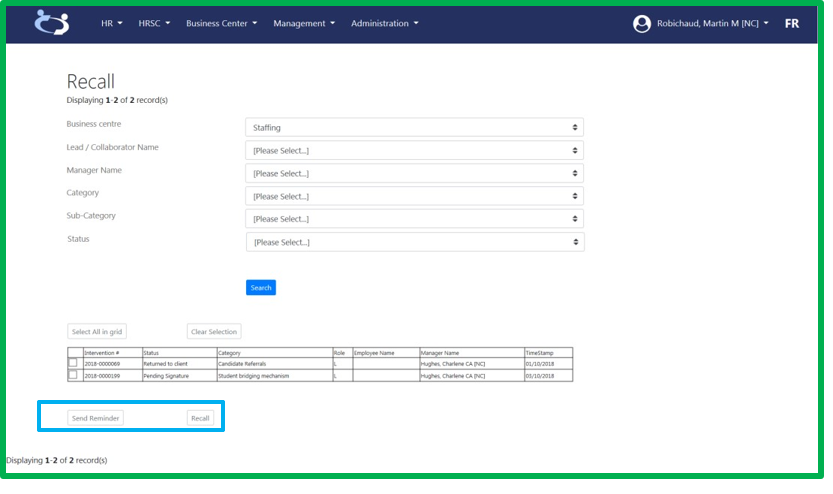
Figure 2-4: User can decide to send an email reminder to the client or to return the request into the HR Workload.
2.3 Overview Workbench Screen
It is now possible to display in one click, new requests, its active workload or pending without having to click on each of the three action types (Past Due, Current and Future).
| Screen | Workbench |
|---|---|
| Description |
This screen allows the BC Employee, an overview of their active workload, pending workload and new requests, which have not yet been assigned. User can also prioritize actions to process according to the Action Type. |
| Status Group |
|
| Action Type |
The Action Type is the "Effective Date" identified on the request and compares it to the Pay Processing Calendar. Requests are aligned as past due, current or a future action type. |
| Feature |
|
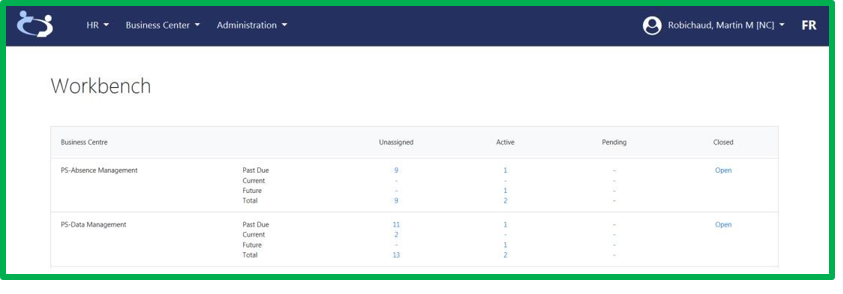
Figure 2-5: The Workbench screen for an employee working in two Business Centre.
2.4 Overview Dashboard Screen
| Screen | Dashboard |
|---|---|
| Description |
This screen is only available to BC Management, to provide you with a picture of the current state of your Business Centre. This screen, opposed to the Workbench screen, has a comprehensive overview than by individual employee. |
| Status Group |
Group Status Unresolved is the total of the Workbench 3 columns. |
| Action Type |
The Action Type uses the "Effective Date" identified on the request and compares it to the Pay Processing Calendar. Requests are then aligned as past due, a current or a future action type. |
| Feature |
Clicking on one of the Action Types will open request types by Category/ Sub-Category and the 3 Status Group. |
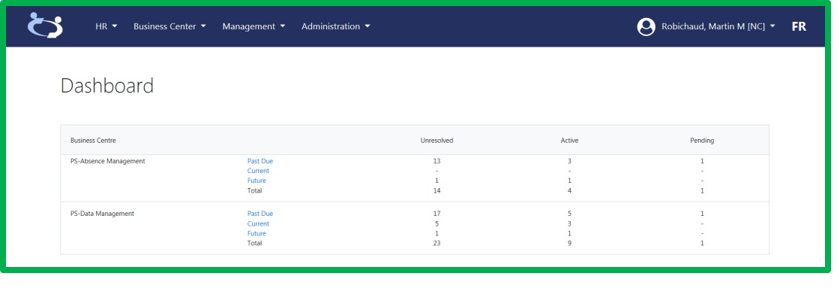
Figure 2-6: The Dashboard of PeopleSoft Absence and Data Management.
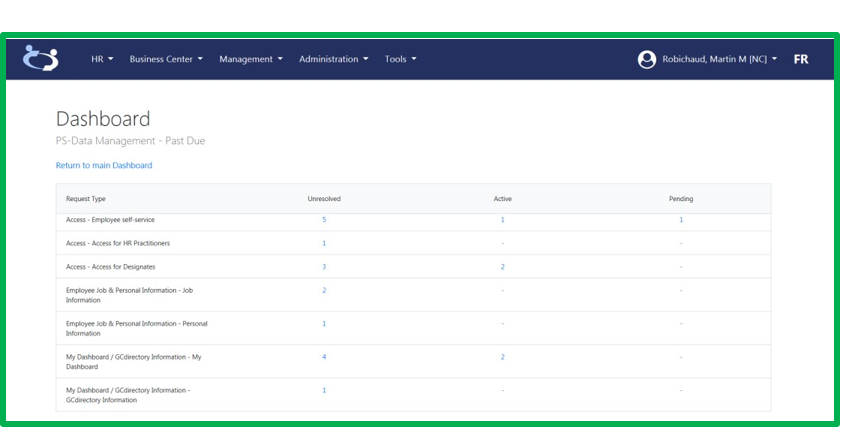
Figure 2-7: The Dashboard of PeopleSoft Data Management.
3.0 Request Management for BC Employees
BC Employee Role
Section 3 is designed to provide a User with a BC Employee Role, all the needed information to manage their workload, to track and research requests that are not assigned to themselves.
3.1 Display Summary of a Submitted Request
Step 1
Click Business Centre - New Requests, All Requestsor My Assigned Requests.
Step 2
Identify the request to view and click on the triangle to the left of the request Number
It is also possible to click on any field of the request (except the Request Number) to extend the summary display and to close it.
3.2 View Details of a Request
Step 1
Click Business Centre - New Requestsor All Requests.
Step 2
Click on the Request Number located at the top corner of the request (Example: 2019-0000001).
On the "My Assigned Requests" screen, the Request Number will direct the user to the “View Intervention” Screen.
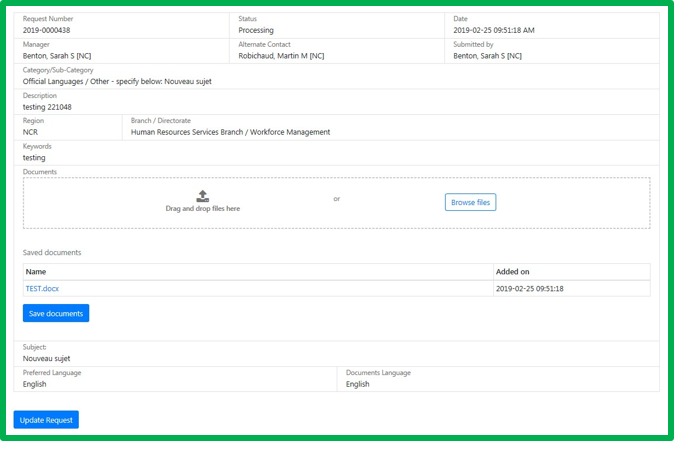
Figure 3-1: View of the details for a Submitted Form.
3.3 View Attachments of a Request
A paperclip icon will appear at the right of a request ID when documents are attached to the submitted request.
Step 1
Click Business Centre - New Requests, All Requests or My Assigned Requests and display summary of the submitted request containing the paperclip icon (refer to 3.1 Display Summary of a Submitted Request).
Step 2
Click the View link located to the right of Documents.
Step 3
Locate the document and click the View link associated to the document.
Step 4
Then, determine, depending on the Web Browser Options, if you want to display on screen or save document in a specific folder before open it.
The "Public" column indicates that the client can view the document.
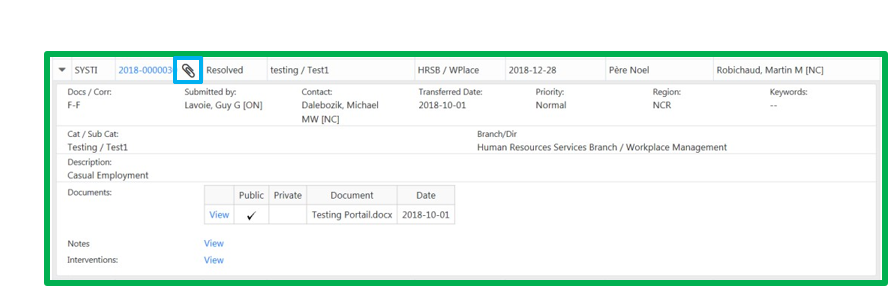
Figure 3-2: Paperclip to view attachments within the request.
3.4 View Notes and Interventions
Step 1
Click Business Centre - New Requests, All Requests or My Assigned Requests and display summary of submitted request (refer to 3.1 Display Summary of a Submitted Request).
Step 2
Click the View links located to the right of Notes to consult notes already added to a request (when applicable).
Step 3
Click the View links located to the right of Interventions to see Business Units already involved on the request.
3.5 Change the Category and Sub-Category of a New Request
This action can only be changed on a new request submitted through the General Enquiry Form, the HR Reporting form, the Pay Escalation Issue Form, the Pay-Related Action Form or the PeopleSoft Form.
Step 1
Click Business Centre - New Requests and display the summary of submitted request to modify (refer to 3.1 Display Summary of a Submitted Request).
Step 2
Click on Change Category / Sub-Category.
If this is not a new request, the following message will be displayed on top of the page at Step 2: The category cannot be changed because previous actions was made before the request was transferred.
Step 3
Identify the new Category and Sub-Category and click on Change.
To cancel the change during the process, you can click the X placed at the top right corner or the Cancel button.
- Request will then be transferred to the Business Centre identified as the new category and sub-category.
- IMPORTANT: If you need to change the effective date and the category / Subcategory, change the effective date first.
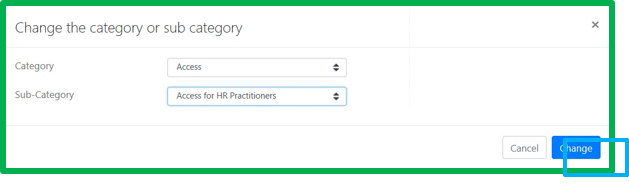
Figure 3-3: Pop-up window allowing the user to change the category and sub-category
3.6 Change Effective Date of a request
The Effective Date can be changed on a new request submitted through the HR Reporting form, the Pay Escalation Issue Form, the Pay-Related Action Form or the PeopleSoft Form.
Step 1
Click Business Centre - New Requests and display the summary of submitted request to be modified (refer to 3.1 Display Summary of a Submitted Request).
Step 2
Click on Change Effective Date.
Step 3
Use the Calendar Icon to identify the new date and click on Change
To cancel the change during the process, you can click the X placed at the top right corner or the Cancel button.
- The request screen then closes and the change is applied in the Effective Date column.
- Important: Due to the purpose of certain actions, it is necessary to change the effective date first if we also have to change the category and subcategory on the New Requests screen (Refer to section 3.5 Changing the category and subcategory of a new request).
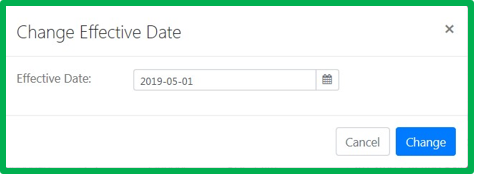
Figure 3-4: Click on the Calendar icon to change the date.
3.7 Assign request to Lead and Collaborators
Step 1
Click Business Centre - New Requests and display the summary of submitted requests to be assigned (refer to 3.1 Display Summary of a Submitted Request).
Step 2
Click on Assign.
Step 3
Use the radio button to select a lead. Only one individual can be identified as the lead.
Step 4
Use the radio button to select a collaborator, if applicable. More than one collaborator can be identified.
Selecting No Role option will remove the lead or collaborator role from the individual.
Step 5
Check the box to send an email to the Lead and Collaborator, if applicable.
Step 6
Click on Assign Intervention.
If Step 5 box has been checked, an automated email is sent to Lead and Collaborators to inform them that a request has been assigned to them.
Status of the request will be shown as Processing if the Leader assigns the request to themselves. If not, the status will be shown as Assigned.
It is important to click Refresh before assigning a new request if you were already in the New Requests screen for too long without taking any action. By Refreshing the screen, it updates the New requests list.
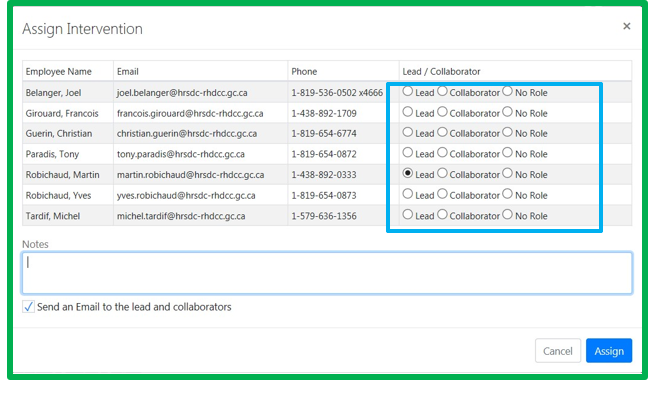
Figure 3-5: Radio buttons to select the lead and collaborators.
3.8 Transfer a New Request to a Business Centre
Step 1
Click Business Centre - New Requests and display the summary of submitted request to transfer to another Business Centre (refer to 3.1 Display Summary of a Submitted Request).
Step 2
Click on Transfer.
Step 3
Check the box beside the applicable Business Centre Unit to transfer the request.. More than one business centre unit can be selected.
Step 4
Indicate the reason of the transfer in the Notes text box.
Step 5
Click on Transfer.
Thereafter, No Action status is indicated for your unit and the request is transferred to the new Business Centre identified.
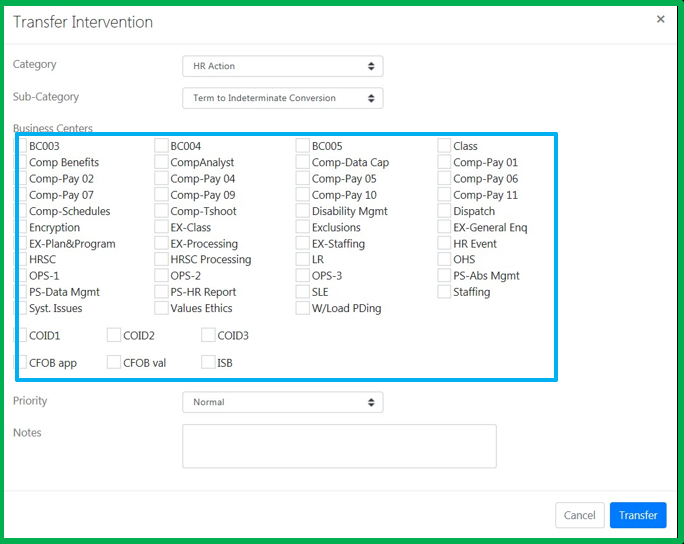
Figure 3-6: List of Business Centres.
3.9 Decline a request from the New Requests Screen
Step 1
Click Business Centre - New Requests and display the summary of the submitted request to decline (refer to 3.1 Display Summary of a Submitted Request).
Step 2
Click on Decline.
Step 3
Choose a pre-defined justification by clicking Select link and/or add a manual justification.
Step 4
Enter an explanation for the status change in the Notes text box.
Step 5
Click on Decline.
Declining automated email is sent to manager, contact and submitter to inform them of the reason why the request has been declined.
- The client is able to copy the declined request form and make changes before resubmitting it.
- Both the Notes Section and Justification Sections are now included in the History Section.
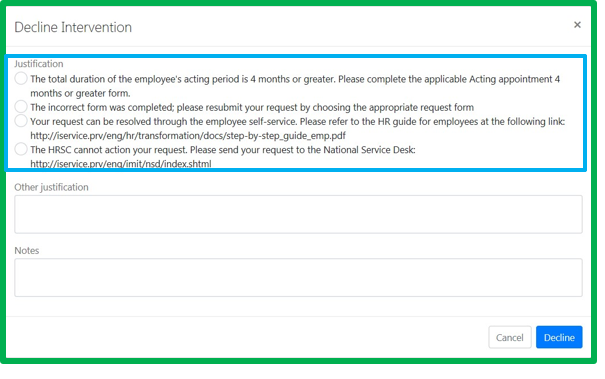
Figure 3-7: Pre-defined justifications to decline a request.
3.10 Assign, Transfer or Decline multiple requests
Step 1
Click Business Centre - New Requests
Step 2
Check the box to the left of request IDs that you would like to assign, transfer or decline.
Step 3
Select the action to do in the Bulk Actions dropdown menu.
Step 4
Click on Apply.
Step 5
- If you selected Assign requests, refer to 3.7 Assign request to a Lead and Collaborators.
- If you selected Transfer requests, refer to 3.8 Transfer a New Request to a Business Centre.
- If you selected Decline requests, refer to 3.9 Decline a request from the New Requests Screen.
3.11 View the intervention
Step 1
Click Business Centre - My Assigned Requests and display the summary of submitted request to view intervention (refer to 3.1 Display Summary of a Submitted Request).
Step 2
Click on View Intervention.
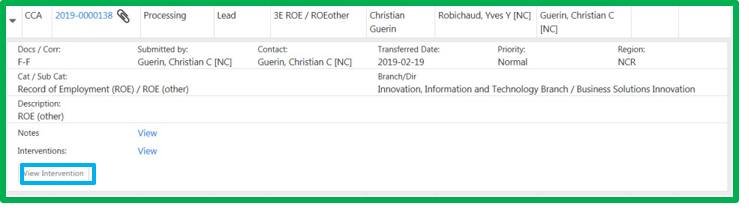
Figure 3-8: View intervention button on the request.
3.12 Understanding intervention
| Fields | Description |
|---|---|
| Contracts |
This section displays all returned signed documentation. |
| Documents |
This section displays all attached documents to a request. |
| Notes |
This section displays all notes inserted to a request. |
| Related Requests |
This section displays all requests related to this specific request. |
| Status |
This section displays the list of Business Centres and leads involved on the request. |
| History |
This section displays the historical actions taken in that request. |
| Assignment |
This section allows to the user to change the lead and collaborators on a request. |
| Business Centre Actions |
This section displays a list of features that can be applied in the process of a request. |
| BF Date |
Use the calendar to select a date as a reminder to follow up on a request. When the selected date has expired, the request is highlighted in red in My Assigned Requests screen (refer to 3.18 Add a Follow-up Reminder to a Request). |
| Importance |
Use these radio buttons to change the level of priority for the request. |
| Count For |
Use the text box to identify the number of actions / transactions, which are to be counted towards this intervention, mainly for reporting purposes. The default is 1. This is an optional field. |
| Key Words |
This text field can contain 20 characters and allow leader and collaborator(s), to give an additional unique identifier that is displayed in the My Assigned Requests Summary Screen (refer to 3.19 Add Key Words to a Request). |
| Category / Sub-Category |
Using these dropdown menus to change the category and sub-category to better align with the request action. Changing will not affect the information provided by the client on the request form. |
| Business Centre |
Use the check box to transfer a request to another Business Centre. The light grey box indicates the request has been already transferred to that Business Centre. |
| Transfer Intervention Keywords |
Allows you to enter keywords to an intervention when transferring it to another BC. |
| Status |
Use the drop down menu to select the best status which represents the progress of the request (refer to 3.16 Update the Status of a Request). |
| Notes |
Use the text box to enter information about the request (refer to 3.14 Add a Note to a Request). |
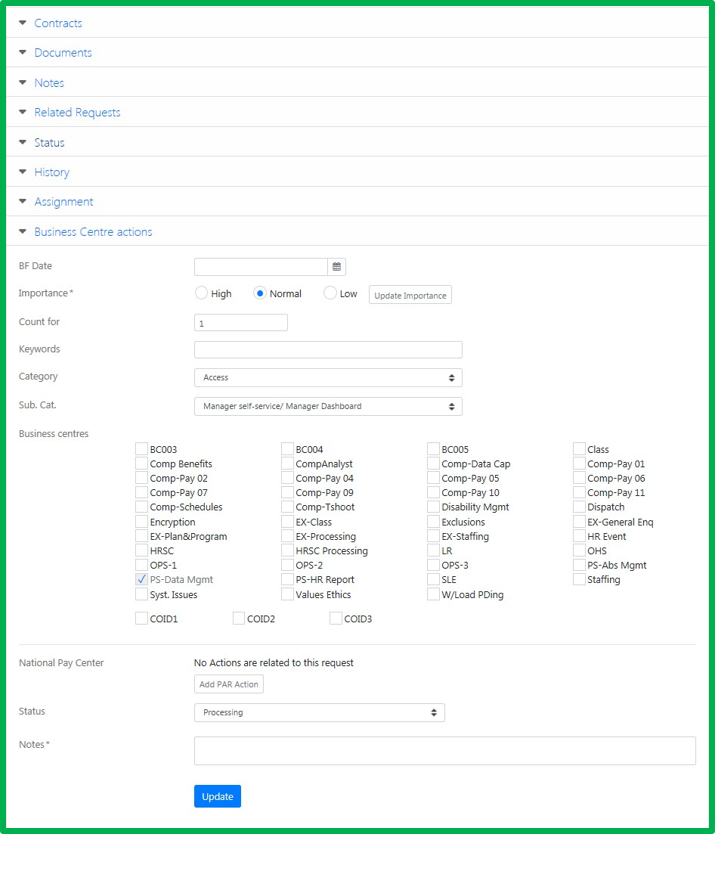
Figure 3-9: Display of the Intervention.
3.13 Display Notes of a request
Step 1
Click Business Centre - My Assigned Requests and access intervention for which you want to view the notes (refer to 3.11 View the intervention).
Step 2
Click on Notes section.
- The latest Note is displayed first.
- Notes from every BC are inserted and can be viewed in the section.
It is important to consult previous notes in the request to be sure that we are taking the correct actions.
If a note is to be ignored by other HR users working on the request, you can locate the note and click the Delete link at the far right of the note. The inserted note is still present but its text is strike. This action cannot be reversed.
3.14 Add a Note to a Request
Step 1
Click Business Centre - My Assigned Requests and display intervention for which you want to add a note (refer to 3.11 View the intervention).
Step 2
Enter the note in the Notes text box.
Step 3
Click on Update
Note is mandatory when statuses Resolved and No Action are selected.
Many BCs can work on the same request on different dates and times, it is important to write clear and comprehensive notes.
If a note is to be ignored by other HR users working on the request, you can locate the note and click the Delete link at the far right of the note. The inserted note is still present but its text is strike. This action cannot be reversed.
3.15 View the Status of a Request
Step 1
Click Business Centre - My Assigned Requests and access intervention for which you want to view the status (refer to 3.11 View the intervention).
Step 2
Click on Status section.
Status is the information visible to the client whereas Status History is the information only available to HR employees.

Figure 3-10: Viewing the Status of a request.
3.16 Update the Status of a Request
Step 1
Click Business Centre - My Assigned Requests and display intervention for the request to change the status (refer to 3.11 View the intervention).
Step 2
Use the Status drop-down menu to select an option (refer to 3.17 Understand the Status of a Request).
Step 3
Enter an explanation for the status change in the Notes text box.
Step 4
Click on Update.
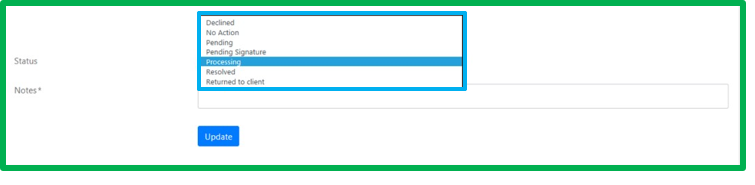
Figure 3-11: Dropdown menu of the available statuses.
3.17 Understand the Status of a Request
| Status | Description |
|---|---|
| Declined |
Closed Requests: To be used when the request cannot be processed as submitted (e.g. wrong staffing form). It closes the request and no changes or actions can be done on client side. HR can only add documents and create links (refer to 3.30 Decline a request). |
| No Action |
Closed Requests: This status is used when we want to close a request within our Business Centre without taking any action or when we want to transfer it to another BC (refer to 3.31 Transfer a request between Business Centers). |
| Pending |
Pending Workload: This status is used when we are waiting for information from client or HR. Use the BF Date to help you manage your pending requests (refer to 3.18 Add a Follow-up Reminder to a Request). |
| Pending Signature |
Pending Workload: This status is used when validation has been completed and we return official documents for signature to client. This action generates, for specific actions, an automatic conversion of details from the original request into a PDF contract (refer to 3.27 Pending Signature of a Client). |
| Processing |
Active Workload: This status is displayed by default when we assign requests to ourselves as a lead. We will manually select this status if a colleague has assigned the request to you. This means that you are starting to take action on the request. This status also stops the client to make any modifications on a new submitted request. It is important not to let the status to remain as “Assigned” when you are starting to process the request. |
| Resolved |
Closed Requests: This status is used when the action in your Business Centre is completed. The request can be transferred if other Units require to action. A resolved request cannot be re-opened but we can add notes, documents and create relations once it is resolved (refer to 3.33 Add Information in a Resolved or Returned Request). |
| Returned to client |
Pending Workload: This status is used when the request contains errors and the client must edit the information. This status could also be used to return a request to a client to cancel (refer to 3.28 Return a Request to the Client for modification). |
3.18 Add a Follow-up Reminder to a Request
Step 1
Click Business Centre - My Assigned Requests and display intervention for which you want to add a follow-up reminder (refer to 3.11 View the intervention).
Step 2
Click on the calendar icon beside the BF Date field.
Step 3
Select a date
Use the X beside the calendar icon to remove the date previously selected or saved by a different user.
Step 4
Click on Update.
A date follow-up Reminder should always be inserted when we use the Pending status on a request.

Figure 3-12: BF date reminder on the request.
3.19 Add Key Words to a Request
Step 1
Click Business Centre - My Assigned Requests and display intervention for which you want to add Key Words (refer to 3.11 View the intervention).
Step 2
Insert information of your choice in the Key Words field. This field can only accept 20 characters or less.
Step 3
Click on Update
The Keywords field added to a request is specific to the Business Centre. A new function allows you to attach a keyword if a request is transferred to another business centre. See section 3.31 Transfer a request between Business Centers.
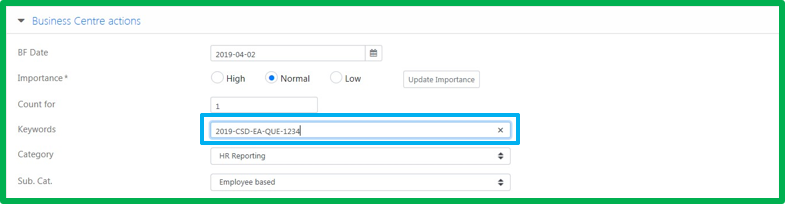
Figure 3-13: Key Words field is 20 characters long.
3.20 Display documents of a Request
The number of documents attached to a request will be displayed between ( ).
Step 1
Click Business Centre - My Assigned Requests and display intervention for which you want to add a document (refer to 3.11 View the intervention).
Step 2
Click on Documents section
- Click on the name of the document to open it.
- The Download Zip button allows you to save all documents in a compressed folder.
- Delete link is used to remove inserted documents.
- Public checkbox identifies that the document can be viewed by the client
- Last column identifies the Date the document has been attached.
3.21 Add documents to a Request
Step 1
Click Business Centre - My Assigned Requests and display intervention for which you want to add a document (refer to 3.11 View the intervention).
Step 2
Click on Documents section
Step 3
Drag and drop documents in the rectangle or click on Browse files and select the required documents.
Step 4
Check the Public checkbox to allow the client to view the attachment. The default setting does not allow the client to view the attachments.
Remove link is used to delete document you wanted to insert.
The addition and deletions of a document appears in the request history and is done automatically without having to confirm the action by clicking on a button.
Only documents to share with the client should be added in public mode. Internal emails should remain private if they are not directly for the client.
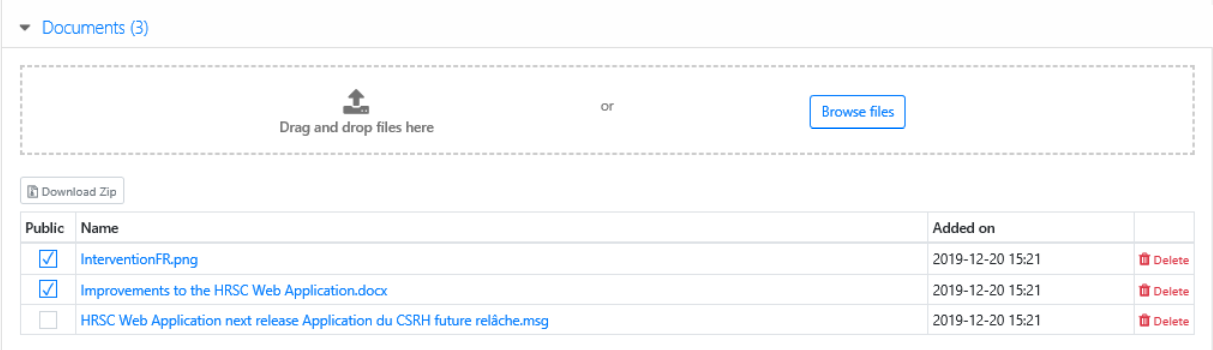
Figure 3-14: Check that box to make document available for the client
3.22 View the History of a Request
This section lists the path request into the HRSC Web Application
Step 1
Click Business Centre - My Assigned Requests and display intervention for which you want to view the history (refer to 3.11 View the intervention).
Step 2
Click History section.
Check the box Include manual notes and click on Refresh data to insert in the history, information typed in the Notes section.
The history shows users and actions taken, documents added and removed, emails sent by the system and the recipients, notes, justifications, instructions and more.

Figure 3-15: Viewing the History of a request.
3.23 Access to a request in relation
Step 1
Click Business Centre - My Assigned Requests and display intervention of the request in relation (refer to 3.11 View the intervention).
Step 2
Click on Related Requests section.
Step 3
Click on the ID Number.
To avoid losing the view of your request, rather than using the select button of your mouse, use the one that shows the popup menu and select, Open in a New Tab or press and hold the CTRL key while clicking the link.

Figure 3-16: View of the request ID 2019-0000111 linked to the current request.
3.24 Understand displays of requests in relation
Two display types can be applied when viewing a related request:
- Full Display: It provides access to the request and allows adding notes and documents to the request.
- Limited Display: It provides the Client’s name, Branch/Directorate, Category/Sub-Category, the status and the Units where the request is processed.
The display type is working according to the Business Centers that are associated to the employee in there user profile. Groups of users have been established to facilitate collaboration between teams.
Here are the groups:
| Groups | Display Type |
|---|---|
|
HRSC and Comp-Troubleshooting
|
The employee has access to the Full display for all requests in the Web Application except for Conflict of Interest. |
|
Classification CompAnalysts Comp & Benefits Comp-Capture Comp-Pay 1 Encryption Exclusion HRSC-Processing Staffing |
The employee has access to the Full display for all requests related to any of these 9 Business Centers The user can also add notes or documents and determine if an automated mail should be sent for the new addition. |
|
All Business Centers |
The employee has access to the Full display for all requests related to a Unit identified in their User Profile. Limited display will apply for requests in relation to BCs not identified in your User Profile. |
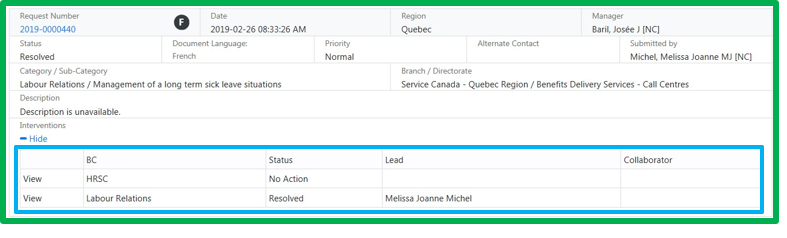
Figure 3-17: BC, Status, Lead and Collaborator is the only information shared on a relation between requests with a limited display
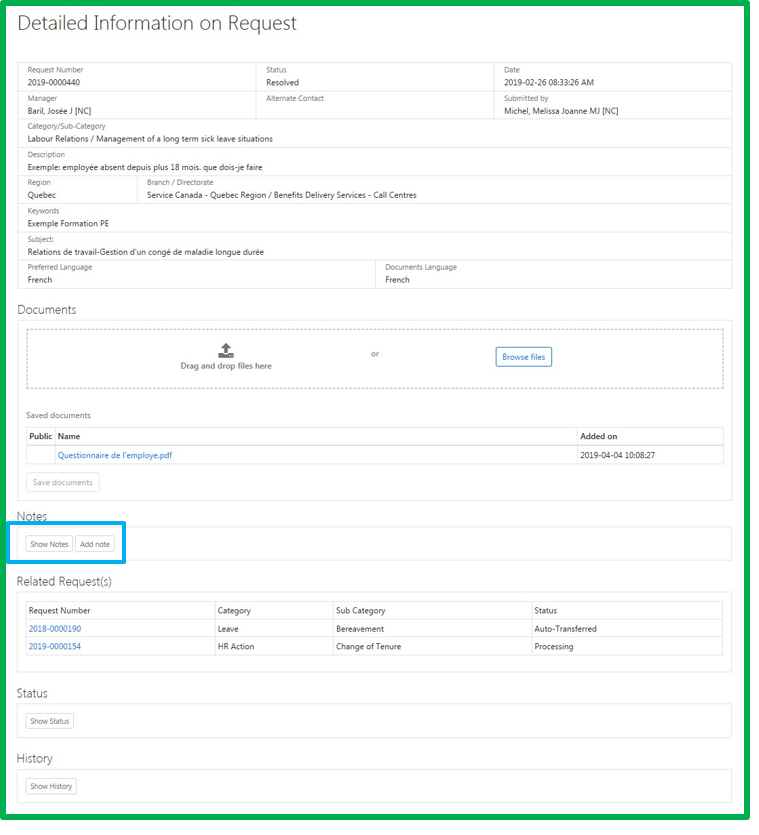
Figure 3-18: Lead or Collaborator can add notes to a request in relation when the full display is applied.
3.25 Add Relations between Requests
Step 1
Click Business Centre - My Assigned Requests and display intervention for one of the requests you would like to link (refer to 3.11 View the intervention).
Step 2
Click on Related Requests section.
Step 3
Click on Add Related Request.
It is possible to link all types of requests regardless of the status or request form.
A related request can be removed by clicking the link Remove Relation.
3.26 Change the Lead and/or Collaborator
Step 1
Click Business Centre - My Assigned Requests and display intervention for the request to change lead (refer to 3.11 View the intervention).
Step 2
Click on Assignment section.
Step 3
Click on button Change Assignment.
Step 4
Use the Lead radio button to select a new lead, if applicable. Only one individual can be identified as the lead.
Step 5
Use the Collaborator radio button to select a new collaborator, if applicable. More than one collaborator can be selected.
Step 6
Select No Role to remove the lead or collaborator role from the individual.
Step 7
Check the box to send an email to the Lead and Collaborator, if applicable.
Step 8
Click on Assign Intervention.
If Step 5 box has been checked, an automated email is sent to Lead and Collaborators to inform them of a request has been assigned to them.
If the change is on the Lead Role, status of the intervention will show "Assigned", if the change is only on the Collaborators, status will remain the same.
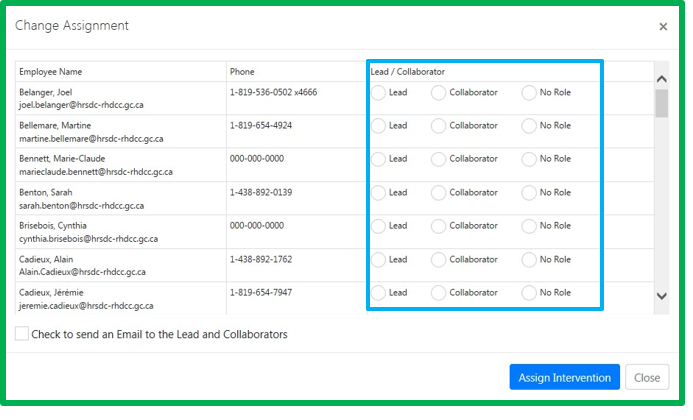
Figure 3-19: Radio buttons to change lead and/or collaborators.
3.27 Pending Signature of a Client
Only one Business Centre can use this status at a time.
Step 1
Click Business Centre - My Assigned Requests and display request to return for signature of client (refer to 3.11 View the intervention).
Step 2
Click on Contracts section if you have documents to send for signature.
System generates an automated PDF for the following actions: Acting Appointment of less than 4 months, Assignment and Secondment IN Agreements and for Extension of Casual, Part Time Worker, Student and Term Employment. If you don't want to generate the automated contract, check the Do Not Generate Contract box.
Step 3
Drag and drop documents to send for signature in the rectangle or click on Browse files and select the documents.
Step 4
Un-Check the Signature Required box for any documents that do not need to be completed and returned.
Step 5
Use the Status drop-down menu to select Pending Signature.
Step 6
Choose a pre-defined instruction by clicking Select link associated to it and/or add a manual instruction.
Step 7
Enter an explanation for the status change in the Notes text box..
Step 8
Click on Update and confirm your choice by clicking on Confirm.
- An automated email is sent to the client with the instructions to follow in order to attach the signed documents within the request.
- Once documents are returned, Lead and Collaborators will receive an automated email indicating that signed documents are returned.
- Once a request is returned, the status will display Signed Document, and request will be Auto-Transferred to the HRSC Capture Unit.
- Client will need to update every document you identified as "Needs Signature" (Box checked at Step 4).
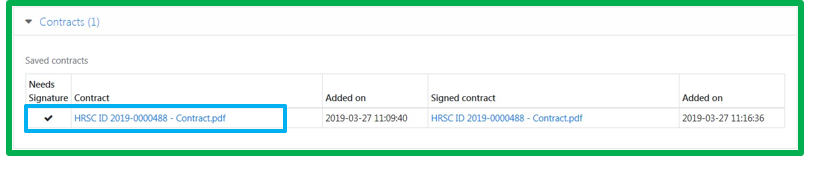
Figure 3-20: A contract is automatically generated for certain transactional forms.
3.28 Return a Request to the Client for modification
Step 1
Click Business Centre - My Assigned Requests and display intervention to return to client (refer to 3.11 View the intervention).
Step 2
Use the Status drop-down menu to select Returned to Client.
Optional: An address book icon appears above the status. Click the icon if you want to replace the existing contact with the request or add one (refer to 2.2 Using the address book of a request form of the client user guide).
Step 3
Choose a pre-defined justification by clicking Select link associated to it and/or add a manual justification.
Step 4
Enter an explanation for the status change in the Notes text box.
Step 5
Click on Update and confirm your choice by clicking on Confirm.
- An automated email is sent to the client with the justification and/or a manual explanation note (if applicable).
- Once the client has confirmed that the change has been completed, the request automatically returns into the workload with the status Modified and an automated email is sent to the leader and collaborators.
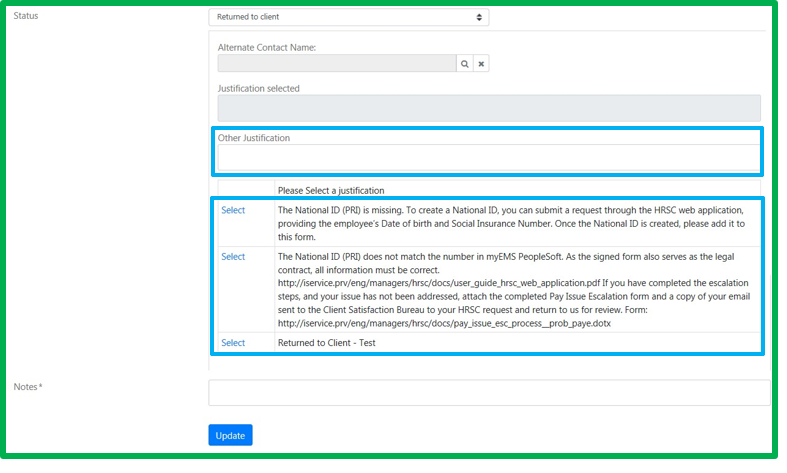
Figure 3-21: A pre-defined justification and/or a manual note can be used when a request is returned to the client.
3.29 Modify the original client request
In order for a client’s original request to be changed, the status of your intervention must be "Assigned" or "Processing" and your business centre must be the first to process the request.
Step 1
Click Business Centre - My Assigned Requests and display intervention to modify (refer to 3.11 View the intervention).
Step 2
Click on Edit Request button.
As a new option, it is now possible to change the type of request for the following groups of forms. Just click on the Change link to the right of the form name and choose the new type of request:
- All appointments term and indeterminate, external and internal, advertised and non-advertised.
- All acting appointments, less than 4 months and 4 months or more.
- All deployments, term and indeterminate, advertised and non-advertised.
- Casual employment and part-time worker.
Step 3
Apply the required changes to the request.
Step 4
Click on Update button.
An automated email is sent to client to inform him of the modification
3.30 Decline a request
Step 1
Click Business Centre - My Assigned Requests and display intervention to decline (refer to 3.11 View the intervention).
Step 2
Use the Status drop-down menu to select Declined.
Step 3
Choose a pre-defined justification by clicking Select link associated to it and/or add a manual justification.
Step 4
Enter an explanation for the status change in the Notes text box.
Step 5
Click on Update and confirm your choice by clicking on Ok.
An automated email is sent to the client with the justification and/or a manual explanation note (if applicable).
The client will be able to copy the data from the declined request into a new request.
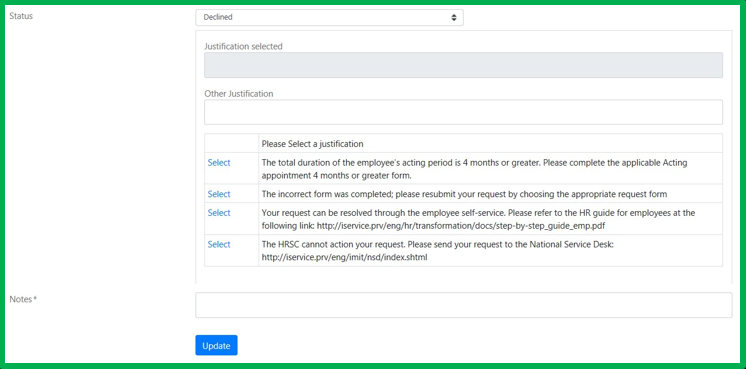
Figure 3-22: A pre-defined justification and/or a manual one can be used when a request from the client is declined.
3.31 Transfer a request between Business Centers
Step 1
Click Business Centre - My Assigned Requests and display intervention for the request to transfer (refer to 3.11 View the intervention).
Step 2
Check the box for one or multiple Business Centers where you want to transfer the request and select in Status field, the one corresponding to actions you did.
- Resolved: You finished your action and the request has to be completed it will be transferred to the new Business Centre.
- No Action: You did not take any action bringing the request to resolution.
- Processing/Pending: You continue to process partially the request but you need to involve a new Business Centre in the resolution.
- Pending Signature and Returned to Client: Never use one of those statuses and then transfer the request at the same time. These 2 actions when entered at the same time will create system bugs.
Step 3
Explain why this request has be transferred to another BC in the Notes section.
If you want one or more keywords to populate the keyword field automatically when transferring the request, insert the phrase (words) into the Transfer Intervention Keywords field. By doing so you will see your keywords appear in the export to Excel of new requests.
Step 4
Click on Update.
Depending on the status selected, here is the system reaction:
- Resolved: request will be closed, transferred to the new Business Centre, and cannot be reassigned back to your Unit.
- No Action: Request will be closed on your side and transferred to the other Business Centre but can be assigned to your Unit if it needs to be.
- Processing/In Pending: Request will continue to be active on your side, also transferred to the checked Unit.
3.32 Add Information in a Colleague's Request
Step 1
Access to a colleague intervention by a Request ID (refer to 3.41 Search in the HRSC Web Application).
Step 2
To add a note. insert it in the Notes text box and click on Add Note or click on Notes section, hit Add Note, insert your comment and confirm with button Add Note.
Step 3
Insert a document, if required (refer to 3.21 Add documents to a Request).
Step 4
Create a relation, if required (refer to 3.25 Add Relations between Requests).
Step 5
Click on Send Email to Lead and Collaborator.
Lead and Collaborators will receive an automated email indicating that one of their request has been updated.
A BC Employee not assigned to a request can only add documents, notes and create relations.

Figure 3-23: Button sending an automated email to Lead and Collaborator.
3.33 Add Information in a Resolved or Returned Request
Step 1
Find a request in one of those statuses by searching by a request ID (refer to 3.41 Search in the HRSC Web Application).
Step 2
Click on Notes section, hit Add Note, insert your comment and confirm by clicking Add Note.
Step 3
Insert a document, if required (refer to 3.21 Add documents to a Request).
Step 4
Create a relation, if required (refer to 3.25 Add Relations between Requests).
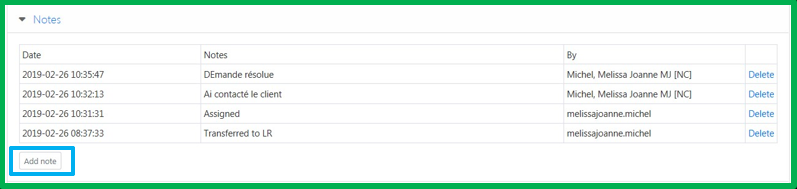
Figure 3-24: Notes Section in a closed request
3.34 Send a follow-up reminder or recall a request
Step 1
Click Business Centre – Recall.
Step 2
Select the Business Centre if you have access to more than one. Different filters can be selected to precise the Search.
Step 3
Click on Search.
Step 4
Check boxes of requests to recall.
Step 5
Click on Send Reminder to send a follow-up reminder to client or on Recall to send back request in Lead/Collaborators Workload.
A recall email is sent to client involved if on Step 5 HR User click Send Reminder. The email indicates that HR is waiting for actions by the client.
A recalled request is returned in the workload with the status that was in place before we returned it to client for modification or signature.
A first reminder email is automatically sent after 10 business days if the request has not yet been returned. A second reminder email is sent automatically after another 10 business days and the request is automatically recalled after 30 business days.
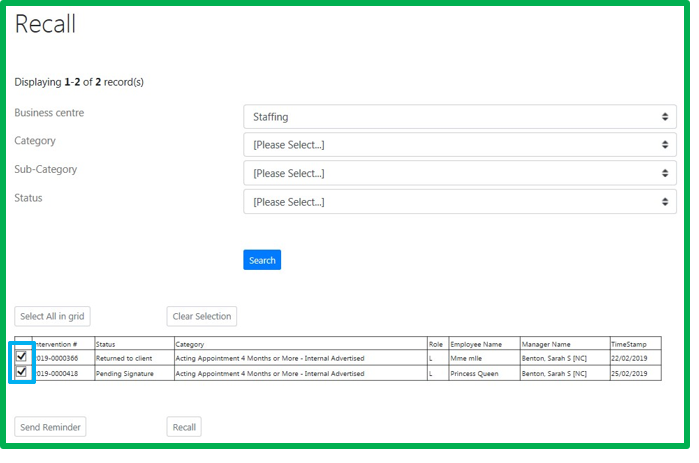
Figure 3-25: Checkboxes identifying requests to recall.
3.35 Confirm Article 34 Validation
Step 1
Click Business Centre - My Assigned Requests and display intervention for the request to confirm Article 34 Validation (refer to 3.11 View the Intervention).
Step 2
Check the box Please check this box once section 34 has been validated.
Step 3
Click on Update.
A new action is recorded with the date and time within the request History.
If you want to uncheck the Please check this box once section 34 has been validated, a note is required to validate your action.
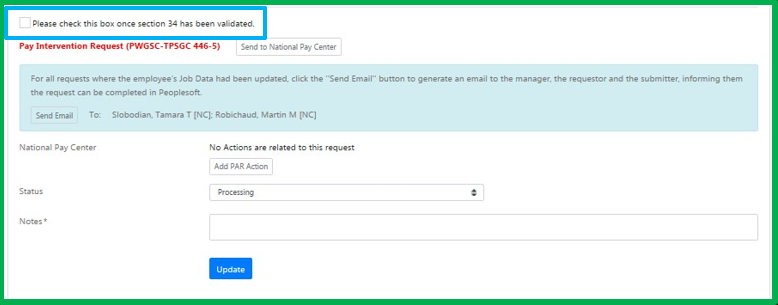
Figure 3-26: Activation of this checkbox is saved in the request History.
3.36 Open and Save a Pay Intervention Request Form
Step 1
Click Business Centre - My Assigned Requests and display intervention for which you would like to fill this form (refer to 3.11 View the Intervention).
Step 2
Click on red link Pay Intervention Request (PWGSC-TPSGC 446-5E).
Step 3
Once directed to the form page, click on Pay action request form 446-5E.
Refer to the Business Procedures to fill the form.
Step 4
Add the completed form to the request (refer to 3.21 Add documents to a Request).
Step 5
Click on Update.
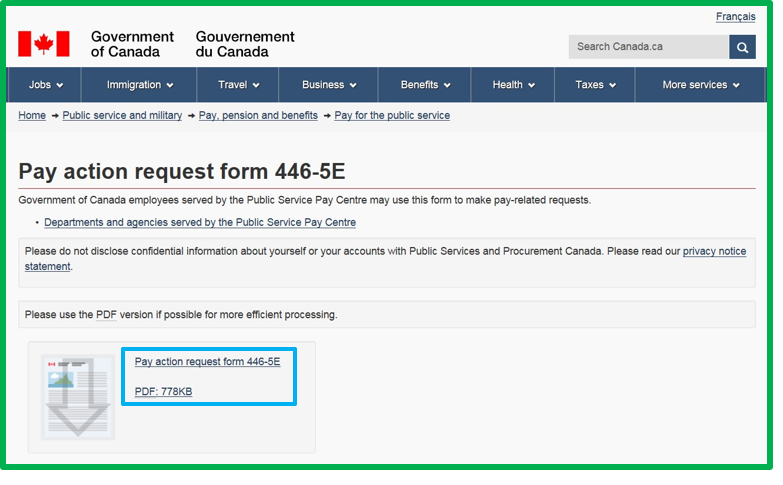
Figure 3-27: Link to the Pay Intervention Request Form.
3.37 Inform Managers of the PeopleSoft Data Entry
Step 1
Click Business Centre - My Assigned Requests and display intervention (refer to 3.11 View the Intervention).
Step 2
Click on Send Email.
An automated email will be sent to the Manager, Alternate Contact and Submitter of the request. It informs them that the new employee has been created in PeopleSoft and that they can now proceed with Onboarding Process next step. It also informs the supervisor to update the schedule of the employee to confirm that it is accurate.
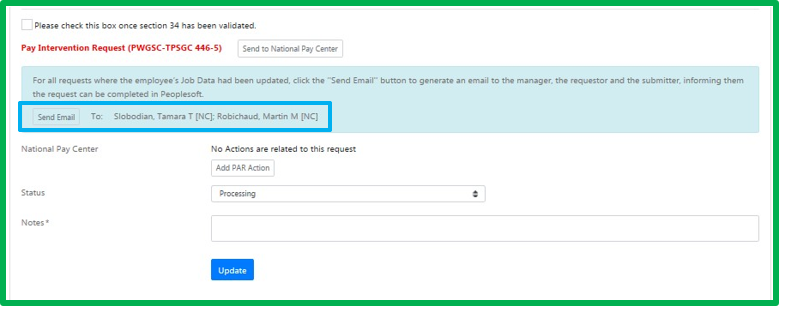
Figure 3-28: Button Send Email will generate an email to manager, contact and initiator to inform them of the data entry.
3.38 Send an email containing selected documents
Step 1
Click Business Centre - My Assigned Requests and display intervention for which documents need to be sent by email (refer to 3.11 View the Intervention).
Step 2
Click on Send to National Pay Centre.
Step 3
Select documents to attach to the email by checking the box in column Attach. If Total/Limit (MB) of Size (MB) column is greater than 6, refer to Step 3 of 3.39 Compress Documents to send via email to continue with next steps.
Click the View link to consult a document, if required.
Step 4
Select the GD Mail box in the dropdown menu Send to.
Step 5
Click on Send.
Step 6
Click on Close
An automated email is sent to Manager, Alternate Contact and Initiator once Send is hit. It indicates that the required documents have been sent to the Public Services Pay Centre to activate the Pay Action.
3.39 Compress Documents to send via email
Step 1
Click Business Centre - My Assigned Requests and display intervention for which documents have to be compressed (refer to 3.11 View the Intervention).
Step 2
Click on Send to National Pay Centre.
Step 3
Select documents to attach to the email by checking the box in column Attach.
Click the View link to consult a document, if required.
Step 4
Click Download.
Step 5
Click on the right arrow of the Save button of your Web Browser and select Save As.
Step 6
Select a place of your choice and click on Save.
If user started at step 3 based on 3.38 Send an email containing selected documents, a manual email has to be sent to the GD mailbox that would have been selected in Send to with documents decompressed.
Step 7
In the screen with the list of documents, click Notification.
Step 8
Click Close.
Automated email is sent at Step 7. It is the same email than the one sent at Step 5 of 3.38 Send an email containing selected documents.
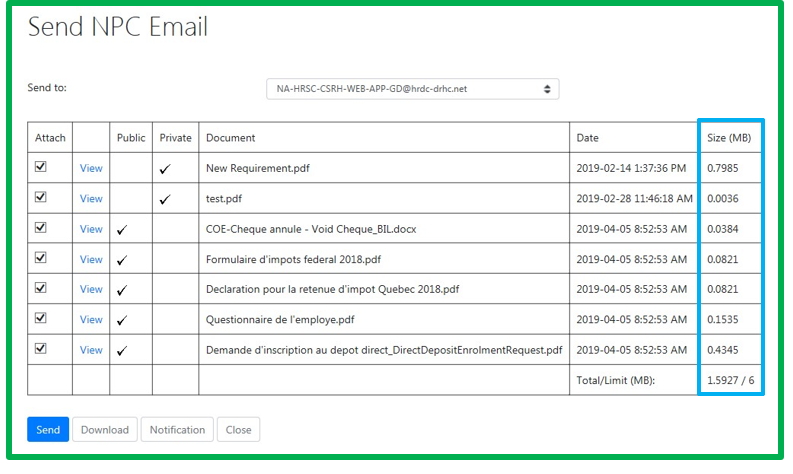
Figure 3-29: Column Size sums documents selected and if total is higher than 6mb, you have to save it instead of sending it;
3.40 Uploading signed documents on behalf of the client
Step 1
Click Business Centre - All requests and view the intervention for that need documents to be uploaded (See section 3.11 View intervention).
Step 2
Click Return signed documents.
Step 3
Click Browse and add the contract/letter or document.
Step 4
Click Submit a signed document.
An email is then generated automatically informing all users involved in the request (Client and HR), that the documents have been returned.
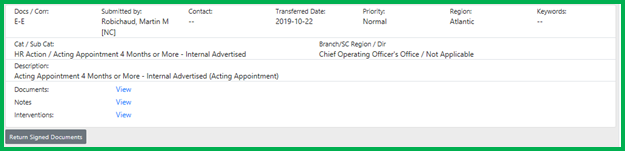
Figure 3-30: New button that allows you to return the request with signed documents on behalf of the client.
3.41 Search in the HRSC Web Application
3.41.1 Search for a Request-by-Request ID
Step 1
Click Business Centre - Search.
Step 2
Select Search by Request Number in Search Type dropdown menu.
Step 3
Enter the number in the Request ID text box (Example: 2019-0000001).
Step 4
Click on Search.
Step 5
Click +View under Interventions to the bottom left corner of the request to display BCs involved and click View to access intervention.
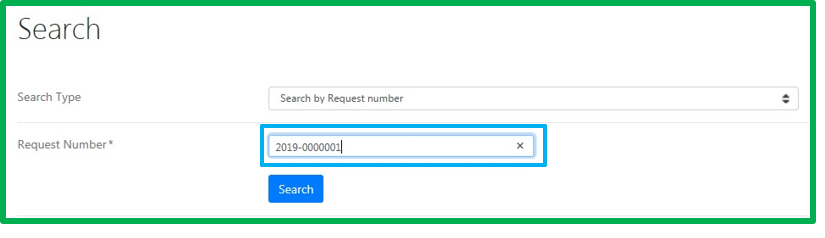
Figure 3-31: Search by Request Number.
3.41.2 Search for a Request by Manager or Contact Name
Step 1
Click Business Centre - Search.
Step 2
Select Search by Manager in Search Type dropdown menu.
Step 3
Enter the Manager or Contact information in the Given Name and Surname text box.
Step 4
Select your Business Centre in the appropriate field.
Step 5
Select the status of the request in the appropriate field.
Step 6
Apply any other search options if required.
Step 7
Click on Search.
Step 8
Select the Manager/Contact you are searching by clicking View link.
Step 9
Click +View under Interventions to the bottom left corner of the request to display BCs involved and click View to access intervention.
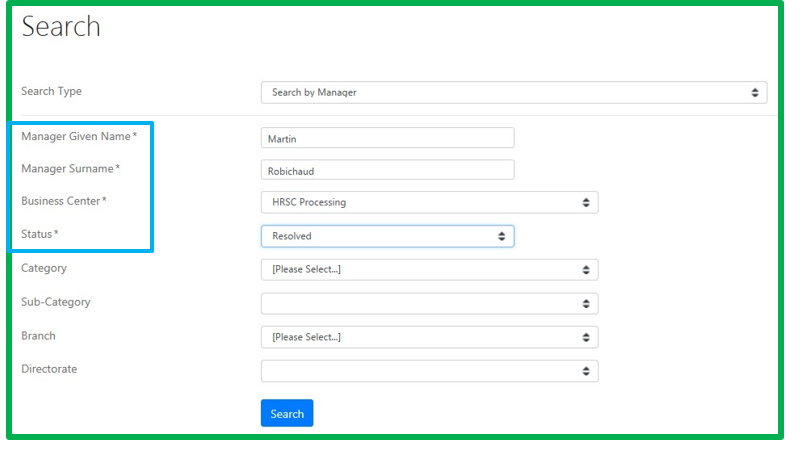
Figure 3-32: 4 mandatory fields when searching by Manager Name.
3.41.3 Search for a Request by Employee Name
Step 1
Click Business Centre - Search.
Step 2
Select Search by Employee for an HR Action and TPA in Search Type dropdown menu.
Step 3
Enter the Employee information in the Given Name and Surname text box.
Step 4
Click on Search.
Step 5
Click +View under Interventions to the bottom left corner of the request to display BCs involved and click View to access intervention.
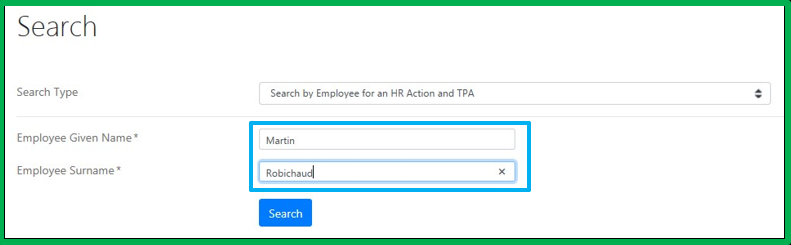
Figure 3-33: Search by Employee Name
3.41.4 Search for a Request by National ID (PRI)
Step 1
Click Business Centre - Search.
Step 2
Select Search by National ID for an HR Action and TPA in Search Type dropdown menu.
Step 3
Type the National ID (PRI) in the text field; you can try to search with and without 0 in front of the identifier.
Step 4
Click on Search.
Step 5
Click +View under Interventions to the bottom left corner of the request to display BCs involved and click View to access intervention.
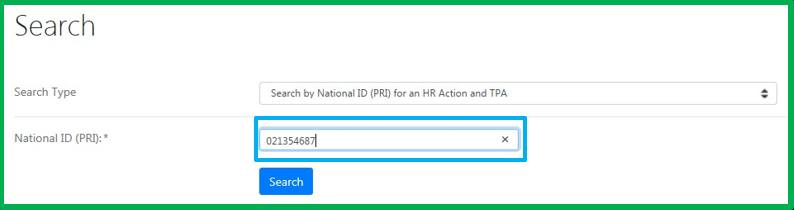
Figure 3-34: Search by National ID.
3.42 Export a list of requests in Excel File
Step 1
Click Business Centre - New Requests, All Requests or My Assigned Requests.
Step 2
If you want to apply filters refer to 2.1.5 Filters the requests.
Step 3
Click on the Excel icon.
Step 4
Depending on your need and Web Browser Options, determine if you want to open document or save it in a specific folder.
A maximum of 15 000 records can be extracted at once.

Figure 3-35: BC Users can extract to Excel for their Business Centre and HRSC Users can extract to Excel for all Business Centers.
3.43 Creation of a PAR Log
Step 1
Launch a search by ID number to reach intervention for which we want to add a PAR Log line (refer to 3.41.1 Search for a Request by Request ID).
Step 2
Click on Add PAR Action.
Step 3
In PAR Action Date, identify the date the action you are recording was taken.
Step 4
Choose the action Type in the dropdown menu.
Step 5
Select the reason why this communication with PSPC was required and needed to be saved within the log.
If reason is not in the list already saved, choose the closer one and do not hesitate to detail it in the Notes field if required.
Step 6
Save the history line by clicking Add PAR Action.
Once the PAR Log row is saved, it becomes available to the Manager in “My Assigned Requests” screen.
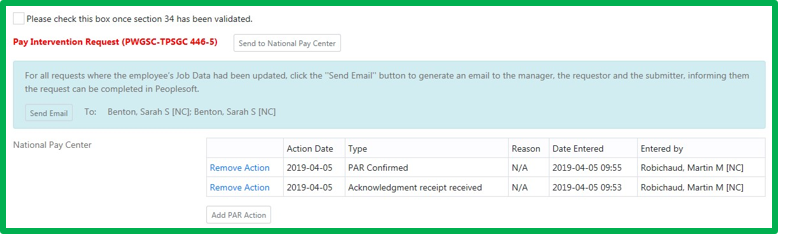
Figure 3-36: An action type and a reason can be linked to identify a line in the log.
4.0 Request Management for HRSC Employees
HRSC Employee Role
4.1 HRSC New Requests Overview
HRSC - New requests - lists of requests submitted through the HRSC Web Application; which are returned by the business centers using the "No Action" status. HRSC employees use this section to review and transfer the request to a business centre for processing. The details of each request are available.
4.2 View Details of a New Request Submitted
Step 1
Click HRSC - New Requests.
Step 2
For more details, click on the Request Number in the upper left corner.
Step 3
To view the notes already added to the request, click +View in the Notes section.
Step 4
To view the documents attached to the request, click +View in the Documents section.
Step 5
To view the request history, click +View from the Status History section.
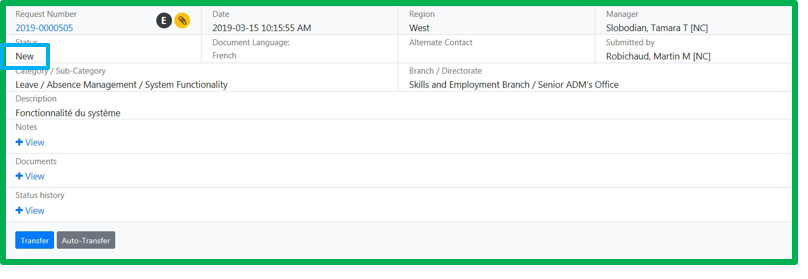
Figure 4-1: A request returned with a "No Action" appears in the HRSC – New Requests screen with a “New” status.
4.3 Transfer manually the request to a Business Centre
Step 1
Click HRSC - New Requests.
Step 2
Consult the request (refer to 4.2 View Details of a New Request Submitted).
Step 3
Click on Transfer
Step 4
Use the drop-down menu to correct the Category and the Sub-Category, if applicable.
Step 5
Check the box beside the Business Centre name to transfer the request to the business centre. More than one business centre can be selected.
Step 6
Indicate the reason of the transfer in the Notes text box.
Step 7
Click on Update.
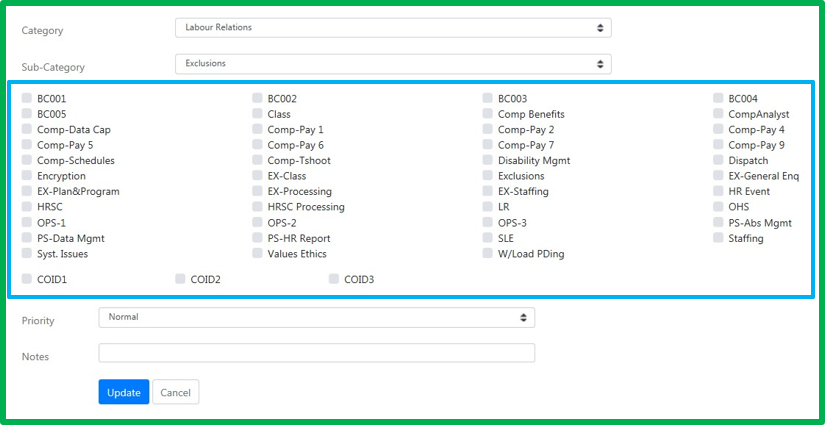
Figure 4-2: List of Business Centers where to auto-transfer.
4.4 Transfer automatically the request to a Business Centre
Step 1
Click HRSC - New Requests.
Step 2
Consult the request (refer to 4.2 View Details of a New Request Submitted).
Step 3
Click on Auto-Transfer
Step 4
Select the Business Centre.
Step 5
Click on Confirm.
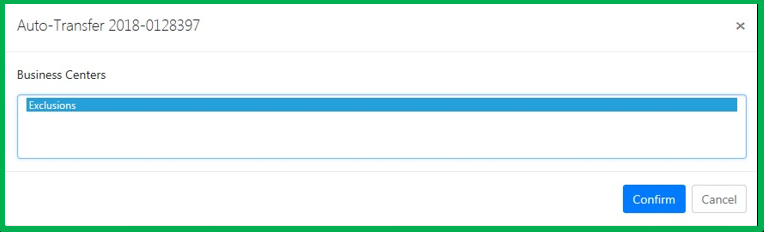
Figure 4-3: List of Business Centers where to auto-transfer.
4.5 Search a Manager through All Requests
An additional search tool is available under HRSC Section to enable the search of a request by manager name without having to identify a specific Business Unit and status.
Step 1
Click HRSC - Search.
Step 2
Select Search by Manager in Search Type dropdown menu.
Step 3
Enter the Manager, Contact or Submitter information in the Given Name and Surname text box. You can add filter criteria but none is mandatory here.
Step 4
Click on Search.
Step 5
Select the Manager/Contact/Submitter name you are searching by clicking View link.
Step 6
Click +View under Interventions to the bottom left corner of the request to display BCs involved and click View to access intervention.
5.0 Request Management for BC Managers
BC Management Role
5.1 Caseload Overview
Management - Caseload is a repository of requests for a Business Centre. BC Managers use this section to review and reassign a request to another employee within the same Business Centre for processing. Details of each request are available.
5.1.1 Overview the list of employees from a Business Centre
Step 1
Click on Management – Caseload.
Step 2
On the left side menu, select the business centre you would like to display.
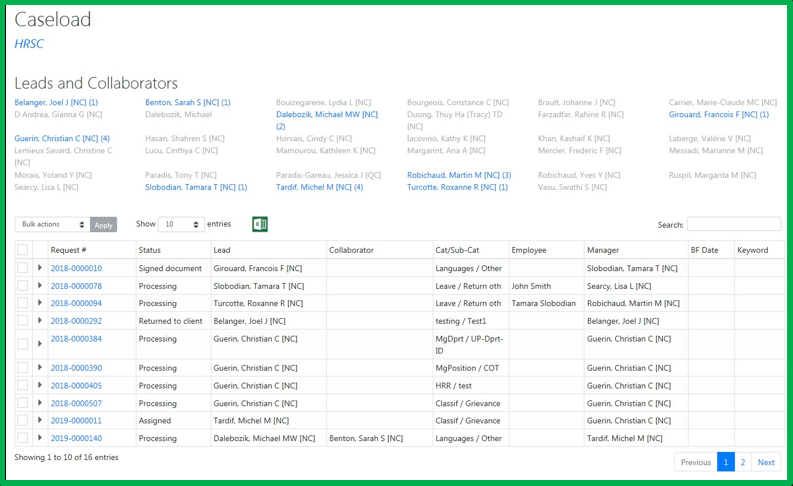
Figure 5-1: Filter to refine search.
5.1.2 View Caseload of an Employee
Step 1
Click on Management - Caseload to display employees from the Business Centre (refer to 5.1.1 Overview the list of employees from a Business Centre).
Step 2
Click on the employee name to view the list of requests.
- The number of requests assigned to an employee is identified between ( ).
- An employee identified in red indicates that they are no longer part of the business centre but still has active requests assigned to them.
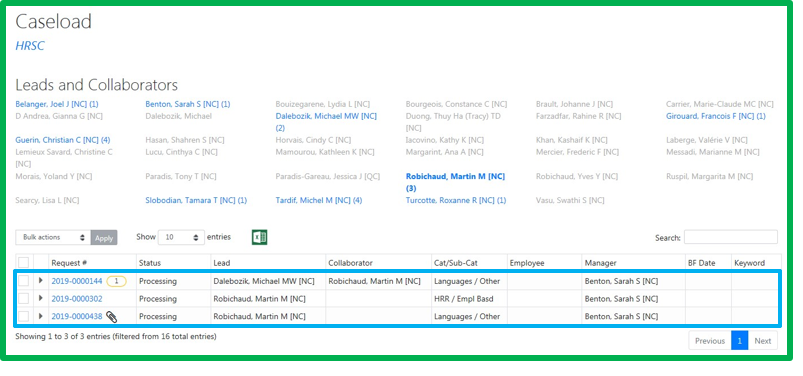
Figure 5-2: Caseload of Business Centre employee.
5.1.3 View Details of a Request
Step 1
Click on Management - Caseload and display the caseload of an employee (refer to 5.1.2 View Caseload of an Employee).
Step 2
Click on the request ID to view details of a request.
If you want to stay on your request page, display the Context Menu of your Internet Browser and select Open in a new tab or press and hold the CTRL key while clicking the Request ID.
5.1.4 Reassign requests from Caseload screen
Step 1
Click on Management - Caseload and display the caseload of an employee (refer to 5.1.2 View Caseload of an Employee).
Step 2
Check boxes of requests that you would like to reassign.
Step 3
Select Assign in the Bulk Actions dropdown menu.
Step 4
Click on Apply.
Step 5
Use the radio button to select a lead. Only one individual can be identified as the lead.
Step 6
Use the radio button to select a collaborator, if applicable. More than one collaborator can be identified.
Selecting No Role option will remove the lead or collaborator role.
Step 7
Check the box to send an email to the Lead and Collaborator, if applicable.
Step 8
Insert a Note, if required.
Step 9
Click on Assign.
If Step 7 box has been checked, an automated email is sent to Lead and Collaborators to inform them that a request has been assigned to them..
Changing the lead and collaborators assigned to a request from this screen will not change the status already associated to the intervention.
5.2 Workbench Screen to manage employee’s workload
The Workbench screen is a tool that can be used by a BC Manager to view: its active or pending workload, of an employee and the list of New Requests. Report to 2.4 Overview of Workbench Screen.
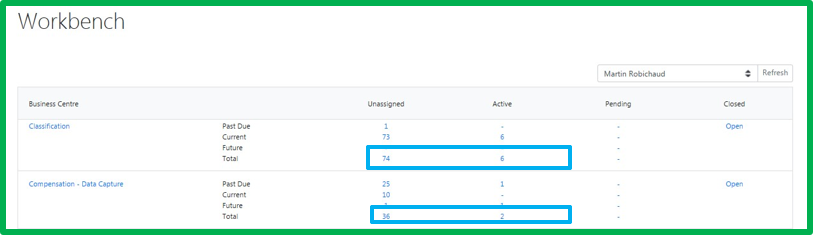
Figure 5-3: Clicking the total will give you the total for a Status group
5.2.1 Display a BC Employee Workbench
Step 1
Click on Business Centre - Workbench).
Step 2
In the dropdown menu that is listing employees on top of the page, select the one you would like to view requests.
Step 3
Click Refresh.
A section (rectangle) is displayed for each Business Centre where employee still has requests in an active or pending Workload. You only have access to requests that are directly under your employee’s workload.
To display Workbench for all BC Employees, click on the name of the BC identified in the first column in Step 2.
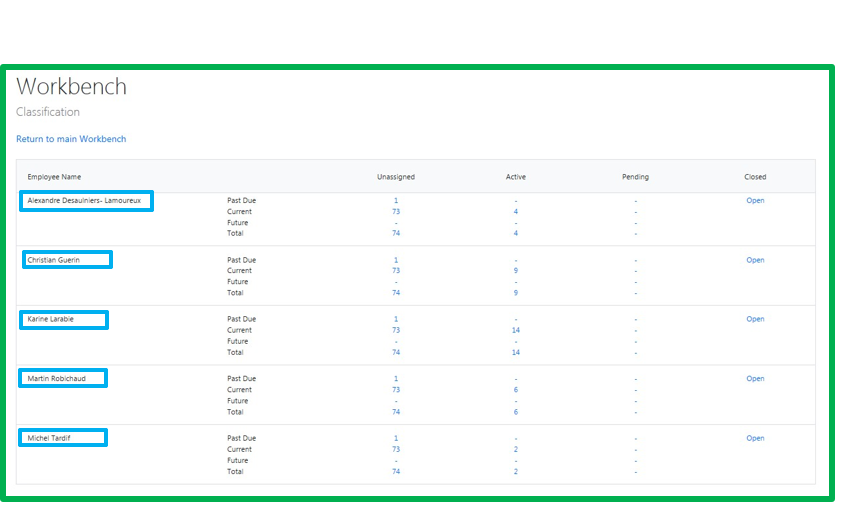
Figure 5-4: After clicking the Business Centre name, you get the list of all employee’s Workbench with a pending or active workload
5.2.2 Display a request detail from an Employee Workbench
Step 1
Click on Business Centre - Workbench and display an employee workload (refer to 5.2.1 Display a BC Employee Workbench).
Step 2
Click one of the links from the active or pending employee workload.
Step 3
Locate request to display and reach the intervention your employee is processing (refer to 3.11 View the Intervention).
You can also extract the Employee List of requests in an Excel format.
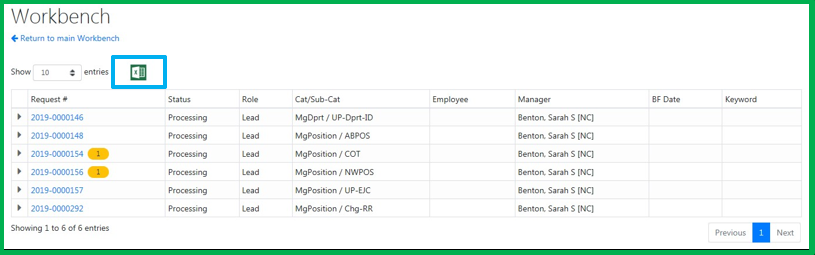
Figure 5-5: The list could be Export to Excel.
5.3 Reassign Request to another Business Centre Employee
Step 1
There are multiple ways to reach detail requests of your employee’s workload. Refer to 3.41 Search in the HRSC Web Application, 5.1.3 View Details of a Request or to 5.2.2 Display a request detail from an Employee Workbench.
Step 2
Click on Assignment section.
Step 3
Click Change Assignment.
Step 4
Use the radio button to select a new lead, if applicable. Only one individual can be identified as the lead.
Step 5
Use the radio button to select a new collaborator, if applicable. More than one collaborator can be selected.
Step 6
Select No Role to remove the lead or collaborator.
Step 7
Check the box to send an email to the Lead and Collaborator, if applicable.
Step 8
Click on Assign Intervention.
If Step 7 box has been checked, an automated email is sent to Lead and Collaborators to inform them of this new intervention.
If the change is on the Lead Role, status of the intervention will show "Assigned", if the change is only regarding the Collaborators, status will remain the same.
5.4 Consult a request from Dashboard
Step 1
Click Management – Dashboard.
Step 2
Click one of the counts to display unresolved requests, active or pending ones based on the Action Type.
Step 3
Click again on one of the counts to display requests based on sub-category.
Step 4
Click on the triangle at the left of the request ID to display information.
Step 5
Click on the View Interventions link.
Step 6
Then, click the View link associated to your Business Centre.
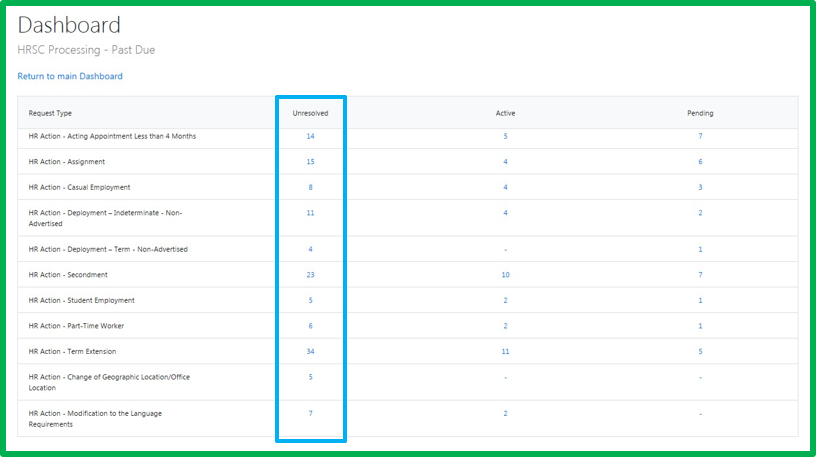
Figure 5-6: Unresolved column contains requests from Active and pending workload and from the New Requests Screen.

Figure 5-7: List of requests clicked.
6.0 Reporting Section
BC Management Role
6.1 Tools for Reports
Reports are only available to users with BC Management access to the HRSC Web Application.
On top of each report forms, you will find different options
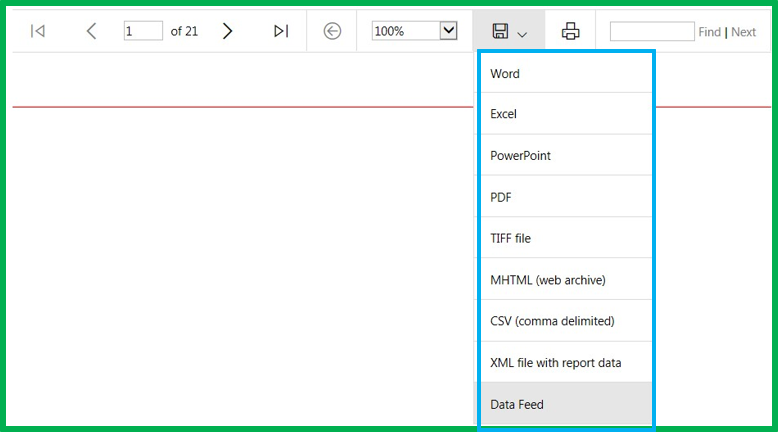
Figure 6-1: Multiple options/ file format are available to convert predefined reports.
| Icon | Description |
|---|---|
 |
Allows the BC Management user to go from one page to another when the size of a report is too long. |
 |
Allows the BC Management user to launch a search on a word or a number. |
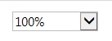 |
Allows the user to change the zoom on the view of the report. |
 |
Gives the capacity for the user to save the report using different format (PDF’ Word, Excel, Tiff, etc.) |
 |
Allows the user to print a copy of the report as shown on the screen. |
6.2 Reports Available
6.2.1 Assignment Report by Intervention Status
This report provides an overview of the intervention status within the Business Centre by assignment. The report details the status of intervention received within the date parameters. This report may be useful for decision making related to resource allocation and workload management.
Step 1
Click Management – Reports.
Step 2
Click on Assignment Report by Intervention Status.
Step 3
Enter the period required in the date fields.
Step 4
Select the type of assignment you would like to report.
Step 5
Select the Business Centre.
Step 6
Click on View Report.
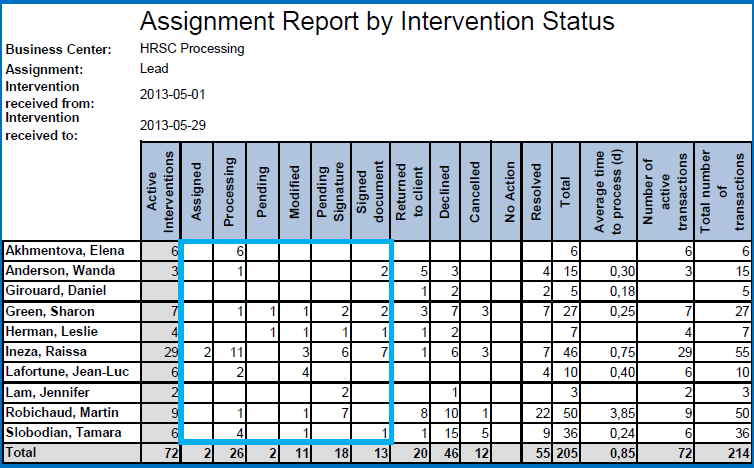
Figure 6-2: Actives Interventions contain more statuses than the new Status Group, pay attention to it!
| Field | Description |
|---|---|
|
Active Interventions |
Calculates the total number of active interventions. Active intervention includes the following status: Assigned, Processing, Pending, Pending Signature, Signed Document and Modified. |
|
Total |
Calculates the total number of interventions received in the Business Centre. Total includes all statuses of interventions. |
|
Average time to process (d) |
Calculates the average time required to process an intervention. Average time to process represents the time status changes from Assigned to Resolved. |
|
Number of active transactions |
Calculates the sum of the field “Count for” for all active interventions. Active interventions include the following status: Assigned, Processing, Pending, Pending Signature, Signed Document and Modified. |
|
Total number of transactions |
Calculates the number of transactions represented by the field "Count for" for all interventions (active and inactive). |
6.2.2 Intervention Processing time Report by Fiscal Year
Report currently unavailable!
This report details the average time for each intervention step (assign and resolve) to provide management with an overview of month-to-month trends.
Step 1
Click Management – Reports.
Step 2
Click on Processing Time Report by Fiscal Year.
Step 3
Select the Fiscal Year.
Step 4
Select the Business Centre.
Step 5
Click on View Report.

Figure 6-3: Average time, in days, that a request remains in the New Requests screen before being assigned.
| Field | Description |
|---|---|
|
Number of interventions received |
Number of interventions received in the Business Centre per month. |
|
Number of transactions |
Based on the interventions received, information from the "Count for" field. |
|
Number of interventions resolved |
Number of interventions resolved in the Business Centre per month. |
|
Average time for intervention assignment in days |
Calculate the average time for the intervention to change from
|
|
Average time for intervention resolution in days (without time in pending) |
Calculates the average time between Assigned and Resolved minus the following periods:
|
|
Average time for intervention resolution in days (with time in pending) |
Based on the interventions resolved, calculates the average time for the intervention to change from Assigned to Resolved with pending periods included. |
6.2.3 Intervention Sub-Category Report by Fiscal Year
Provides an overview of the interventions received according to the sub-category listed on the intervention. This report used to monitor the types of interventions processed within a Business Centre.
Step 1
Click Management – Reports.
Step 2
Click on Intervention Sub-Category Report by Fiscal Year.
Step 3
Select the Fiscal Year.
Step 4
Select the Business Centre.
Step 5
Click on View Report.
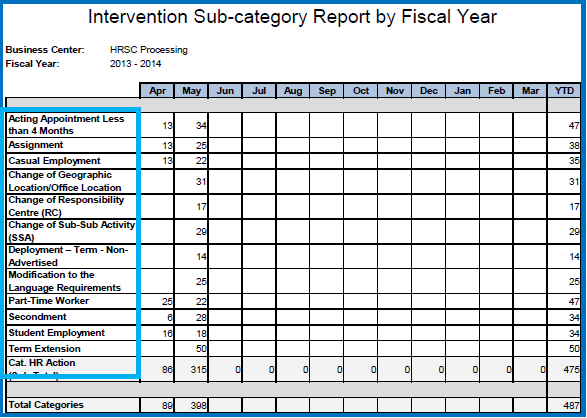
Figure 6-4: All Categories and Sub-Categories will be listed even if it is not processed by the Business Unit.
| Field | Description |
|---|---|
|
April to March (Fiscal Year) |
Calculates the number of interventions received by category and sub-category in a Business Centre. |
|
YTD (Year to Date) |
Calculates the total interventions of all months in the fiscal year to date. |
|
Sub-total |
Calculates total interventions of all sub-categories in a category. |
|
Total categories |
Calculates the total interventions of all categories. |
6.2.4 Intervention Sub-Category Report by Status
Provide an overview of the intervention status within the Business Centre by sub-category. The report details the status of intervention received with the date parameters. This report may be useful for decision making related to resource allocation and workload management.
Step 1
Click Management – Reports.
Step 2
Click on Intervention Sub-Category Report by Status.
Step 3
Enter the period required in the date fields.
Step 4
Select the Business Centre.
Step 5
Click on View Report.
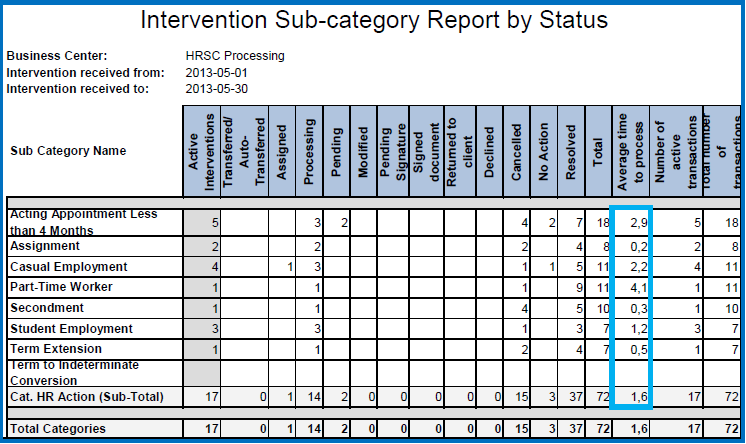
Figure 6-5: Average Time to Process refers to the number of days for a request to go from Assigned to Resolved.
| Field | Description |
|---|---|
|
Active interventions |
Calculates the total active interventions. Active intervention includes the following status: Assigned, Processing, Pending, Pending Signature, Signed Document and Modified. |
|
Total |
Calculates the total for interventions received in the Business Centre. All types of statuses are considered. |
|
Average time to process |
Calculates the average time required to process an intervention. Calculate the time status changes from Assigned to Resolved. |
|
Number of active transactions |
Calculates the field "Count for" for active interventions. Active interventions include the following status: Assigned, Processing, Pending, Pending Signature, Signed Document and Modified. |
|
Total number of transactions |
Calculates the number of transactions represented by the field "Count for" for all interventions (active and inactive). |
6.2.5 Lead Report by Age of Intervention
Provides an overview of an employee’s workload. Calculation starts from the Assigned Date and includes requests in pending statuses. This report may be useful for decision making related to resource allocation and workload management.
Step 1
Click on Management – Reports.
Step 2
Click on Lead Report by Age of Intervention.
Step 3
Select the Business Centre.
Step 4
Click on View Report.
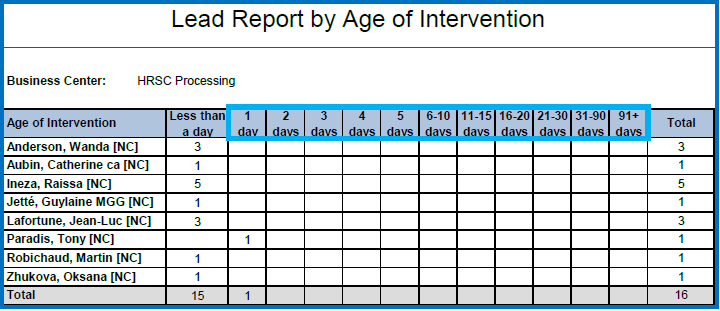
Figure 6-6: Active and pending workloads are considered in the number of days.
6.2.6 Active Intervention Report
This report displays a list of all active interventions in a specific Organization selected for a Business Centre.
Step 1
Click on Management – Reports.
Step 2
Click on Active Intervention Report.
Step 3
Select the period in the date fields.
Step 4
Select the Organization.
Step 5
Select the Business Centre.
Step 6
Click on View Report.
To maintain a good Web Application Performance, you can refer to the All Requests to know what the oldest unresolved request is. This will prevent to launch a research too far in the past.
6.2.7 Separation Report
Report used by Separation Clearance Users.
6.2.8 Active Separation Report
Report used by Separation Clearance Users.
7.0 Access Right Management
BC Management Role
7.1 Types of User Roles and Access Right
User Role
A
Client
B
Business Centre Employee (All)
C
Business Centre Employee (HRSC Processing)
D
Business Centre Employee (HRSC / Compensation Troubleshooting)
E
Business Centre Management (All)
F
Business Centre Management (HRSC Processing)
G
Business Centre Management (HRSC / Compensation Troubleshooting)
H
HRSC Management
Top Menu Screens
User Roles
| HRSC Icon | A | B | C | D | E | F | G | H |
|---|---|---|---|---|---|---|---|---|
| HRSC Home Icon | ✓ | ✓ | ✓ | ✓ | ✓ | ✓ | ✓ | ✓ |
| HR Section | ||||||||
| Submit a Request | χ | ✓ | ✓ | ✓ | ✓ | ✓ | ✓ | ✓ |
| HRSC Section | ||||||||
| New Requests | χ | χ | χ | ✓ | χ | ✓ | ✓ | ✓ |
| Inactive Requests | χ | χ | χ | ✓ | χ | ✓ | ✓ | ✓ |
| Search | χ | χ | χ | ✓ | χ | χ | ✓ | ✓ |
| ASRF | χ | χ | χ | ✓ | χ | χ | ✓ | ✓ |
| ELS | χ | χ | χ | ✓ | χ | χ | ✓ | ✓ |
| Business Centre Section | ||||||||
| Workbench | χ | ✓ | ✓ | ✓ | ✓ | ✓ | ✓ | ✓ |
| New Requests | χ | ✓ | ✓ | ✓ | ✓ | ✓ | ✓ | ✓ |
| Requests | χ | ✓ | ✓ | ✓ | ✓ | ✓ | ✓ | ✓ |
| My Assigned Requests | χ | ✓ | ✓ | ✓ | ✓ | ✓ | ✓ | ✓ |
| Recall | χ | ✓ | ✓ | ✓ | ✓ | ✓ | ✓ | ✓ |
| Search | χ | ✓ | ✓ | ✓ | ✓ | ✓ | ✓ | ✓ |
| Management Section | ||||||||
| Dashboard | χ | χ | χ | χ | ✓ | ✓ | ✓ | ✓ |
| Caseload | χ | χ | χ | χ | ✓ | ✓ | ✓ | ✓ |
| Reports | χ | χ | χ | χ | ✓ | ✓ | ✓ | ✓ |
| Administration Section | ||||||||
| Manage Announcements | χ | χ | χ | χ | χ | χ | χ | ✓ |
| Manage Users | χ | χ | χ | χ | ✓ | ✓ | ✓ | ✓ |
| Manage Users Roles | χ | χ | χ | χ | ✓ | ✓ | ✓ | ✓ |
| Manage Categories | χ | χ | χ | χ | χ | χ | χ | ✓ |
| Manage Sub-Categories | χ | χ | χ | χ | χ | χ | χ | ✓ |
| Manage Automatic Transfer | χ | χ | χ | χ | χ | χ | χ | ✓ |
| Automatic Transfer List by BC | χ | χ | χ | χ | χ | χ | χ | ✓ |
| Manage Branches | χ | χ | χ | χ | χ | χ | χ | ✓ |
| Manage Directorates | χ | χ | χ | χ | χ | χ | χ | ✓ |
| Manage Guides and Procedures | χ | χ | χ | χ | χ | χ | χ | ✓ |
| Manage Justifications | χ | χ | χ | χ | χ | χ | χ | ✓ |
| Pay Period Calendar | χ | χ | χ | χ | χ | χ | χ | ✓ |
| Manage Email Template | χ | χ | χ | χ | χ | χ | χ | ✓ |
| User Name Section | ||||||||
| My Requests | ✓ | ✓ | ✓ | ✓ | ✓ | ✓ | ✓ | ✓ |
| Template and Draft | ✓ | ✓ | ✓ | ✓ | ✓ | ✓ | ✓ | ✓ |
| Logout | ✓ | ✓ | ✓ | ✓ | ✓ | ✓ | ✓ | ✓ |
7.2 Who is giving access right?
| User role | Authority to grant access rights |
|---|---|
|
BC Employee |
BC Management of the specific BC |
|
BC Management |
HRSC Web Portal system administrator |
|
HRSC Management |
IITB System administrators |
7.3 Add a user with a BC Employee Role
Most of the time, failure in giving access to a BC Employee is based on a missing step. Add a BC Employee successfully on a first try, following Section 7.3.
7.3.1 Add or modify user on the Web Application
Step 1
Click on Administration – Manage Users.
Step 2
Type the employee name in the Search text box.
Step 3
Retrieve the employee in the list.
Step 4
If employee is missing from the list, you need to add him/her to the portal. Click on Add Employee, enter employee Last Name and First Name and click Search. Find employee in the list and click Ok to display the profile.
Step 5
Be sure that boxes Active Employee and Lead / Collaborator Access are checked.
Step 6
Click on Update.
The Lead / Collaborator Access checkbox is the most often action that BC Managers forget when they grant access.
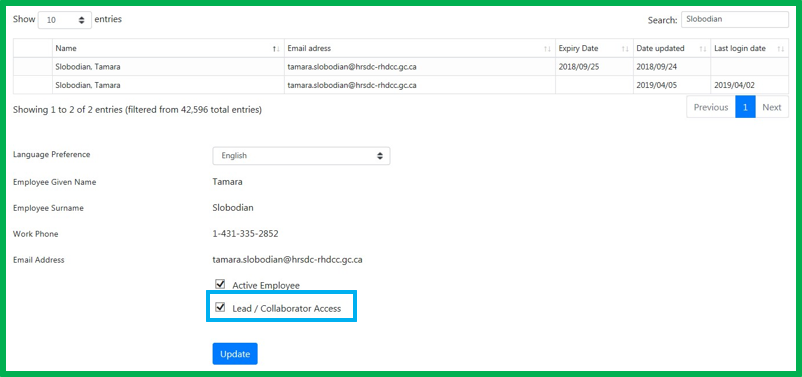
Figure 7-1: Do not forget to check the box "Lead / Collaborator Access"
7.3.2 Grant access to a Business Centre
Now that the employee is added to the Web Application, we need to give the role and Business Centers associated.
Step 1
Click on Administration – Manage Users Roles.
Step 2
Click on the letter of the Employee initial Last Name.
Step 3
Use the Select an Employee drop-down menu to select the name.
Step 4
Select the BC Employee Role as the Role.
Step 5
Check the box of the Business Centre to grant access.
Step 6
Click on Update.
Employee will get access just after this action. Employee might need to log out and go back in the portal to see changes. If employee can access Business Centre but cannot be assigned to requests, refer to 7.3.1 Add or modify user on the Web Application.
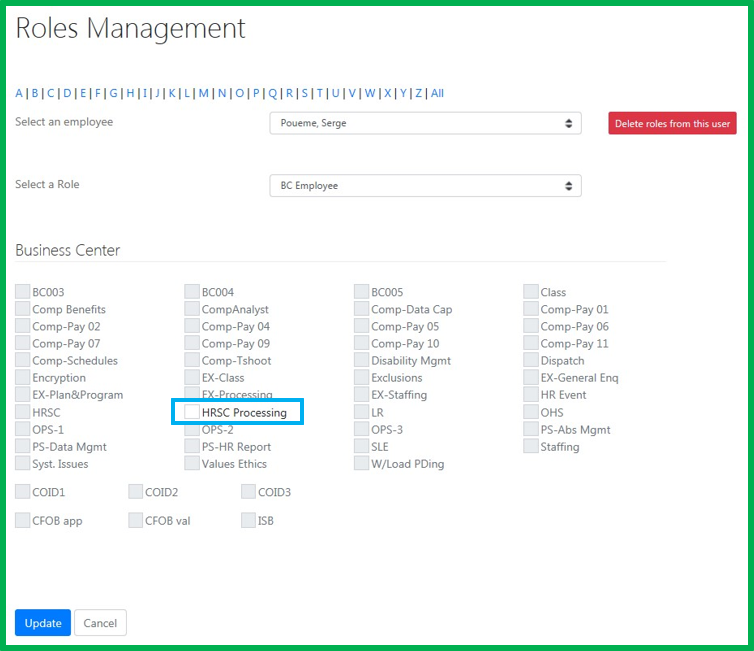
Figure 7-2: A BC Management User will only be able to give access to their BC’s which they are authorized.
7.4 Revoke Access to One or more Business Centre
Step 1
Click Administration – Manage User Roles.
Step 2
Click on the letter of the Employee initial Last Name.
Step 3
Use the Select an Employee drop-down menu to select the name.
Step 4
Remove the checkbox beside the Business Centre name to revoke access to the Business Centre or click on Delete Roles from this User.
Step 5
Click on Update.