Human Resources Service Centre (HRSC) Web Application
User guide for Clients
Version 1.10
Effective Date:
June 19, 2013
Review By Date:
September 30, 2019
Last Modified:
April 23, 2019
Revision History
#
Date
Author
Changed Reference
1.7
2016-02
HRSC
Review format Adjustment of some screens
1.8
2016-05
HRSC
Addition of the Search Tool Addition of the new form
1.9
2018-07
HRSC
Review, update and enhance entire document Adjustments to several screen shots
1.10
2019-04
HRSC
Addition of new screen shots Update content with enhanced features
Contents
What is the purpose of this guide?
- 1.0 HRSC Web Application
- 1.1 Home Page Overview
- 1.2 "My Requests” Overview"
- 1.3 How to access the new "My Requests" Screen
- 1.4 How to set the new "My Requests" Screen as default
- 1.5 How to reset the original "My Requests" Screen as default
- 2.0 Request Forms
- 3.0 Request Management
- 3.1 View Details of a Submitted Request
- 3.2 View status of a request
- 3.3 Understanding the Status of a Request
- 3.4 Modify a submitted request
- 3.5 Modify a returned to client request
- 3.6 Using a Previously Submitted Request Form to Submit a New Request
- 3.7 Add documents to a submitted request
- 3.8 Cancel a submitted request
- 3.9 Pending Signature – Retrieving received documents
- 3.10 Pending Signature – Returning required Documents
- 3.11 Filter submitted requests
- 3.12 Sort submitted requests
- 3.13 Search a request by its Identification Number
- 3.14 Display only the active requests
What is the purpose of this guide?
The guide provides the necessary information to perform available functionalities and adds guidance on the various good practices using the Web Application.
Acronyms
Some acronyms will be used to reduce text in this guide. Refer to this section if you are unsure of any of these terms.
| Acronym | Short-Term Outcomes |
|---|---|
| BC | Business Centre |
| Cat. | Category |
| E | English |
| F | French |
| HR | Human Resources |
| HRSC | Human Resources Service Centre |
| Sub. Cat. | Sub-category |
Icons Used in this User Guide
You will see 3 main icons while you go through this guide. Each will share information on different aspects. The role of each icon is described in the right column.
| Icon | Description |
|---|---|
| Provides information on sending and receiving automated emails generated by the Web Application. | |
 |
Provides information to readers on limitation and reaction of the Application while we go through the steps performed. |
 |
Sharing tips and tricks to simplify the use of the HRSC Web Application on the Client side. |
1.0 HRSC Web Application
Client
1.1 Home Page Overview
This screen is your starting point when you want to view announcements or initiate a new request form.
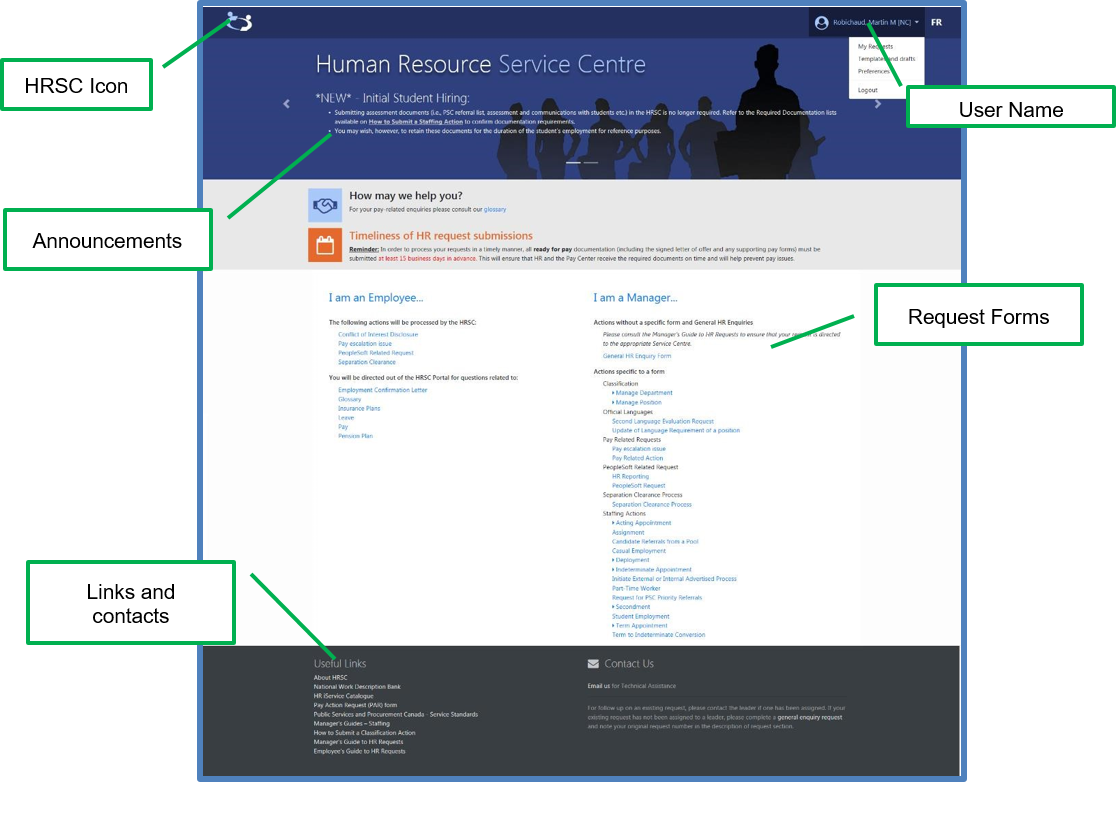
Figure 1-1: HRSC Home Page
| Screens | Description |
|---|---|
| HRSC Icon |
The HRSC icon will bring you back to the HRSC Web Application Home Page, which contains announcements and list of request forms to submit. |
| User Name |
Under your name, you will find:
|
| Announcements |
HRSC announcements will be posted on the HRSC web application homepage. To view each announcement, simply click the left or right arrow at the edge of this section. |
| Request forms |
The Main Section of the Home Page contains various forms, which are grouped by request type. |
| Links and Contacts |
This section contains useful links to assist you in submitting a HR Request form, a Feedback link and a Help and Support Section directing users to the direct point of contact depending on the system. |
1.2 "My Requests" Overview
A new version of the "My Requests" screen has been developed and is now available to clients.
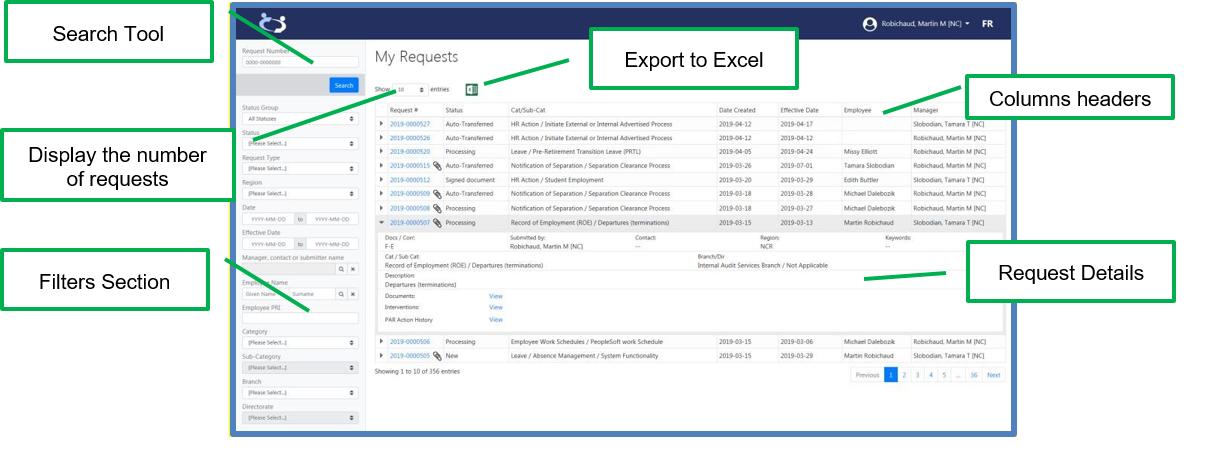
Figure 1-2: Display of the new "My Requests" Screen.
| Screens | Description |
|---|---|
| Search Tool |
The quick search by request number tool is now at the top of the left side section. Just type the number and click on "Search". |
| Display the number of requests |
The user can adjust the number of requests to be displayed on this screen by 10, 25, 50 or 100 requests per page. |
| Columns Headers |
The Request Number, Status, Category and Subcategory identified, Creation Date, Effective Date, Employee Name concerned and Manager Name identified on the form are columns available in the basic display. By clicking on one of the column headings, the list of the displayed requests will be automatically sorted. |
| Request Details |
Just click on the line of a request to see additional information:
|
| Filters Section |
Multiple filter options can be applied to restrict the display of requests on the screen. Just choose the required filters and confirm your choice by clicking "Search". |
| Export to Excel |
The Excel icon allows you to export all the requests displayed in .xlsx format. Only the most common fields will be found in the extraction. |
1.3 How to access the new "My Requests" Screen
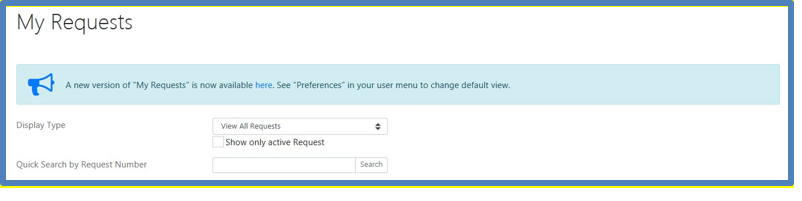
Figure 1-3: The "Here" link leads to the new "My Requests" Screen.
1.4 How to set the new "My Requests" Screen as default
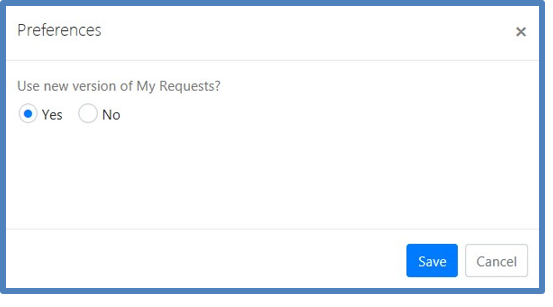
Figure 1-4: The "Yes" radio button will identify the new "My Requests" screen as default.
How to reset the original "My Requests" Screen as default
2.0 Request Forms
Client
2.1 Requests Form Overview
Submission of a request form requires that all mandatory fields be completed. A small asterisk marks these fields. Failure to complete a mandatory field will prevent you from submitting the request form and an error message will display at the top of the form.

A manager’s guide is shown in the upper right corner of all specific transaction forms and provides you with useful information for your specific action type.

2.2 Use the Address Book on a Request Form
- Repeat steps 2 to 5 if you want to add multiple contacts to a request form.
- Check the box Me to insert your name as an Alternate Contact Name or click the X to delete the user identified.
- Sub-Delegated Manager and Alternate Contact cannot be identified in both fields.
Did you have some difficulty finding the name of an employee?
Type the beginning of the last name followed by an asterisk * to display all surnames beginning with those letters. This is useful to locate surnames and those with an apostrophe.
What if I click on the Address Book and no windows are opening?Some Searching/Tool Bars enabled in the browser navigator are blocking the functionality to open the Address Book. How to fix it? Contact the National Service Desk to ask a technician on site to uninstall the incompatible tool bar of your browser and to ensure, once rebooted, that the Windows pop-up is functional.

Figure 2-1: Address book on the request form.

Figure 2-2: Enter the last name then first name, separated by a comma and click search
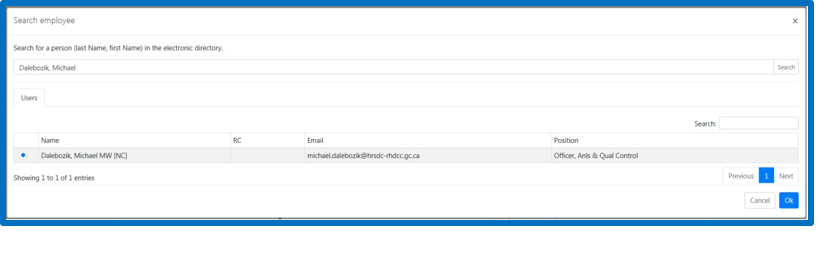
Figure 2-3: Choose a name and click ok.
2.3 Add documents to a request form
The submission of a request and the functionality to attach documents can be done now in 1 unique step.

Figure 2-4: Attach documents section.
2.4 Finalize the request
Click on Submit button
A confirmation email will be sent to the submitter of the request, the alternate contacts and the Manager identified on the request.
2.5 Drafts and Templates
All employees who would like to initiate a request have the option to:
- Save as Template – for a multiple use. Once the request is retrieved and submitted, fields identified before saving as a template go back to the same value.
- Save as Draft – for a unique future use. You can retrieve the request where you left off and once submitted, the draft disappears from the Templates and Drafts Section.
2.5.1 Save Request Form as a Template or Draft
Enter a name and click Ok.
If you have request types for which Location of Work is required and the location is missing from our database, you can build and save a template with this information. These fields would only need to be prefilled once.
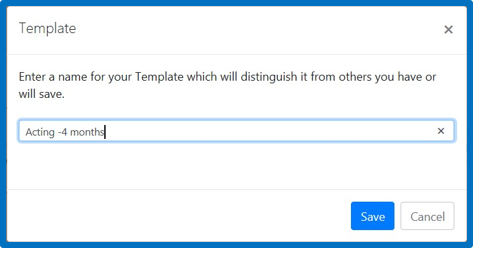
Figure 2-5: Type a relevant name for your template or draft.
2.5.2 Access Request Form Saved as a Template or Draft
Click on the name of draft or template you wish to use.
Once reviewed, you can save this Draft or Template as a new Draft or as a new Template or you can submit the request.
2.5.3 Delete Request Form Saved as a Template or Draft
Click on the X to Delete the item.
As a good practice, we ask clients to do a cleanup and to delete Templates and Drafts when they are no longer used or when they have been saved a while. This way, you will always have the most up-to-date version.
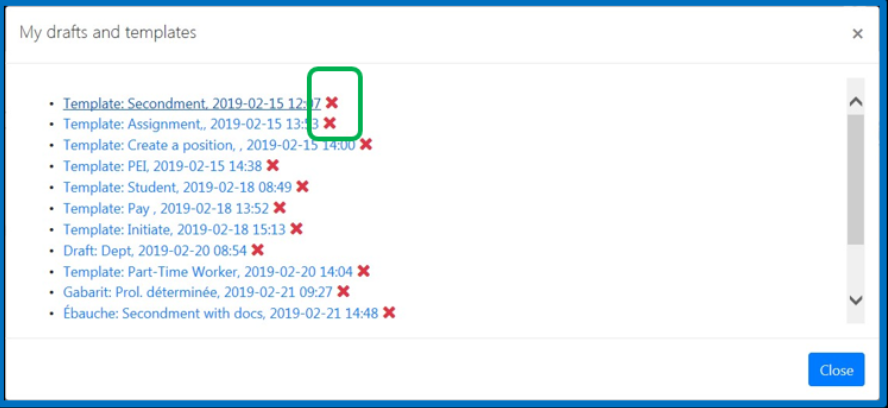
Figure 2-6: Use the X to remove a saved draft or template.
3.0 Request Management
Client
3.1 View Details of a Submitted Request
3.2 View status of a request
At the bottom of the request, click on the +View under Interventions.
You will find the name(s) of the Business Unit(s), the lead and collaborating employee(s) working on the request and the status within each of those Business Units. Many Business Centers can work simultaneously on your request, it is important to refer to this section to get real time statuses on your request.
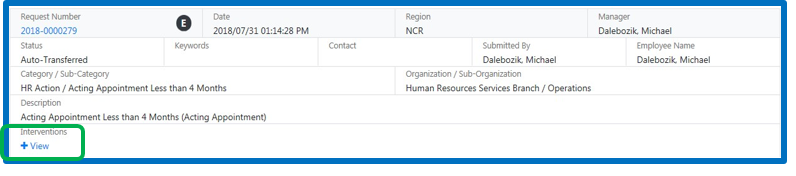
Figure 3-1: The + to view the status of the request.
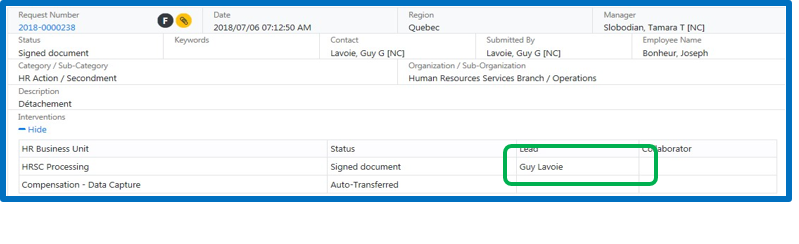
Figure 3-2: Status information
3.3 Understanding the Status of a Request
| Status | Definition |
|---|---|
| Assigned |
Indicates the request was assigned to a lead and collaborator (if applicable) within the HR business unit. Click on the + sign to view the name (s). |
| Auto - Transferred |
Indicates the request has been automatically transferred to the appropriate HR business unit for action. |
| Cancelled |
Indicates the client cancelled the request. Request is closed and no further changes or action can be made on the request. |
| Declined |
Indicates the request cannot be processed as submitted. Request is closed and no further changes or action can be made on the request. |
| Modified |
Indicates the client updated the information requested for a returned request. |
| New Request |
This status indicates that a Separation Clearance Process has been initiated for an employee. This means the request is waiting for the final submission, which should be initiated on the official Employee Departure Date. The request can be finalized by the Manager or by an Alternative Contact authorized to finalize the request on his/her behalf. |
| Pending |
Indicates the request is on hold. |
| Pending Signature |
Indicates the request is on hold. Client Action Required: The HR business unit is waiting for the client to sign and return documents. |
| Processing |
Indicates the HR business unit is working on the request. |
| Resolved |
Indicates the HR business unit processed the request. Request is closed and no further changes or action can be made on the request. |
| Returned to Client |
Indicates the request could not be processed as submitted. The request contains errors and the client will need to modify the information. Client Action Required: The HR business unit is waiting for the client to provide an updated request. |
| Signed Document |
Indicates the client has signed and returned the documents. |
| Transferred |
Indicates the request has been transferred to another HR business unit for action. |
3.4 Modify a submitted request
A request form can be modified from the time it is submitted to the moment the status is changed to “Processing”, or on a “Returned to client” status. If you would like to modify a request which is being processed, you should contact the person processing your request via email or telephone (refer to 3.2 View status of a request)
Click on the underlined Request Number located at the top corner of the request (Example: 2019-0000001).
An overview of the request will appear. Click on Update Request.
Review the information and modify as necessary.
At the bottom of the page, click on Update.
A confirmation email will be sent to the manager, alternate contacts, submitter, lead and collaborators if a request is assigned.
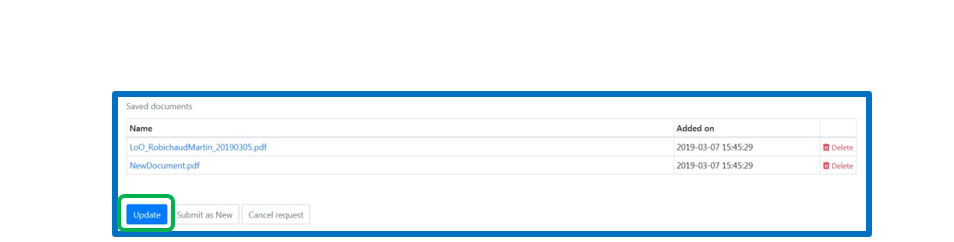
Figure 3-3: Update button to save changes to a modified request.
3.5 Modify a returned to client request
In cases where a request is returned to client for modification, client will receive an automated email with a justification indicating the information that needs to be updated on the request form.
Click on the underlined Request Number located at the top corner of the request (Example: 2019-0000001).
An overview of the request will appear. Click on Update Request.
Review the information and modify as necessary.
At the bottom of the page, click on Update.
If all changes have been made to the request, confirm by selecting radio button "Yes, return my request for processing". Click on "Not yet, just save my changes for now" if you want to go back into the request to modify at a future time.
Click on Submit.
A confirmation email will be sent to the submitter of the request, the alternate contacts and the Manager identified on the request.
It is important when updating your request for the last time that the radio button "Yes" be selected in order to return the request to HR for processing.

Figure 3-4: Pop-up is asking if all changes are completed.
3.6 Using a Previously Submitted Request Form to Submit a New Request
Click on Continue.
A confirmation email will be sent to the submitter of the request, the alternate contacts and the Manager identified on the request.
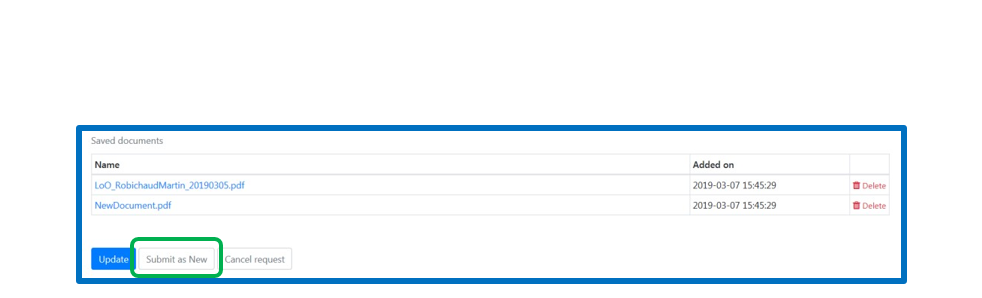
Figure 3-5: Documents attached within the request form will not carry forward with the new request.
3.7 Add documents to a submitted request
At anytime in the process of a request, a client has the ability to add documents to a request form.
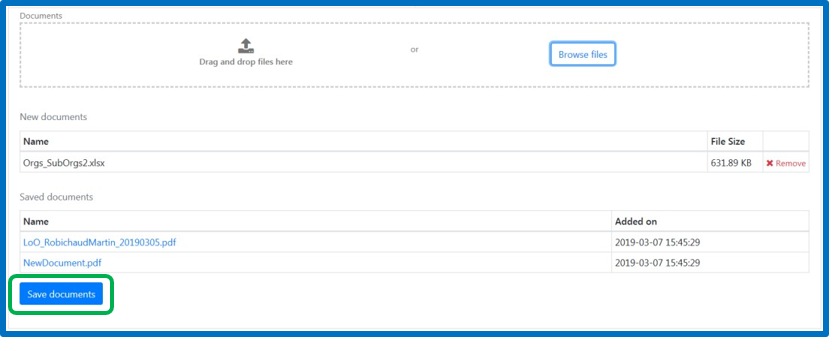
Figure 3-6: Use the "Save documents" button to upload documents to the request.
3.8 Cancel a Submitted Request
A request can be cancelled as long as its status is not Resolved, Pending Signature or Signed Document. Contact the lead on your request if you are unable to cancel the request so that they can return it to you to cancel.
At the bottom of the page, click on Cancel request.
A confirmation email will be sent to the submitter of the request, alternate contacts, Manager, lead and collaborators.
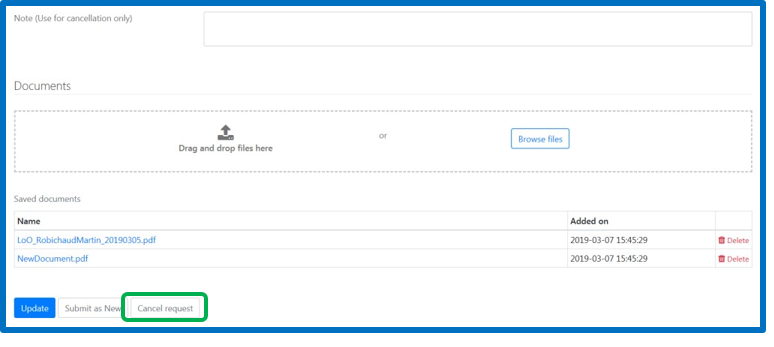
Figure 3-7: Note field and cancel button to withdraw a request
3.9 Pending Signature – Retrieving received documents
Required documents that need to be completed, signed, and returned will be sent to the client in 2 different ways. They are inserted in an automated email or they are attached within the request when the status is changed to "Pending Signature". Here is how to retrieve your documents:
An overview of the request will appear. Scroll down to the bottom of the page to find the contract/letter and documents to return.
Do you have to request modification on a document ready to sign?
If a document requires modification, it is important not to download the document into the Signed Document section. Contact the lead (Figure 3-2) on your request so he/she can recall and return the request with the amended documents.

Figure 3-8: Documents are located at the bottom of the Request.
3.10 Pending Signature – Returning required Documents
An overview of the request will appear. Scroll down to the bottom of the page to attach the contract/letter.
Click on Upload Signed Document and add the contract/letter or document.
If there is more than one button to upload Signed documents, be sure to upload a document for every Upload Signed Document button.
Click on Submit Signed Document.
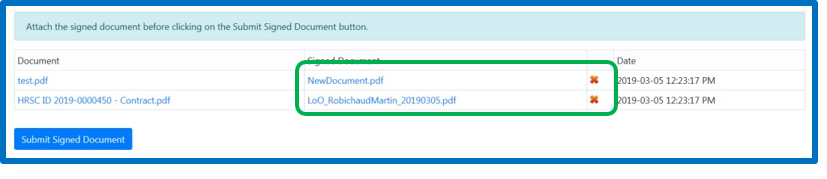
Figure 3-9: If more than one document is identified within the Signed Document section, be sure to upload a document for every "Upload Signed Document".
3.11 Filter submitted requests
Identify the search criteria by checking the appropriate boxes and selecting an item in the dropdown menu.
Click on the underlined Refresh.
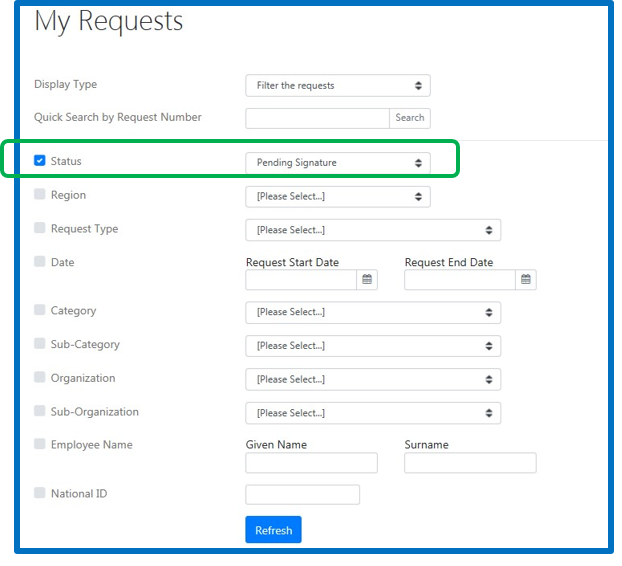
Figure 3-10: Use filter “Status” to find only "Pending Signature" submitted requests.
3.12 Sort submitted requests
Identify the Ascending or Descending order.
Click on Refresh.
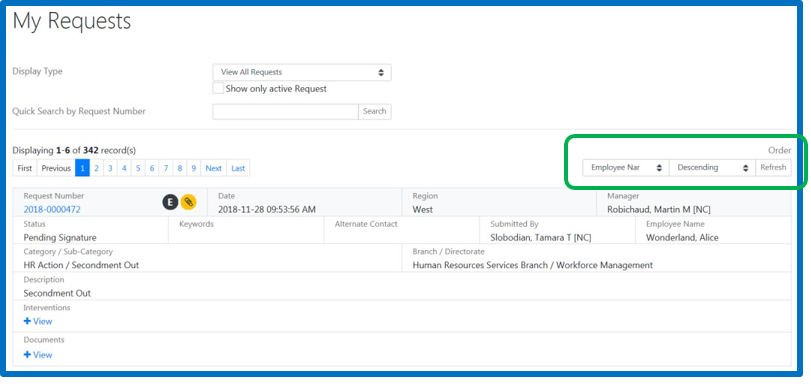
Figure 3-11: Use the "Employee Name" to sort requests on “My Requests” page.
3.13 Search a request by its Identification Number
Click Search.
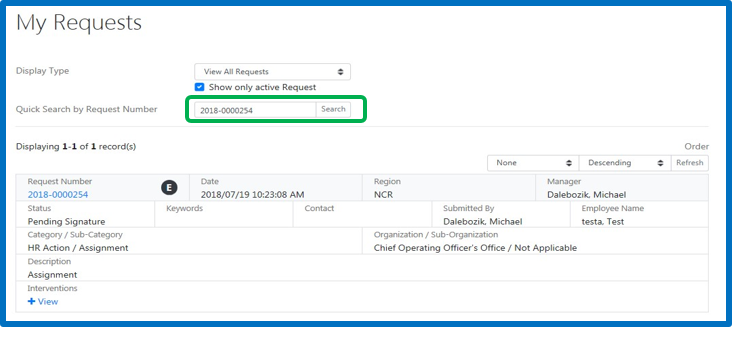
Figure 3-12: Type the specific Request ID to view the request summary.
3.14 Display only the active requests
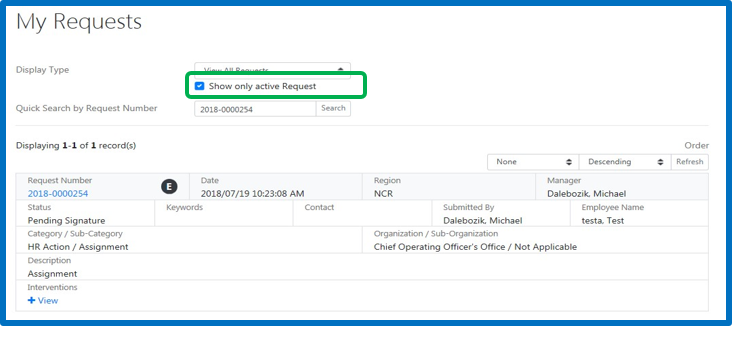
Figure 3-13: Check the box to view active requests only.